1.
2.
12.
Advanced Topics
If your survey requires special symbols, accented letters, or characters that do not belong to the Latin alphabet, use Microsoft's built-in character map to add the characters to your survey.
- From the Windows toolbar, choose Start > Accessories > System Tools > Character Map
- For each character you want to add, click on the character and click Select to copy it into the Characters to copy field.
- Once you've selected all of the characters you want to copy, click the Copy.
- Click once in the Question Designer, or HTML editor and move the cursor to the point at which you would like to insert the special characters.
- Hold down the control key and press the letter v (Ctrl-V) to paste the special characters into your text.

Note: You can paste special characters into almost any Windows application using this method.
Illume Surveys are stored as XML documents in C:\Documents and Settings\YOUR_USER_NAME\Application Data\DatStat\Survey Cache\localhost. (Substitute your Windows login name for YOUR_USER_NAME.)
Open the XML file in any text editor to edit the XML by hand. You should not edit the XML file if the Survey Designer is open, because your text editor and the Survey Designer may try to save conflicting changes to the same file.
If want to edit only a single survey item, you can drag the item from the Survey Designer into a text editor, and the XML will appear in the editor. After editing, select all of the XML and drag it back into the Survey Designer. The Survey Designer may ask you to give a new name to the item you are dragging in.
If you edit any Survey XML by hand, be sure to validate the survey before you start editing it again the Survey Designer. See Validating a Survey.
To check whether a survey is valid, choose Tools > Validate Survey... from the Survey Designer menu. If the Survey Validator finds any problems, it will explain them.
A survey may become invalid when any of the following occur:
- Someone edits the survey XML by hand and leaves the XML malformed. The survey is invalid because the XML is invalid.
- Question B includes text piped in from the response to question A, and then question B is moved from its original location, so that it now appears before question A. The survey is invalid because question B relies on information that it cannot possibly obtain.
- Question B includes a show-if condition that evaluates the response to question A, and then question B is moved from its original location, so that it now appears before question A. The survey is invalid because question B relies on information that it cannot possibly obtain.
This article describes how to create hidden variables in your Illume survey. Hidden variables store data that can be used for calculations, and can be saved with a participant's submitted survey.
Participants do not explicitly answer questions to set the value of hidden variables. Instead, data for hidden variables comes from one of three places:
- Illume can preload data from the participant list into the participant's survey.
- Illume can read data appended to the survey URL and store it in a hidden variable.
- Custom software developed with the Illume SDK (software development kit) can read and set values stored in hidden variables.
Creating Hidden Variables and Preloading Data from Participant Lists
Participant Lists include a list of all the participants invited to take your survey, along with a unique id for each participant and optional additional information. It may be useful at times to preload data from the participant list into a participant's survey. For example, if you want your survey to greet each participant by name, you can preload the name and display it when the participant logs in. Sometimes you may want to pre-load data that will never be displayed to the participant, but that will end up in the data that is submitted with the participant's survey. To preload data from a participant list into a survey, follow these steps:
- From the Survey Designer's Survey menu, choose Preload/Hidden Variables...

- Click Add... to add a new variable.

- Type in a name for the variable you are loading. This should be a descriptive name, like "USERNAME" for a participant's name. The variable name must be unique: that is, no other questions or objects in your survey can have the same name as this variable.
- Choose the Value Type that you will be using
- Single-value will utilize the data type that you choose from the drop-down menu. This refers to a preload/hidden variable that will have exactly one value. Data type Text will work for any value that you pre-load from a participant list. However, if you are going to use the preloaded data in a numeric calculation later in your survey, you should choose either Whole Numbers or Decimal Numbers. Illume will not attempt to perform numeric calculations on Text data.
- Multi-Value (Check All) assumes that data will be passed into your survey in a comma-delimited fashion and, the values correspond to the scale that you define in the Scale tab. If you are using this preloaded/hidden variable in a MultiControl component, your scale is capable of dynamically generating your table. See the section on MultiControl for more information on this topic.
- Choose a default value for the variable. The following options are available:
None - When participants start the survey, the variable will have no value.
User data - When each participant begins the survey, the variable will be set to a value found in the participant's participant list entry. Participant lists include the columns FIRSTNAME, LASTNAME, EMAIL, CUSTOMID, and any custom columns you define.
You must enter the name of the participant list column from which to populate the data. In the image above, the value for the variable PL_YOB comes from the participant list column called BIRTH_YEAR. When a participant starts the survey, Illume copies the participant's birth year from the participant into a hidden variable in the survey.
Custom - Choosing Custom enables you to set the default value of the variable to any value you choose. Simply enter the value in the box next to the word Custom. Illume will set the value of this variable to the value you entered for all participants starting the survey.
When choosing the Custom option, be sure the value you enter matches the variable's data type. For example, if you've chosen Whole Numbers as the data type, be sure to enter a number as the default value; otherwise, the default value will be "unanswered."
- (Optional) Check any of the checkbox options described under Special Options for Preloaded Data below.
- (Optional) Type a description for this variable. Unless this is a runtime only variable, the description will appear in the data dictionary along with the descriptions of all other survey questions.
Steps to Create a Multi-Value Preload/Hidden Variable
- To add a Preload/Hidden Variable begin by selecting Survey > Preload/Hidden Variables
- Click Add
- The Unique name can be anything you like
- Select the Value Type as Multi-Value
- The Default Value should be User Data, with the field being the same as the column in the participant list
- Enter a Prompt Description
- Click the Scale Tab
- Enter the Name and visible text for each Scale Value and Click Add
- You should see the Scale Values in the lower field as they are added.
- After you have added all of the Scale Values, Click OK

NOTE: There is only a need for one column in the Participant list for this variable if you are filling it with data from the Participant List.
Special Options for Preloaded Data and Hidden Variables
Disable this preload - This disables the preload without deleting. This may be useful for temporarily turning off a preload.
Automatically generate a scale as unique values are discovered - This option is useful if you know ahead of time that the number of possible values for this variable will be limited. For example, if you are preloading the US state in which a participant lives, there are only 51 possible values (including DC). The scale that Illume generates appears in the Web Console's Data Dictionary. In the Web Console, items with scales can be included in cross-tab queries and summary statistic results. This is one of the most common reasons for generating scales for preloaded data.
If the number of possible values is very large, checking this option may cause Web Console queries to run slowly.
Runtime only (do not store the value of this item) - This option makes the preloaded value available while the survey is running, but does not submit the value to the database when the participant submits the survey. This can be useful for data that are required for calculations, show-if conditions, or run-time display but that should otherwise be kept separate from results.
Conditions Under which Preloads Will Fail
Illume will not preload data if either of the following conditions are true:
- There is no data to preload for the current participant. E.g. Your survey preloads each participant's phone number from the participant list into the survey, but the participant list has no phone number for participant 9999. The preload for participant 9999 will be empty.
- The data that Illume is trying to preload do not match the data type you specified in the preload variable. E.g. Your survey preloads each participant's weight into a variable called WEIGHT, whose data type is "Whole Number." In the participant list, participant 9999's weight appears as "N/A". Because "N/A" is not a whole number, Illume loads no value into the WEIGHT variable for participant 9999.
The second problem is most likely to occur with variables of type Date, Time and Date/Time. Date and time values must be properly formatted before they can be loaded. See
Date and Time Data for more information.
Preloading Data through the Survey URL
You can pre-load data by embedding it in the URL a participant uses to access your survey. For details, see Passing Data though the Survey URL. There are two things to keep in mind pre-loading data through the URL:
- You must first create the variable in the Preload Editor. Otherwise, Illume has no place to store the value it receives in the URL.
- If the variable name exists in both the participant list and in the URL, Illume will use the value in the URL if it is available. If there is no value in the URL, Illume will use the value in the participant list, if available.
Passing data to a Multi-Value Preload/Hidden Variable from a Query String
Like all Preload/Hidden Variables, it is possible to pass the information directly from a Query string into the variable.
Use the name that you added in the Multi-Value Preload/Hidden Variable Userdata field and the Scale Values separated by commas. If the Scale value is not passed it will be assumed to be not selected.
In the example Query String, the Multi-Value Preload/Hidden Variable CRITERIA will be Yes for OPTION1 and OPTION2 and No for OPTION3
Example: http://lorien/46Test-collector/Survey.ashx?Name=MVPreloadTest&LoginID=123455&CRITERIA=OPTION1,OPTION2
Again, see
Passing Data though the Survey URL for more details.
Passing Data into a Survey through the Survey URL
An Illume survey can capture any data passed in through the query string of the survey URL. These data are treated as if they came from the participant list. Participant list data and data that come in through the query string of the survey URL have the following characteristics:
- The data are NOT saved with the participants' responses, unless you explicitly make this happen (see Saving Data From the Query String below)
- The data are available throughout the survey for use in piping, calculations, and show-if conditions.
A Practical Example
Assume you have a survey with 2 different email invitations: one invitation offers participants a free music CD for completing your survey, and the other invitation offers participants a $10 check. You want to know which invitation has the higher response rate. The first invitation includes the following survey URL: https://www.datstat.com/Collector/Collector.ashx?LoginId=abc123&INCENTIVE=FREECD The second invitation includes this URL: https://www.datstat.com/Collector/Collector.ashx?LoginId=abc123&INCENTIVE=CHECK&CRITERIA=OPTION1,OPTION2 Anyone accessing the survey through either of these links causes a UserData variable called INCENTIVE to be created as well as a Multi-Value variable called CRITERIA with OPTION1 and OPTION2 set to Yes. You can get the values of these variables anywhere in your survey by typing {UserData:Incentive} or {UserData:Criteria.OPTION1}. (The case of the letters does not matter. The curly braces do!) You can create a question in your survey that asks which music CD the participant would like to receive, and you can set a show-if condition on that question so that it appears only when {UserData:Incentive} equals "FREECD". While variable names in the URL are case-sensitive in most web-based applications, variable names in the URL of an Illume survey are not case sensitive. The Illume server does not differentiate between INCENTIVE=CHECK and incentive=CHECK.
Saving Data from the Query String
Like data from the participant list, data from the query string are not automatically saved with the participant's responses. If you wanted to save the Incentive data from the example above, follow these steps:
- Decide ahead of time what the name of the variable will be! For this example, we will use the variable name INCENTIVE.
- In the Survey Designer, choose Survey > Preload/Hidden Variables....
- Click the Add button.
- Enter a unique name for the data. This name will appear in the Data Dictionary and will be the name of the variable in which the data are stored in the Web Console. For this example, we will call the variable PAYMENT_TYPE.
- Choose a data type that matches the data you are expecting to passed in the query string. For the INCENTIVE example above, you should choose Text.
- Under Default Value, choose the User data option.
- In the text box next to User Data type the name of the variable that will appear in the URL. For example, if the variable in the URL is called INCENTIVE, then type INCENTIVE here. This tells Illume to take the data from the INCENTIVE variable in the survey URL and to store them in the variable PAYMENT_TYPE when the participant submits the survey.
- (Optional) Click the Scale tab and choose a scale option for this variable. A scale can be useful for creating calculated variables, show-if conditions, and data queries. The scale options include:
Do not use a scale for this item. This is a good choice when the list of potential values for the variable is large.
Automatically generate a scale as unique values are discovered. This is useful if the the variable may include an unknown set of responses within a limited range. For example, if you are passing the name of a partner site through the URL, you may not know ahead of time who all the partner sites will be, but you do know that there will not be more than a few dozen of them.
Predefined. Use this if you know ahead of time all of the possible values that the variable may store.
- Click OK.
Note: The Preload Editor first looks in the participant list for the field you named in
User data name, and then it looks at the contents of the survey URL. If your participant list already contains a field called INCENTIVE, and you pass in an INCENTIVE value on the URL, then {UserData:Incentive} will contain the value passed in through the URL rather than the value from the participant list.
In short, the value from the URL overrides the value from the participant list. General Notes about URLs and Query Strings
The query string portion of a URL consists of everything after the first question mark in the URL. In the example below, the query string appears in bold italics: https://www.datstat.com/Collector/Collector.ashx?product=gadget&incentive=freecd&source=yahoo+shopping This query string includes 3 variables: product (this might indicate the type of product the participant purchased), incentive (which may indicate the type of payment the participant has been promised) and source (which may indicate the page or web site on which the link to your survey appeared). Each variable is represented by the variable name, followed by an equal sign =, followed by the variable's value. Each name-value pair in the query string is separated by an ampersand &. Variable names should include only letters, numbers and underscores. Spaces in variable values must be represented by a plus sign +. (Notice that the source in the URL above, yahoo shopping, appears as yahoo+shopping.)
Reserved Words
The following variable names are reserved for use by the Illume server. You cannot use these variable names in your URL:
- Name
- Path
- XmlDocument
- LoginId
- PageLayout
- PrintPreview
Words with Special Meaning
The following words have special meaning in the URL. You may use them, but you should understand first what they do.
- TESTDATA If this is set to 1, the survey will be marked as test data when it is submitted. See Adding a Test Data Flag in the URL, below.
- Translation If this is set to a numeric or character LCID, Illume will attempt to present the survey in the language represented by that LCID. See How to Force Illume to Display a Specific Translation for details.
- LCID This has the same effect as Translation above.
Adding a Test Data Flag in the Survey URL
If the URL used to access a survey includes TESTDATA=1 in the query string, the data from that survey will be marked as test data. For example, in a survey that uses the variable customid to authenticate participants, the following survey URL would give participant 9999 access to the survey: https://www.datstat.com/Collector/Collector.ashx?customid=9999 When the participant submits the survey that he or she accessed through this link, the data will be saved as normal response data. For testing purposes, the participant could access the survey through this URL: https://www.datstat.com/Collector/Collector.ashx?customid=9999&TESTDATA=1 Any data the participant submits after accessing the survey with this URL will be treated as test data. The Web Console separates normal participant data and test data so that test data does not skew actual results.
Note Each participant can only take an authenticated survey once, unless this participant is a test participant or the survey session is marked as a test session by appending "&TESTDATA=1" to the URL.
Avoid using real participants to submit test data, because doing so could prevent the participant from being able to take a survey and will possibly skew your non-test data.
Overview
A jump causes a participant to jump from one part of a survey to another, skipping everything in between. Jumps can be conditional, occurring only when a participant meets certain criteria, or unconditional, in which case they always happen for all participants. A jump can move a participant forward or backward through a survey. Each survey can contain multiple jumps.
Warnings
While jumps are convenient, they can make a survey excessively complex, difficult to test, and difficult to maintain. In general, you should use show-if conditions rather than jumps, for these reasons:
- Show-if conditions appear as yellow circles next to survey objects in the survey designer. That means you always know where they are, and can easily see the conditions attached to them. This makes them easier to maintain and edit.
- Unlike show-if conditions, jumps are not attached to any particular object. While a show-if condition can suppress only the object to which it is attached, a jump can suppress all objects between its point of origin and it's destination. If a certain question is not appearing in your survey, it's easy to look at the question to see if a show-if condition is attached. It's much more difficult to hunt through the entire survey looking for a particular jump that contains a condition that might cause your question not to display.
- Poorly implemented jumps can leave participants in an infinite loop. For example, if a jump sends certain participants back to question #2 after they answer question #10, some participants may never be able to get past question #10 of your survey.
When to Use Jumps
There are two particular cases in which jumps are preferable to show-if conditions:
- When you want a participant to go directly to the end of a survey.
- When a single jump will prevent you from having to create many identical show-if conditions.
How to Use Jumps
To add a jump to your survey, follow these steps:
- In the Survey Designed, choose Survey > Add Jump...

- (Optional) Give the jump a unique name. A descriptive name will help you to remember the purpose of this jump.
- (Optional) Type in a description. This can help you understand the reason for the jump.

- Choose the jump's destination. Jump to the end of the survey goes to the last page of the survey without submitting. No questions will appear on this page; only the Submit and Back buttons. If this jump has no jump-if conditions (that is, if it always appears), the submit button will appear on the bottom of the page that contains the jump, rather than on the bottom of the jump's destination page. Jump to the end of the survey and automatically submit submits the participant's survey and displays the end page (the page participants see after submitting a survey). Participants cannot go back from the end page. Jump to the selected survey item jumps to the survey item you select in the Select Survey Item list.
- If you chose Jump to the selected survey item in step 4, select the item to which the participant should jump. This can be any type of item: a question, a collection, or a text/HTML item. You can even jump to another jump, but you will almost surely regret doing so.
- Set the Jump-if conditions. Participants will jump only if the conditions you specify are met. Set Jump-if conditions in the same manner as you would set show-if conditions. See Setting a Question's Show-if Conditions for specific details.
- Click OK to close the Jump Editor and save your changes.
- Move the jump to the point in the survey where the jump should occur. For example, if you want the jump to occur after a participant completes the Intro collection, then drag the jump in the Survey Designer so that it appear immediately beneath the intro collection, as in the image below.

Notice that in the Survey Designer, the Jump appears with its name:
JMP1, its destination:
Jump-to: C1 and its description:
Participants who don't drink alcohol jump directly to C1. The yellow circle to the left indicates that this jump is conditional. Hold the mouse pointer over the yellow circle to see the jump-if condition.
This article describes how to set up Save and Restore on unauthenticated surveys. Save and Restore enables survey participants to save a survey in progress and resume work on it later.
Authenticated Surveys
Authenticated surveys are surveys that are associated with one or more participant lists. Only participants on the lists can take the surveys, and Illume keeps track of which survey belongs to which participant.
Authenticated surveys always have the restore feature enabled, so there is no need to set it up. When a participant comes to your authenticated survey, Illume always checks first to see if the participant has a survey in progress. If so, Illume gives the participant the option to restore the survey in progress, or to start over.
You can customize the Restore and Start Over buttons. See Customizing Survey Buttons for details.
You may want to add the Save button even for authenticated surveys for two reasons: its presence lets participants know that they can save the survey and resume it later, and it enables them to save responses on a page they've only partially completed. Without the save button, Illume saves only the participant's last completed page. (The last page on which they clicked the Next button.)
Unauthenticated Surveys
Unauthenticated surveys are open to the public. They do not need to have an associated participant list. They simply grant access to everyone.
You must set up Save and Restore for Illume to be able to reconnect an unauthenticated participant with the survey he or she had been working on.
To set up Save and Restore for your unauthenticated survey, follow these steps:
- Choose Edit > Preferences... from the Survey Designer Menu.
- Click the Buttons tab of the Preferences Editor.
- Choose Save from the Buttons list on the left side of the Preferences Editor.
- Type the text for the Save button in the Button Text entry. Whatever you type here will appear as the text of the Save button.
- Check at least one Placement option for the Save button.
- Choose Send Email from the Buttons list.
- Type the text for the Send Email button in the Button Text entry.
- Check at least one Placement option for the Send Email button.
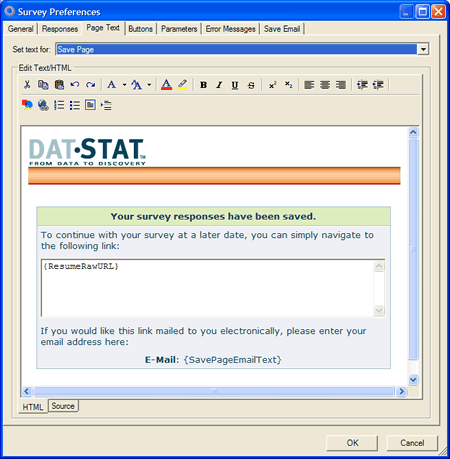
- Click the Page Text tab.
- Choose Save Page from the Set text for list.
- Compose the text you want to appear on the Save Page. This is the page participants see after clicking the save button. Note that the sample below uses two special tags:
{ResumeRawURL} will be replaced in the live survey by the actual unique URL the participant can use to resume his or her survey.
{SavePageEmailText} will be replaced in the live survey by a text box in which the participant can enter his or her email address. Illume will validate the email address.
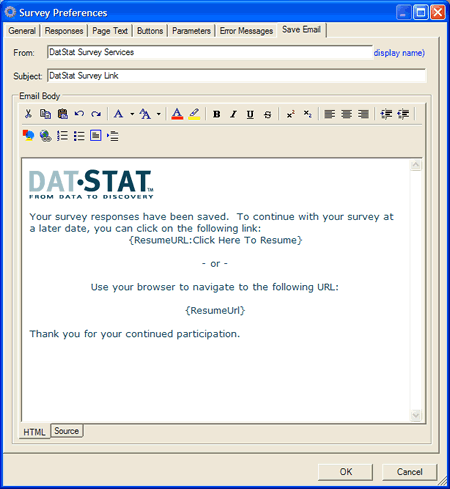
- Click the Save Email tab.
- Compose the email message you want Illume to send to the participant. Note that the sample below contains two special tags.
{ResumeUrl:Click Here To Resume} will be replaced in the actual email with a clickable link that says "Click Here To Resume." Clicking the link takes the participant back to his or her survey in progress. Note that whatever text you type after the colon in this tag becomes the text of the clickable link.
{ResumeRawUrl} will be replaced in the actual email with the full URL the participant needs to resume his or her survey. This full URL will appear as a clickable link in most email clients (such as Microsoft Outlook). The participant may click the link, or cut and paste the URL into a browser to resume their survey.
Note: The Save Email that Illume sends to the participant is an HTML formatted email. Illume does not send a plain text version.
- Click OK to save your changes.
When a participant clicks the Save button, they will see a page like the one below.
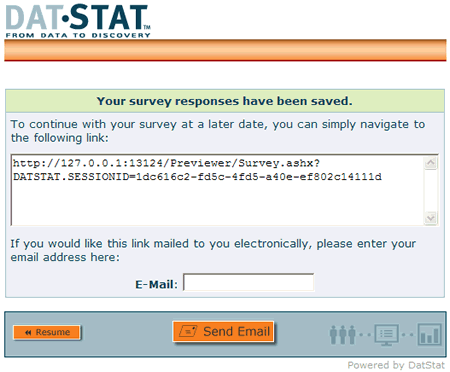
If the participant chooses to have the URL emailed, Illume will attempt to send the email immediately.
Error Messages for the Save Email
Illume includes some special customizable messages for the Save Email.
Click on the Error Messages tab of the Survey Preferences editor to set the text of these messages.
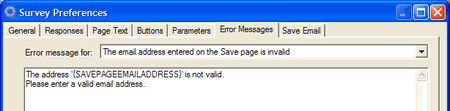
From the Error message for list, you set text for any of the following items pertaining to the Save page.
The email address entered on the Save page is invalid. This message appears if the participant enters an invalid email address. Illume will not try to send an email if the address is invalid. Notice that the message above uses the special tag {SavePageEmailAddress}. In the actual error message, this will be replaced with the email address that the participant entered.
There was a problem sending an email to the participant from the Save page. This message appears after the participant clicks the Send Email button if Illume was not able to send the email.
An email was sent successfully to the participant from the Save page. Illume displays this message to confirm that the email was sent.
Illume can perform calculations while a survey is in progress, and can store the result of the calculation with the rest of the survey data it collects. Calculated variables are particularly useful for identifying whether a respondent fits a particular profile.
For example, in a survey on depression, respondents may receive a certain number of points for each question to which they answer yes. A calculated variable can keep track of the points as the survey progresses, adding them all together to produce a sum that indicates the respondent's overall level of depression.
To implement this type of logic, you must first create a calculated variable, as described below. Then you would create a question (or collection of questions) with a show-if condition that tests your calculated variable. See Setting Show-if Conditions for more information about how to set the conditions under which questions or collections will appear.
Participants may be required to answer (or allowed to skip) questions or entire sections of a survey based on calculated variables. Continuing the example above, respondents whose calculated depression scores are beyond a given threshold may be required to answer follow-up questions that those with lower calculated scores may skip.
Defining a Calculated Variable
To define a calculated variable, follow these steps:
- Choose Survey > Survey Calculations... from the Survey Designer menu
- Click the Add button to add a new calculated variable, or double click on the name of an existing calculation to edit it.

- In the Calculation Editor, give your calculated variable a unique name if it does not already have one. You can also provide an optional description to help you and others remember what this variable means.
- Choose a data type. The data type you choose depends on what result you expect your expression to produce. Mathematical operations and any true/false expression produce numbers, so these require a numeric data type. (True expressions are equal to 1; false expressions are equal to 0.) Expressions that return text data require a Text data type.
- Assign an optional default value. This will be the value of the calculation when there are not enough data to perform the actual calculation. For example, if your calculation is the sum of A, B and C, the calculation will contain the default value until the participant has answered questions A, B and C.
- Click Insert Expression to select survey variables to include in your calculation.
- In the Expression Calculator, choose the variables required to perform the calculation. To select more than one variable, hold down the Control key while you click on each variable you want to include. Note that the selected variables appear in an expression below the variable list. The expression uses only addition. You will be able to change this in a moment.

- After choosing all of the variables you want to include in your calculation, click Paste. Your expression will be pasted into the Calculation Editor. Beneath the Insert Expression button, you should see the message "Calculation is valid and evaluated successfully."
- You can now edit the calculation by hand. Illume will evaluate any simple and complex JScript.NET expressions. Expressions cannot include user-defined objects or functions, but they can include built-in JScript.NET objects, datatypes, methods and operators. Note JScript.NET is the version of JavaScript used by Microsoft Windows and Internet Explorer. It is essentially a superset of standard JavaScript (a.k.a. ECMAScript). See Microsoft's JScript.NET Language Reference for more information about JScript.NET. If there is a problem with the calculation, a message describing the problem will appear below the Insert Expression button, and the offending part of the calculation will be highlighted in red. If the calculation is valid JScript.NET but the calculation editor does not have enough information to evaluate it, you'll see the message Calculation is valid but failed to evaluate. The calculation will be evaluated while the survey is running, if there is enough information to perform the evaluation. (I.e., if the participant answered the questions to which the expression refers.) Note: Illume uses parentheses to determine precedence when evaluating calculations. This is described under "Using Parentheses in Calculations" below.
- Click OK .
How Calculations Work
For each calculation, Illume creates a variable with the same name as the calculation. Illume attempts to evaluate all of the calculations in the survey each time a participant moves from one page to the next.
Illume substitutes the value of the named variable for each of the {Value} tags. For example, if a participant entered "200" in response to the question named WEIGHT that asked "What is your weight (in pounds)?", Illume substitutes 200 for the tag {Value:WEIGHT}.
Illume will perform value substitutions on any variables for which it has data. It does not matter whether that data came from a participant response, from a variable appended to the survey URL, or from data that was pre-loaded from the participant list. (See the articles on Preloading Participant Data for details on how to get data from your participant list into your survey. See Passing Data Through the Survey URL for information on how to pass in survey data through a link.)
If Illume cannot perform the calculation, the value of the calculation will be the default value you set for the calculation in the Survey Calculations Editor. There are three conditions under which Illume cannot perform a calculation:
- The expression is invalid. The Survey Calculations Editor will tell you if your calculation is invalid before you save it.
- The expression includes variables whose values are unanswered or unknown.
- The calculation would result in an error. The most common causes of this are attempting divide by zero and supplying a value of the wrong data type. For example, if your calculation is {Value:HEIGHT} / {Value:WEIGHT}, you must design your survey to allow only numeric values for the height and weight questions. Illume can divide by the numeric value "150" but it cannot divide by the text value "one hundred and fifty."
The calculation itself is a JScript.NET expression, or a series of JScript.NET statements. Illume evaluates the JScript.NET using the eval() function and sets the value of the calculated variable to whatever eval() returns. There are two things to note about eval() in JScript.NET:
- eval() returns the value of the last expression in the script.
- eval() does not permit a return statement.
The following calculation determines the total price for a quantity of some material, then applies a discount of 5%:
var weightInGrams = {Value:KILOGRAMS} * 1000;
var pricePerGram = 0.13;
var totalPrice = weightInGrams * pricePerGram;
var discount = 0.05;
totalPrice * (1 - discount);
Notice that the value to be returned is expressed on the last line as totalPrice * (1 - discount), and that there is no return statement. Because JScript's eval() returns the value of the last expression, the result of your calculation will be the value of the last expression in the calculation.
Calculation Operators
The following operators are available for calculated variables:
Arithmetic Operators
- + (Plus Sign) Used for addition.
- - (Minus Sign) Used for subtraction.
- * (Asterisk) Used for multiplication.
- / (Forward Slash) Used for division.
- % (Percent Sign) Modulo operator, used to find the remainder of a division operation
- Math.pow(num, exp) Raises a number(num) to a power (exp). E.g. Math.pow(5,3) is 5 to the third power, or 125.
Comparison Operators
- == Is equal.
- != Is not equal.
- < Is less than.
- > Is greater than
- <= Is less than or equal to
- >= Is greater than or equal to
Logical Operators
Date and Time Calculations
Though you can use JScript date objects in calculations, date and time calculations can be tricky. Calculations that use the current time must take into account the fact that Illume re-calculates calculated variables every time participants move from one page to the next. This means that if you are not careful, the calculation will change every time the participant goes to a new page.
For an example of a time calculation that averts this problem, see How can I time a participant's progress through portions of my survey?
Date calculations are tricky because programmers often make incorrect assumptions about units of time. For example, because the JScript date object uses milliseconds as its unit of time, you might think it's easy to measure a span of years by converting years to milliseconds and performing simple arithmetic on the milliseconds. This may lead to incorrect calculations, since leap years are longer than standard years.
Months are notoriously irregular. They can have 30 days, or 31, or 28, or in some cases, 29.
Days irregular as well. In most parts of the US, the first Sunday in April is a 23-hour day, and the last Sunday in October is a 25-hour day.
The following JScript calculates a participant's age on the date of the survey. This calculation assumes that the variable BIRTHDATE is a variable of type Date:
var today = new Date();
var dob = new Date({Value:BIRTHDATE});
var yearDiff = today.getFullYear() - dob.getFullYear();
var monthDiff = today.getMonth() - dob.getMonth();
var dayDiff = today.getDate() - dob.getDate();
if(monthDiff < 0 || (monthDiff == 0 && dayDiff < 0))
yearDiff--;
yearDiff;
If BIRTHDATE were a text variable, and had the format mm/dd/yyyy, the calculation would be as follows:
var today = new Date();
var dob = {Value:BIRTHDATE} + "";
var dateParts = dob.split(/\D/);
var month = parseInt(dateParts[0], 10);
var day = parseInt(dateParts[1], 10);
var year = parseInt(dateParts[2], 10);
if(year < 100)
year += 1900;
var yearDiff = today.getFullYear() - year;
var monthDiff = today.getMonth() - ( month - 1);
var dayDiff = today.getDate() - day;
if(monthDiff < 0 || (monthDiff == 0 && dayDiff < 0))
yearDiff--;
yearDiff;
Note that the value of the value of the calculated variable is set to the value of the last expression evaluated in the JScript. In the examples above, that is the variable yeardiff. Keep in mind that because Illume uses eval() to evaluate the JScript in calculated variables, you do not need a return at the end of the script.
Reverse Scoring
While the {Value} tag yields a question's selected response value, the {RScore} tag yields the reverse score.
To get a question's reverse score, use the {RScore} with the question id. For example, to get the reverse score of the question SATISFACTION, use the tag {RScore:Satisfaction}.
Reverse scoring is generally used on questions that have both negative and positive items in the scale, though Illume permits reverse scoring of any items.
For questions with numeric scales, the reverse score is the score in the same position at the opposite end of the scale. The following tables illustrate reverse scores for items with numeric scales.
| Score | Reverse Score |
| -1 | 1 |
| 0 | 0 |
| 1 | -1 |
| Score | Reverse Score |
| 1 | 4 |
| 2 | 3 |
| 3 | 2 |
| 4 | 1 |
For Check all that apply questions, the {Score} tag gives the number of items checked. The {RScore} tag gives the number of items NOT checked.
For individual checkboxes, the {Score} tag yields a value of 1 if the item is checked and 0 if the item is not checked. The {RScore} yields the opposite values.
For non-question items (such as calculations and pre-loaded variables), the {Score} tag yields the item's value. The {RScore} tag always yeilds one of the "not set" values described below.
Reverse Scoring Values for Unanswered/Unset Items
If a question has not been answered, or has no value, the {RScore} will return one of the following values, depending on the item's data type:
- For all Numeric items that are unanswered or have no value, the {RScore} will be 0 (zero).
- For all Yes/No items that are unanswered or have no value, the {RScore} will be 0 (zero). (Note that zero is equivalent to an answer of False or No in most computer systems and applications.)
- For all Date, Time and Date/Time items that are unanswered or have no value, the {RScore} will be the current date with hours, minutes and seconds set to zero. (E.g. June 23, 2005 00:00:00.)
- For all Text types that are unanswered or have no value, the {RScore} will be an empty string ("")-- that is, a text value with a length of zero.
Using Parentheses in Calculations
Illume calculations use parentheses to determine which parts of a calculation should be evaluated first. If your calculation uses only addition and subtraction, parentheses do not matter. If your calculation uses multiplication or division, parentheses matter very much.
Illume will scan a calculation from right to left (that's the opposite of the direction in which most Western languages are read), evaluating all expressions in parentheses, followed by all multiplication operations, then all division operations, then all addition operations, and finally all subtraction operations.
Note the following examples:
- ({Value:SALARY} + {Value:BONUS} + {Value:OTHERINCOME})
This calculation simply adds together a participant's salary, bonus, and other income. - ({Value:SALARY} + {Value:BONUS} * {Value:TAXRATE})
This would be an incorrect calculation for the amount of income tax a person pays. If salary is 40000 and bonus is 2000 and tax rate is 0.28, this calculation will produce the following result:
40000 + (2000 * 0.28) = 40000 + 560 = 40560
The correct calculation uses parentheses to add salary and bonus before applying the tax rate.
(({Value:SALARY} + {Value:BONUS}) * {Value:TAXRATE})
Which works out as follows:
(40000 + 2000) * 0.28 = 42000 * 0.28 = 11760
When using multiplication or division, use parentheses to explicitly define the order in which your calculation should be evaluated!
Text Calculations
You can use calculations to test and assemble text values. The following expression tests whether someone typed "California" in response to question Q2: {Value:Q2} == "California" This expression returns a whole number: 1 if the value does equal "California" and 0 if the value does not equal California. Beginning in Illume 3.0, text calculations are not case sensitive!
This means the calculation above will be true whether the participant typed California, california, or CALIFORNIA.
The expression below creates an email address by adding @company.com to whatever the user typed in response to the LASTNAME question: {Value:LASTNAME} + "@company.com" This expression returns a Text value that ends with @company.com
Complex Expressions
Illume supports complex expressions that use the ?: operator. This operator tests an expression and returns one of two values, based on whether the expression is true or false. If the expression before the question mark is true, the expression returns the value before the colon. If it is false, it returns the value after the colon. For example, the following expression returns the value "yes" because the expression before the question mark is true: (10 > 5) ? "yes" : "no"; This expression returns "no" because the expression before the question mark is false: (5 > 10) ? "yes" : "no";
A simple way to remember this syntax is: Is this true ? "Yes Value" : "No Value";
You may include multiple complex expressions within a single calculation, as in this example, which calculates the cost of an order as the number of items times the cost per item, plus a fixed rate of either $20 or $12 or $8, based on the type of shipping: {Value:NumberOfItems} * {Value:CostPerItem} + ({Value:Shipping} == "Overnight" ? 20 : 0) + ({Value:Shipping} == "3-day" ? 12 : 0) + ({Value:Shipping} == "USPS" ? 8 : 0) Assuming that the Shipping question is required and that participants can choose only one shipping option, one of the three complex expressions will be true, and the other two will be false. The true expression will add either 20 or 12 or 8 to the value of the calculation. The two false expressions will both add 0 to the calculation. Complex expressions are especially useful in calculations that must be applied differently to different participants. For example, calculations of lean body weight and blood alcohol content use different constants for men and women.
See Microsoft's JScript Language Reference for more information about JScript.
Disabled Calculations
If you check "Disable this calculation," the calculation will not be performed. This option is provided in case you want to disable a calculation that you may need to re-enable later.
Runtime Only Option
If you do not want the result of the calculation to be stored with the results of the survey, check the "Runtime only" option. The results of the calculation will be available while the survey runs, and will be discarded when the participant submits the survey.
DatStat Object Overview
The survey calculation DatStat object is new in version 4.7 and it consists of many very useful methods that can be called from survey calculations that were formally only exposed using the SDK. These methods allow for more capability and flexibility within a survey calculation, and in some cases, problems can be solved by just using a survey calculation where previously it would have required use of the runtime SDK.
Limitations
The survey calculation editor does not currently color code any of the DatStat object methods. Variable name references used in the DatStat object methods will not be updated when using the survey rename capability unlike the tags (e.g. {Value:GENDER}).
How to Use
Almost all of the DatStat object methods exposed share the same signatures as those used by our runtime SDK. To make a call just prefix the method or property with “DatStat.” (case sensitive). The methods are also type aware so make sure you pass variables of the proper type to them (eg if the method is expecting an integer, do not pass a string to it).
Reference Guide
| Method Name | Returns | Description |
| GetHttpFormElement(name : String) | String | This method retrieves the name of an Http form element. |
| var val = DatStat.GetHttpFormElement(‘MYHIDDEN’); |
| GetParameter(parameterName : String) | String | This method signature is equivalent to the HookContext.GetParameter() method. It retrieves a survey parameter string value. |
| var parameter_text = DatStat.GetParameter(‘MYPARAM’); |
| GetRandomizationMap(variableName : String) | String | This method retrieves the randomization map for a specific variable that is randomized. The value returned is a comma delimited list of ordinals (e.g. 3,1,0,2). |
| var order = DatStat.GetRandomizationMap(‘CUSTOMER_EVAL’); |
| GetResponse(variableName : String) | Object | This method signature is equivalent to the HookContext.GetResponse() method. This method retrieves the response code and is equivalent to using a {Value} tag. |
| var val = DatStat.GetResponse(‘Q55’); |
| GetResponseLabel(variableName : String) | String | This method signature is equivalent to the HookContext.GetResponseLabel() method. This method retrieves the response label. |
| var theResponse = DatStat.GetResponseLabel('Q55'); |
| GetUserData(dataName : String) | String | This method signature is equivalent to the HookContext.GetUserData() method. It will return the value for the specified piece of User Data from a participant list. |
| var userData= DatStat.GetUserData(‘LOCATION’); |
| IsOnPage(variableName : String) | Boolean | This method will return true if the item identified by the variableName parameter appears on the page of the set of responses that are being currently processed. |
| if(DatStat.IsOnPage('Q55')) { // do something } |
| PageItemNames() | String[] | This method returns an array of variable names that appear on the page of the set of responses that are currently being processed. |
| var items : String[] = DatStat.PageItemNames(); |
| QuotaCountGet(quotaName : String) | int | This method returns the current count for the specified quota. |
| var count = DatStat.QuotaCountGet('MALE'); |
| QuotaLimitGet(quotaName : String) | int | This method returns the quota limit defined for the specified quota. If the current survey session happens to be a test participant then the test data quota limit is returned. |
| var limit = DatStat.QuotaLimitGet('MALE'); |
| QuotaStatusGet(quotaName : String) | int | This method returns a ‘0’ or ‘1’ that designates the quota status for the sepecified quota. A value of ‘0’ means that the specified quota hasn’t yet met the limit. A value of ‘1’ means that the specified quota has met or exceeded the quota limit. |
| var status = DatStat.QuotaStatusGet('MALE'); |
| ResponseReplacement(input : String) | String | This method signature is equivalent to the HookContext.ResponseReplacement() method. This method replaces all tags to their proper values. |
| var surveyName = DatStat.ResponseReplacement(‘{SurveyName}’); |
| SetResponseData(variableName : String, responseValue : Object) | Boolean | This method signature is equivalent to the HookContext.SetResponseData() method. This method sets a specific variable to a particular value. A value of true is returned if the variable was set properly, otherwise a value of false is returned. Setting a value to ‘null’ is equivalent to clearing the value. |
| DatStat.SetResponseData(‘Q1’, myvar); |
| SetUserData(dataName : String, dataValue : String) | void | This method signature is equivalent to the HookContext.SetUserData() method. This method sets a user data field to a particular string value. |
if ( DatStat.GetResponse(‘GENDER’) == 1 )
DatStat.SetUserData(‘PRONOUN’, ‘his’);
else
DatStat.SetUserData(‘PRONOUN’, ‘her’); |
Overview of Ranking and Sum Check validation
Ranking validation requires survey participants to enter sequential numeric responses for a minimum and/or maximum number of question items. Here is an example of a ranking question:

Sum check validation requires survey participants to enter numeric values for a group of questions whose sum equals some value or is between some specified minimum and maximum values. JavaScript code can also be supplied to update a running total that is displayed in the survey. Here is an example of a sum check question:

Ranking and sum check validation is normally performed using a group of questions which are normally part of a question table. Ranking and sum check validation requires that the data type of the questions be “Whole Numbers” or “Whole Numbers >= 0” and the display type of the questions be “Text Field”, “Select One – Poplist”, or “Select One – Radio Button”.
In order to use Ranking/Sum Check validation, Multi-Control component validation, or other custom client validation,
a survey must have originated from a version 4.7 survey template or the following conditions must be true:
The following example demonstrates how to add ranking validation:
- Make sure the survey you are editing aheres to the Survey requirements for using Ranking/Sum Check validation.
- Add 5 questions to a question table and set the variable names to 'Q1' through 'Q5'.
- Make sure the data type of these questions is Whole Numbers and the display type is set to Text Field.
- Add a Text/HTML object IMMEDIATELY FOLLOWING all the ranking questions and/or the question table.
- Click the Source tab of the Text/HTML object created in the previous step and insert the following content:
<script type="text/javascript">
DatStat.addClientValidationCheck(new DatStat.RankingValidation(
['{FormElement:Q1}', '{FormElement:Q2}', '{FormElement:Q3}', '{FormElement:Q4}',
'{FormElement:Q5}'], /* Question List Array */
'You must uniquely rank between 3 and 5 items.', /* Error Message */
3, /* Required minimum rank items */
5, /* Maximum rank items */
true /* Sequential ranking (true or false) */
));
</script>
RankingValidation parameters
The RankingValidation parameters are separated by commas and must appear in the order as listed below.
Question list array
This value should be a comma-delimited list of single-quoted text values that are the form element names of the questions to be ranked all enclosed between beginning and end brackets ('[' and ']'). The {FormElement:} tag is normally used to specify the form element names for each of the questions.
Example: ['{FormElement:Q1}', '{FormElement:Q2}', '{FormElement:Q3}' ]
Error message
This is a text message enclosed in single-quotes. It is displayed if the user fails to uniquely rank the minimum and maximum number of items.
Required minimum rank items
This is the minimum number of items that are required to be ranked. This number is adjusted to the number of question items displayed on the page if that number is less than the minimum. An error message will be displayed it the survey participant fails to uniquely rank this minimum number of items.
Maximum rank items
This is the maximum number of items that can be ranked. An error message will be displayed if the survey participant ranks more than this specified maximum.
Sequential ranking
This is a true/false option. Set this option to true if you require ranking values to be sequential numbers starting with 1. This option is especially important if the ranking questions are of display type text field.
The following example demonstrates how to add sum check validation. In this example, let's assume we want the sum of these questions to add up to 100.
- Make sure the survey you are editing aheres to the Survey requirements for using Ranking/Sum Check validation.
- Add 5 questions to a question table and set the variable names to 'Q1' through 'Q5'.
- Make sure the data type of these questions is Whole Numbers and the display type is set to Text Field.
- Click the Source tab of the question table Instructions field and append the following HTML content that allows for a running total to be displayed:
<P>Current Total: <SPAN id=TOTAL style="FONT-WEIGHT: bold;COLOR: red"></SPAN>
- Add a Text/HTML object IMMEDIATELY FOLLOWING the question table created above.
Click the Source tab of the Text/HTML object created in the previous step and insert the following content:
<script type="text/javascript">
function setTotal(total, ok)
{
var display = document.getElementById("TOTAL");
if(!display || typeof display == 'undefined')
return;
display.innerHTML = total + "%";
if(ok)
display.style.color = 'green';
else
display.style.color = 'red';
}
DatStat.addClientValidationCheck(new DatStat.SumCheckValidation(
['{FormElement:Q1}', '{FormElement:Q2}', '{FormElement:Q3}','{FormElement:Q4}',
'{FormElement:Q5}'], /* Question array list */
100, /* Minimum sum */
100, /* Maximum sum */
setTotal, /* Callback function */
'Total must equal 100. Current total is {0}.' /* Error Message */
));
</script>
SumCheckValidation parameters
The SumCheckValidation parameters are separated by commas and must appear in the order as listed below.
Question list array
This value should be a comma-delimited list of single-quoted text values that are the form element names of the questions to be ranked all enclosed between beginning and end brackets ('[' and ']'). The {FormElement:} tag is normally used to specify the form element names for each of the questions.
Example: ['{FormElement:Q1}', '{FormElement:Q2}', '{FormElement:Q3}' ]
Minimum allowed sum
This is a numeric value that is the minimum allowed by the sum check validation code. This value should be less than or equal to the maximum allowed sum (i.e. the next parameter).
Maximum allowed sum
This is a numeric value that is the maximum allowed by the sum check validation code. This value should be greater than or equal to the minimum allowed sum (i.e. the previous parameter).
Callback function
This is an optional argument. If not set to null, this argument should be a JavaScript function object that accepts 2 arguments: 1) the current running ‘total’; and 2) whether or not this value is ‘ok’ and fulfills the sum check minimum/maximum requirements. This function is called whenever the sum of the questions changes.
Error message
This is a text message enclosed in single-quotes. It is displayed if the sum of the responses isn’t between the required minimum/maximum values. This error message can contain the following tag: {0} which will be replaced with the current total.
Introduction to Multi-Control Components
The Multi-Control Component allows for complex questions and question tables containing multiple UI controls to be easily created. For single questions this component allows for a more flexible layout of the controls and allows them to be placed either on the same line or different lines. For question tables this component allows for multiple controls to be displayed in columns of the same table as well as row header elements and text fields within the prompt column.
NOTE: You do not need to have purchased the Software Development Kit (SDK) in order to utilize the Multi-Control tool. Even though you may not have the SDK, you will see an SDK Menu item (Add Runtime Content...) in the Survey Designer which will allow you to create Multi-Control questions and question tables.
Creating the Preload/Hidden Variables for the Multi-Control Fields
- To add a Preload/Hidden Variable, begin by selecting Survey --> Preload/Hidden Variables
- Click Add
- The Unique name should match the variable names used in the Hook Data XML Code
- If creating a single question, your hook data will define a variable name and the variable name defined needs to match exactly the name of the variable in the Preload/Hidden UNIQUE name field.
- If creating a question table, your hook data will define a variable prefix and a number of rows (eg prefix="Q_" and you have 3 rows with Q_ corresponding to a text field). You will define your preload/hidden variables as "Single-Select" of type Text. You will have 3 of them (Q_1, Q_2, Q_3) which correspond to the number of rows that that item is present in
- Select the Value Type as either Single-Value or Multi-Value(Check All). If of type Single-Value, select the Data Type as well for the field.
- Keep the Default Value as None
- Enter a Prompt Description of the field.
- Click OK
- Repeat Steps 1-7 for each field in the Multi-Control Question/QuestionTable
Inserting a Multi-Control Question into Your Survey
- Add a Runtime Content Hook object in a particular location of a survey. This is done by selecting the Survey --> Add Runtime Content... menu option.
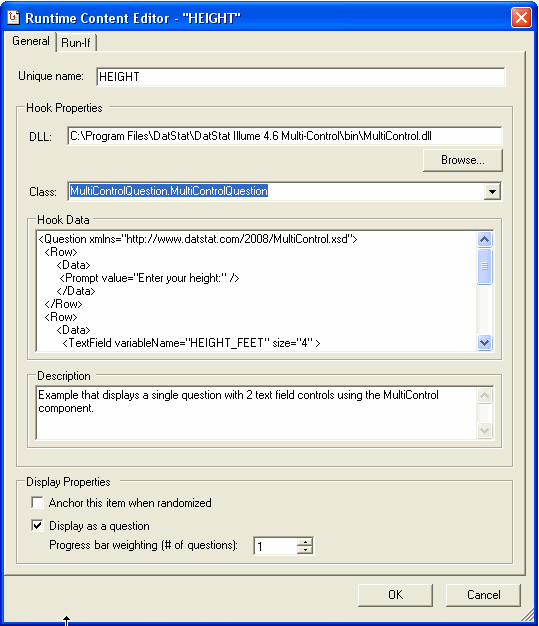
NOTE: A Runtime Content object needs to be created for each Multi-Control Question - Edit the Runtime Content object for this question
- Begin by assigning this object a Unique Name
- Select the location of the Components.dll file (in \DatStat\DatStat Illume 4.7\Previewer\Bin\Components.dll)
- In the "Class" drop-down menu, select either the MultiControlQuestion class to design a single-question or the MultiControlQuestionTable class to design a question table.
- Check the box "Display as a question" option
- Set the Progress bar weighting to a value that is equal to the number of question in your Multi-Control question.
NOTE: The Progress bar weighting determines how the progress bar recognizes the fields in the Multi-Control question. Does it count the question as one question or does it count each field or (if using a question table) does it count each row? - Specify hook data to display the desired question or question table elements. The hook data is specified as a specific XML grammar that is described in more detail later in this document.
- Create a hidden/preload variable for each field in the Multi-Control object. These will be used in storing the responses of the questions asked by the Multi-Control component.
- Click OK in the Runtime Content editor to save your changes.
- Preview the survey and make sure that you visually inspect the questions created using this component. During preview mode, additional validation is performed that checks for XML language syntax errors. Error messages are presented in the same space where the question would normally be displayed in the survey.
Here is the Runtime Content Editor window:
NOTE: If you plan on localizing your survey into multiple languages (through the use of a Translation Package), you should not enter text directly into the various elements of MultiControl questions. Rather, replace the text with {ParamValue:param1} and set the associated parameters in Edit-->Preferences-->Parameters. The parameters are included in a translation package whereas Runtime Content Hooks are not.
Using Show-If Logic with a Single Multi-Control Question or QuestionTable
The Runtime Content Object uses a Run-if statement instead of Show-if, but the logic functions the same.
If you want to use the response for a Multi-Control Question in Show-If Logic, you will have to link it to the Preloaded variable that you created for the specific field.
Using XML
NOTE: XML is case sensitive so be very careful in how you are entering your elements and information.
When using the Multi-Control component, you must specify XML data using a specific XML grammar in the Hook Data field of the Runtime Content editor. It is a good idea to preview your surveys in the Survey Designer for testing purposes, because details of any syntax errors are displayed when in preview mode.
If you haven’t used XML before you need to adhere to a few simple rules:
- An XML element tag is placed between angle brackets, e.g.

- All element tags must have an end tag which includes a slash after the first angle bracket, e.g.

- XML element can contain zero or more attributes. Attributes have the form: name="value", e.g.

- XML element and attribute names are case-SENSITIVE.
- An element can contain nested data or other elements. In this case you MUST include an end tag.
- Some elements only contain attributes and do not contain nested data or elements. In this case the end tag does NOT have to be included and an abbreviated version can be used instead. For example, the following two lines are 100% equivalent:

This section details the XML grammar required for a single question multi-control component.
The Question Element
The Question element consists of 1 or more Row elements. The Question element MUST appear on the first line of the Hook Data.
The Row Element
The "Row" element consists of 0 or more "Data" elements. Use of this element will create a "tr" (or row) tag within an HTML table.
| Attribute Name | Required | Values |
| style | No | Contains CSS Styles |
The Data Element
The "Data" element consists of 0 or more "Prompt", "TextField", "Checkbox", or "Poplist" elements. Use of this element will create a "td" (or data cell) tag within an HTML table and facilitates different layout options and control.
| Attribute Name | Required | Values |
| colspan | No | A numeric value that corresponds to the colspan attribute of the "td" tags in HTML tables. |
| style | No | Contains CSS Styles |
The Prompt Element
The "Prompt" element is most often used in the first row of the question.
| Attribute Name | Required | Values |
| value | Yes | A text value to be displayed as the prompt. |
| style | No | Contains CSS Styles |
The TextField Element
The "TextField" element displays a text field control and can contain 0 or more "RequiredValidation", "NumericValidation", or "TextValidation" elements.
| Attribute Name | Required | Values |
| variableName | Yes | Refers to a variable defined in the Survey as a preload hidden. |
| size | No | The size of the text field. |
| maxLength | No | The maximum number of characters that can be entered in this text field. |
| style | No | Contains CSS Styles. |
| labelBefore | No | Text value that precedes the text field control. |
| labelAfter | No | Text value that follows the text field control. |
The Checkbox Element
The "Checkbox" element consists of zero or more "RequiredValidation" elements. Use of this element will create a single checkbox control.
| Attribute Name | Required | Values |
| variableName | Yes | Refers to a variable defined in the Survey as a preload hidden. |
| style | No | Contains CSS Styles. |
| labelBefore | No | Text value that precedes the text field control. |
| labelAfter | No | Text value that follows the text field control. |
The Poplist Element
The "Poplist" element consists of zero or more "PoplistOption" elements followed by zero or more "RequiredValidation" elements. If the "Poplist" element does not contain any "PoplistOption" elements, then the options are created by reading the scale values of the hidden variable.
| Attribute Name | Required | Values |
| variableName | Yes | Refers to a variable defined in the Survey as a preload hidden. |
| unansweredResponse | No | The name or label given to an unanswered response in the poplist control. |
| style | No | Contains CSS Styles. |
| labelBefore | No | Text value that precedes the text field control. |
| labelAfter | No | Text value that follows the text field control. |
The PoplistOption Element
Optional elements contained within "Poplist" elements.
| Attribute Name | Required | Values |
| code | Yes | This value should be the same response code as defined in the hidden question used in this "Poplist" control. |
| response | Yes | This is the poplist option value viewed by the survey respondent. |
The RequiredValidation Element
Use of the "RequiredValidation" tag will enforce input validation rules using javascript on the control in which this tag is contained within. In this case a response to a particular parent control will be required.
| Attribute Name | Required | Values |
| errorMessage | Yes | Error message displayed to the user if the input constraints are violated. |
The NumericValidation Element
Use of the "NumericValidation" tag will enforce numeric input validation rules using javascript on the control in which this tag is contained within.
| Attribute Name | Required | Values |
| errorMessage | Yes | Error message displayed to the user if the input constraints are violated. |
| required | No | This value can be either “true” or “false”. |
| minValue | No | This is a numeric value that is the minimum value allowed in the parent control. |
| maxValue | No | This is a numeric value that is the maximum value allowed in the parent control. |
The TextValidation Element
Use of the "TextValidation" tag will enforce text input validation rules using javascript on the control in which this tag is contained within.
| Attribute Name | Required | Values |
| errorMessage | Yes | Error message displayed to the user if the input constraints are violated. |
| required | No | This value can be either “true” or “false”. |
| minLength | No | This is a numeric value that is the minimum length of the input entered. |
| maxLength | No | This is a numeric value that is the maximum length of the input entered. |
| regEx | No | A regular expression value that the input value must match. |
This section details the XML grammar required for a question table multi-control
object. If you haven’t used XML before please refer to the topic called Using XML
in the
Multi-Control Overview section.
The QuestionTable Element
The "QuestionTable" element consists of an "Instruction" element,
followed by 1 or more control elements ("TextField", "RadioGroup",
"CheckAll", "Checkbox", "Poplist", or "Empty"),
followed by 1 or more row elements ("Row", "RowHeader", or "RowTextField").
The "QuestionTable" element MUST appear on the first line of the Hook
Data.
|
Attribute Name |
Required |
Values |
|
xmlns |
Yes |
This value must be: "http://www.datstat.com/2008/MultiControl.xsd" |
|
width |
No |
Set the width of this QuestionTable. |
|
numbering |
No |
A text phrase can be entered. “{0}” will be replaced with the alpha row number (e.g.
“a.”, “b.”, etc…) and “{1}” will be replaced with the numeric row number (e.g. “1.”,
“2.”, etc…) |
|
promptHeader |
No |
Contains an optional text phrase that is used in the prompt header position of the
question table. |
|
randMethod |
No |
Accepts one of the following arguments: ‘all’, ‘reverse’, ‘previous’
Note: ‘all’ randomizes ALL items, ‘reverse’ randomly displays the items either in the same order OR in reverse order, and ‘previous’ displays the items in the same order as a previous survey object whose items have been randomized. |
|
randArgs |
No |
Only valid if ‘randMethod’ is set to ‘previous’. When the ‘randMethod’ is set to ‘previous’, set the randArgs attribute to the name of a previous Question or Collection object that is randomized.
|
The Instructions Element
This element contains text instructions that are displayed before the question table.
The TextField Element
The "TextField" element displays a text field control and can contain
0 or more "RequiredValidation", "NumericValidation", or "TextValidation"
elements.
|
Attribute Name |
Required |
Values |
|
variablePrefix |
Yes |
The prefix used along with the row number ordinal to form the name of the variable
used to store the response for this particular row/column. |
|
heading |
No |
Text displayed in the heading of this control |
|
columnWidth |
No |
Width of this control column |
|
size |
No |
The size or width of this text field control. |
|
maxLength |
No |
The maximum number of characters that can be typed in this text field. |
|
labelBefore |
No |
Text to be displayed before the control. E.g. “$” |
|
labelAfter |
No |
Text to be displayed before the control. E.g. “$” |
The RadioGroup Element
The "RadioGroup" element displays a group of radio buttons and contains
zero or more "RadioOption" elements followed by zero or more "RequiredValidation"
elements. If the "RadioGroup" element does not contain any "RadioOption"
elements, then the options are created by reading the scale values of the hidden
variable.
|
Attribute Name |
Required |
Values |
|
variablePrefix |
Yes |
The prefix used along with the row number ordinal to form the name of the variable
used to store the response for this particular row/column. |
|
heading |
No |
Text displayed in the heading of this control |
|
columnWidth |
No |
Width of this control column |
|
randMethod |
No |
Accepts one of the following arguments: ‘all’, ‘reverse’, ‘previous’
Note: ‘all’ randomizes ALL items, ‘reverse’ randomly displays the items either in the same order OR in reverse order, and ‘previous’ displays the items in the same order as a previous survey object whose items have been randomized. |
|
randArgs |
No |
Only valid if ‘randMethod’ is set to ‘previous’. When the ‘randMethod’ is set to ‘previous’, set the randArgs attribute to the name of a previous Question or Collection object that is randomized.
|
The RadioOption Element
Optional elements contained within "RadioGroup" elements.
|
Attribute Name |
Required |
Values |
|
code |
Yes |
The response code defined in the hidden question used with this Radio button control. |
|
heading |
Yes |
Text displayed in the heading of this specific radio button control. |
The Checkbox Element
This element is used to display a single checkbox. It can contain zero or more "RequiredValidation"
elements.
|
Attribute Name |
Required |
Values |
|
variablePrefix |
Yes |
The prefix used along with the row number ordinal to form the name of the variable
used to store the response for this particular row/column. |
|
heading |
No |
Text displayed in the heading of this control |
|
columnWidth |
No |
Width of this control column |
The CheckAll Element
This element is used to display a grouping of checkboxes so that multiple selections
can be made. It contains zero or more "CheckAllOption" elements followed
by zero or more "CheckAllValidation" elements (order is important if both
types of elements are specified). If the "CheckAll" element does not contain
any "CheckAllOption" elements, then the check box options are created
by reading the scale values of the hidden variable.
|
Attribute Name |
Required |
Values |
|
variablePrefix |
Yes |
The prefix used along with the row number ordinal to form the name of the variable
used to store the response for this particular row/column. |
|
heading |
No |
Text displayed in the heading of this control |
|
columnWidth |
No |
Width of this control column |
|
style |
No |
CSS style |
|
randMethod |
No |
Accepts one of the following arguments: ‘all’, ‘reverse’, ‘previous’
Note: ‘all’ randomizes ALL items, ‘reverse’ randomly displays the items either in the same order OR in reverse order, and ‘previous’ displays the items in the same order as a previous survey object whose items have been randomized. |
|
randArgs |
No |
Only valid if ‘randMethod’ is set to ‘previous’. When the ‘randMethod’ is set to ‘previous’, set the randArgs attribute to the name of a previous Question or Collection object that is randomized.
|
The CheckAllOption Element
Optional elements contained within "CheckAll" elements.
|
Attribute Name |
Required |
Values |
|
heading |
Yes |
Text displayed in the heading of this specific checkbox control. |
|
name |
Yes |
This value is the response name of the checkbox as defined in the hidden questions
used by this CheckAll or “Select all that apply” question. |
The Poplist Element
This element is used to display a poplist control. It contains 1 or more "PoplistOption"
elements followed by zero or more "RequiredValidation" elements. If the
"Poplist" element does not contain any "PoplistOption" elements,
then the options are created by reading the scale values of the hidden variable.
|
Attribute Name |
Required |
Values |
|
variablePrefix |
Yes |
The prefix used along with the row number ordinal to form the name of the variable
used to store the response for this particular row/column. |
|
heading |
No |
Text displayed in the heading of this control |
|
columnWidth |
No |
Width of this control column |
|
unansweredResponse |
No |
Text that is displayed in the poplist control when no value is selected. |
|
randMethod |
No |
Accepts one of the following arguments: ‘all’, ‘reverse’, ‘previous’
Note: ‘all’ randomizes ALL items, ‘reverse’ randomly displays the items either in the same order OR in reverse order, and ‘previous’ displays the items in the same order as a previous survey object whose items have been randomized. |
|
randArgs |
No |
Only valid if ‘randMethod’ is set to ‘previous’. When the ‘randMethod’ is set to ‘previous’, set the randArgs attribute to the name of a previous Question or Collection object that is randomized.
|
The PoplistOption Element
Optional elements contained within "Poplist" elements.
|
Attribute Name |
Required |
Values |
|
code |
Yes |
The response code defined in the hidden question used with this poplist control. |
|
response |
Yes |
Text displayed in the poplist control for this response. |
The Empty Element
This element is used to add an empty column in the question table.
|
Attribute Name |
Required |
Values |
|
heading |
No |
Text displayed in the heading of this control |
|
columnWidth |
No |
Width of this control column |
|
headingStyle |
No |
CSS style applied to the header of the "Empty" element. |
|
cellStyle |
No |
CSS style applied to each of the TD cells of an "Empty" element. |
The RequiredValidation Element
Use of the "RequiredValidation" tag will enforce input validation rules
using javascript on the control in which this tag is contained within. In this case
a response to a particular parent control will be required.
|
Attribute Name |
Required |
Values |
|
errorMessage |
Yes |
Error message displayed to the user if the input constraints are violated. |
The NumericValidation Element
Use of the "NumericValidation" tag will enforce numeric input validation
rules using javascript on the control in which this tag is contained within.
|
Attribute Name |
Required |
Values |
|
errorMessage |
Yes |
Error message displayed to the user if the input constraints are violated. |
|
required |
No |
This value can be either “true” or “false”. |
|
minValue |
No |
This is a numeric value that is the minimum value allowed in the parent control. |
|
maxValue |
No |
This is a numeric value that is the maximum value allowed in the parent control. |
The TextValidation Element
Use of the "TextValidation" tag will enforce text input validation rules
using javascript on the control in which this tag is contained within.
|
Attribute Name |
Required |
Values |
|
errorMessage |
Yes |
Error message displayed to the user if the input constraints are violated. |
|
required |
No |
This value can be either “true” or “false”. |
|
minLength |
No |
This is a numeric value that is the minimum number of characters allowed in the
parent control. |
|
maxLength |
No |
This is a numeric value that is the maximum number of characters allowed in the
parent control. |
|
regEx |
No |
A regular expression value that the input value must match. |
The CheckAllValidation Element
This element will enforce “check all that apply” input validation rules using javascript.
|
Attribute Name |
Required |
Values |
|
errorMessage |
Yes |
Error message displayed to the user if the input constraints are violated. |
|
minRequired |
No |
The minimum number of checkbox selections allowed. |
|
maxRequired |
No |
The maximum number of checkbox selections allowed. |
The Row Element
This element will add a “normal” row to the question table. This row contains a
prompt followed by controls.
|
Attribute Name |
Required |
Values |
|
prompt |
No |
Value displayed in the prompt column. |
|
showIf |
No |
This is a simple ShowIf expression of the form:
"variable" "op" "value"
Where:
"variable" is the name of a survey variable
"op" is any of the following operators:
‘_eq_’ is equals
‘_ne_’ is not equals
‘_lt_’ is less than
‘_gt_’ is greater than
‘_lteq_’ is less than or equals
‘_gteq_’ is greater than or equals
‘_ans_’ is answered
‘_nans_’ is not answered
"value" is a required value except if the _ans_ or _nans_ operators are
used.
Example: GENDER _eq_ 1
|
|
maxRequired |
No |
The maximum number of checkbox selections allowed. |
The RowHeader Element
This element will add a content row to the question table. This row will not contain
any controls.
|
Attribute Name |
Required |
Values |
|
value |
No |
Value displayed in the row. |
|
style |
No |
CSS style applied to the row header. |
|
showIf |
No |
This is a simple ShowIf expression of the form:
"variable" "op" "value"
Where:
"variable" is the name of a survey variable
"op" is any of the following operators:
‘_eq_’ is equals
‘_ne_’ is not equals
‘_lt_’ is less than
‘_gt_’ is greater than
‘_lteq_’ is less than or equals
‘_gteq_’ is greater than or equals
‘_ans_’ is answered
‘_nans_’ is not answered
"value" is a required value except if the _ans_ or _nans_ operators are
used.
Example: GENDER _eq_ 1
|
|
maxRequired |
No |
The maximum number of checkbox selections allowed. |
The RowTextField Element
This element will add a text field control in the prompt column.
|
Attribute Name |
Required |
Values |
|
prompt |
No |
Value displayed in the prompt column. |
|
variableName |
Yes |
Variable name used by this text field control. |
|
size |
No |
Size of the text field control. |
|
maxLength |
No |
Maximum number of characters that can be entered in the text field control. |
|
labelBefore |
No |
Text value displayed before the text field control. |
|
labelAfter |
No |
Text value displayed after the text field control. |
|
showIf |
No |
This is a simple ShowIf expression of the form:
"variable" "op" "value"
Where:
"variable" is the name of a survey variable
"op" is any of the following operators:
‘_eq_’ is equals
‘_ne_’ is not equals
‘_lt_’ is less than
‘_gt_’ is greater than
‘_lteq_’ is less than or equals
‘_gteq_’ is greater than or equals
‘_ans_’ is answered
‘_nans_’ is not answered
"value" is a required value except if the _ans_ or _nans_ operators are
used.
Example: GENDER _eq_ 1
|
The following example creates a simple question that asks for a survey respondent's height in feet and inches.

Hook Data
<Question xmlns="http://www.datstat.com/2008/MultiControl.xsd">
<Row>
<Data>
<Prompt value="Enter your height:" />
</Data>
</Row>
<Row>
<Data>
<TextField variableName="HEIGHT_FEET" labelAfter="feet" size="4" >
<NumericValidation errorMessage="A numeric value between 3 and 8 for the height in feet is required." required="true" minValue="3" maxValue="8"/>
</TextField>
<TextField variableName="HEIGHT_INCHES" labelAfter="inches" size="4" >
<NumericValidation errorMessage="A numeric value between 0 and 11 for the height in inches is required." required="true" minValue="0" maxValue="11"/>
</TextField>
</Data>
</Row>
</Question>
Notes about this Example
- This question consists of 2 rows contained with the "row"
|
tags. - The first row contains a prompt ("Prompt" tag) and the second row consists of 2 text fields ("TextField" tag) with labels.
- The survey variables, HEIGHT_FEET and HEIGHT_INCHES, are referenced by this Multi-Control question and must be defined as Preload/Hidden questions. If they are not an error message will be displayed in place of the question when viewing or previewing the survey.
- The "NumericValidation" tag is specified for both text fields and this requires the respondent to enter a numeric response within a certain range. Please note that all Multi-Control input validation requires javascript. If Multi-Control validation is used, it is highly recommended that the ‘Require survey participants to have javascript enabled’ option found on the Advanced tab of the Survey Preferences dialog is checked.
The following example is a different variation of the previous example that asks for the respondent’s height in feet and inches. Instead of text field controls, this question uses poplist controls:

Hook Data
<Question xmlns="http://www.datstat.com/2008/MultiControl.xsd" >
<Row>
<Data>
<Prompt value="Enter your height:" />
</Data>
<Data>
<Poplist variableName="HEIGHT_FEET" style="text-align:left;width:180px" unansweredResponse="--Select Height in Feet--" >
<RequiredValidation errorMessage="Please select a response for your height in feet."/>
</Poplist>
</Data>
</Row>
<Row>
<Data>
<Poplist variableName="HEIGHT_INCHES" style="text-align:left;width:180px" unansweredResponse="--Select Height in Inches--" >
<RequiredValidation errorMessage="Please select a response for your height in inches."/>
</Poplist>
</Data>
</Row>
</Question>
Notes about this Example
- The Poplist values must be configured in the Scale values of the Preload/Hidden Variable used in the field and the poplist will be generated automatically with values and labels you specify in the preload/hidden.
- This question only consists of 1 row
- The "RequiredValidation" tag is specified for both poplist controls. This requires a response. Please note that all Multi-Control input validation requires javascript. If Multi-Control validation is used, it is highly recommended that the ‘Require survey participants to have javascript enabled’ option found on the Advanced tab of the Survey Preferences dialog is checked.
The following example is a different variation of the previous example that asks for the respondent’s height in feet and inches. It uses a mix of text field control, poplist and a checkbox:

Hook Data
<question xmlns="http://www.datstat.com/2008/MultiControl.xsd">
<row>
<data>
<prompt value="Enter (and choose) your height:" />
</data>
</row>
<row >
<data>
<textfield size="4" variablename="HEIGHT_FEET_ALLFIELDS" labelafter="feet">
<numericvalidation required="true" errormessage="A numeric value between 1 and 7 for the height in feet is required." minvalue="1" maxvalue="7" />
</textfield>
<poplist style="FONT-WEIGHT: bold; WIDTH: 150px; TEXT-ALIGN: left" variablename="HEIGHT_INCHES_ALLFIELDS" labelafter="inches" unansweredresponse="--Inches--">
<requiredvalidation errormessage="Please select a certain amount of inches for your height" />
</poplist>
<checkbox variablename="HEIGHT_CHECK_OPTOUT" labelafter="I like my height">
</data>
</row>
</question>
The following example attempts to demonstrate all of the possible controls within a question table:
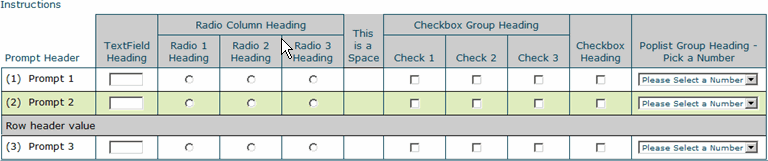
Hook Data
<QuestionTable xmlns="http://www.datstat.com/2008/MultiControl.xsd" width="1000px" numbering="({1})" promptHeader="Prompt Header">
<Instructions>Instructions</Instructions>
<TextField variablePrefix="TFCOM_" heading="TextField Heading" size="5" maxLength="5" columnWidth="80px" >
<TextValidation required="true" minLength="1" maxLength="2" errorMessage="Text field response must be 1 or 2 characters in length."/>
</TextField>
<RadioGroup variablePrefix="RGCOM_" heading="Radio Column Heading" columnWidth="80px" >
<RadioOption code="0" heading="Radio 1 Heading" />
<RadioOption code="1" heading="Radio 2 Heading" />
<RadioOption code="2" heading="Radio 3 Heading" />
<RequiredValidation errorMessage="A radio button response is required." />
</RadioGroup>
<Empty columnWidth="50" heading="This is a Space" headingStyle="border-bottom:none;border-top:none;" cellStyle="border-bottom:none;"/>
<CheckAll variablePrefix="CBGCOM_" heading="Checkbox Group Heading" columnWidth="80px" >
<CheckAllOption heading="Check 1" name="0" />
<CheckAllOption heading="Check 2" name="1" />
<CheckAllOption heading="Check 3" name="2" />
<CheckAllValidation errorMessage="You must select between 1 and 3 items in the checkbox group." minRequired="1" maxRequired="3" />
</CheckAll>
<Checkbox variablePrefix="CBCOM_" heading="Checkbox Heading" columnWidth="80px">
<RequiredValidation errorMessage="You must select the single checkbox."/>
</Checkbox>
<Poplist variablePrefix="POPLCOM_" heading="Poplist Group Heading - Pick a Number" columnWidth="175px" unansweredResponse="Please Select a Number">
<RequiredValidation errorMessage="Please select a response for your height in feet."/>
</Poplist>
<Row prompt="Prompt 1"/>
<Row prompt="Prompt 2"/>
<RowHeader value="Row header value" style="background-color:#CCCCCC;border-bottom:none;" />
<Row prompt="Prompt 3"/>
</QuestionTable>
Hook Data Explained
Must be in each XML. The Numbering= determines if you will number or letter your rows

Allows you to write instructions for your Question Table

Each Type of Control will need a Prefix to be defined and then used in the Preload/Hidden Variables that get created. This is the Text Field prefix. There are three Preload/Hidden variables that have been created with this prefix. TF_1, TF_2, TF_3

The RadioGroup needs a Heading for each option and a Preload/Hidden Variable for each.

This will add a space between sections. The Heading was added to explain the gap.

The CheckAll requires that you check the Multi-Value in the Preload/Hidden Variable creation. Scale Values will also need to be added. See The example Multi-Control Example Survey

The Checkbox requires Preload/Hidden Variables that have the Data Type as Yes/No

The Poplist code information can be coded in the XML or can be part of the Scale Values in the Preload/Hidden Variables. In this case it is part of the Preload/Hidden Variable.

This represents 3 Question Prompts with a row header between the 2nd and 3rd Prompt.

Notes about this Example
- This question table contains 5 different controls: TextField, RadioGroup, CheckAll, Checkbox and PopList.
- The question table contains 4 rows, of which 1 is treated like a header.
- The variable prefix for the TextField control is “TF_”. This means that hidden questions named “TF_1”, “TF_2”, and “TF_3” should be defined in the survey, otherwise an error will be displayed.
- The variable prefix for the CheckAll question is “CBG_”. The survey should have the following hidden questions defined in the survey: “CBG_1”, “CBG_2”, and “CBG_3”. Each of these questions should be marked as “Check all that apply” questions that contain responses with suffixes of “OPT1”, “OPT2”, and “OPT3”.
- The “CheckAllValidation” tag is specified for the “CheckAll” control. This requires the survey respondent to enter between 1 and 3 checks. Please note that all Multi-Control input validation requires javascript. If Multi-Control validation is used, it is highly recommended that the ‘Require survey participants to have javascript enabled’ option found on the Advanced tab of the Survey Preferences dialog is checked.