Welcome to the DatStat Illume online help system. In this tool, you will find instructions for using all of the DatStat Illume components. If you wish to go to a specific component, choose from the following links.
To navigate the help directory, navigate through the folder structure that you see in the left panel. Click on a folder to drill down into a category. Click on an article to read about the topic.
Searching
To search by keyword, use the search form in the top of the navigation panel. Enter keywords that apply to the topic in which you are interested. Results will appear in this panel.
Type an article id in the search form and click Search to go directly to that article.
Articles
Article content will appear in this portion of the tool - the right panel. If there are any related articles, they will be displayed on the bottom of the article as hyperlinks.
Index
Select the index tab to view help topics alphabetically.
Multi-Control Component
The Multi-Control Component was introduced in the 4.6 release, and provides a facility for DatStat customers to build complex questions involving multiple controls representing a single question, as well as side by side question tables. This feature set enables DatStat users to design and field sophisticated surveys, however the existing implementation does not allow the user to randomize the order of prompts.
In a MultiControlQuestionTable, you can now randomize the order in which prompts are shown.
Quota Management
Quota management is an add-on module that provides survey designers with a mechanism to control the number of survey respondents, meeting a specified set of criteria, who are allowed to participate in a given survey.
When purchased, this module can be enabled with a license modification from DatStat Customer Support.
Group Header Enhancement
Select-one, Check-All-That-Apply, and Question Table style questions now support group headers. These group headers, when added, will provide an extra set of display control for the survey designer to break multiple options out into a specific group for participants.
Test Data Generation Enhancement
In the Web Console/Test Data tab you are able to add up to 100 rows of test data. There have been improvements made in 4.7 when generating test data. One of these improvements worth mentioning is the ability to provide test data for preloaded questions (i.e. hidden questions that have a user name assigned to them). Please note that test data is still not able to be generated for hidden questions whose values are not preloaded from a participant list.
DatStat Object Methods for use in Calculations
The survey calculation DatStat object is new in version 4.7 and it consists of many very useful methods that can be called from survey calculations that were formally only exposed using the SDK. These methods allow for more capability and flexibility within a survey calculation, and in some cases, problems can be solved by just using a survey calculation where previously it would have required use of the runtime SDK.
When using the Illume Survey Designer, you can choose to work locally, or you can connect to an Illume server. You can create and edit surveys while working locally, but in order to check in, check out, or publish a survey, you must be connected to an Illume server.
Note: You must log in to an Illume server to activate your license. Once your license is active, you will be able to design and build surveys.
Logging In
To log in to an Illume server:
Start Illume by choosing Start > Programs > DatStat Illume > DatStat Illume 4.7 from the Start menu.
(Optional) If you have access to more than one Illume server, click the Options button and select the name of the server you want to log in to from the Connections list.
Enter your User Name and Password.
Click Login
Working Locally
To work locally:
Start Illume by choosing Start > Programs > DatStat Illume > DatStat Illume 4.7 from the Start menu.
Start Illume by choosing Start > Programs > DatStat Illume > DatStat Illume 4.7 from the Start menu.
Check Work Locally on the Illume Login dialog and click OK.
Select File > New from the console menu.
Click on Default Template. Survey templates determine how your survey will appear in a participant's browser. The default template has a simple layout that looks the same on all major browsers and operating systems.
Name the survey "SampleSurvey" and click Create Survey.
Illume creates a new survey called "SampleSurvey" and presents the Survey Designer.
The Survey Designer resembles Windows Explorer, with a collection pane on the left, and a question pane on the right. This is similar to the way Explorer displays folders and files.
Every Illume survey contains a collection of questions called "LOGIN", which will hold information about individual survey participants.
Let's add a question to the survey. Click the question icon in the Designer toolbar. This brings up the Question Editor.
We want to add a question that asks a participant's age. To do this, type the question "What is your age?" in the prompt field. For this question, we want participants to type in a number, so we change the Display Type from "Select One" to "Text." This will present participants with a text box in which to enter their age.
Note that when you change the Display Type, the image next to the Display Type list changes to show what type of control participants will see when they take the survey.
Click on the Response Options tab. This tab contains a list of Data Types. Since we're asking for a participant's age, we will want the data type to be a number--preferably a positive number. Choose "Whole Numbers >= 0" as the data type.
You may also choose to enter a default value for the question. If you set this, it becomes the pre-selected answer to the question, but does not prevent participants from choosing another answer.
Click the Display Properties tab. This tab lets us control some details of the text box that will appear in the survey. Since we're asking about a participant's age, let's add the label "years" to the right side of the text box, just so that everyone knows what kind of age measurement we're expecting.
Note that we check the "Show label after" option, so that it will appear to the right of the text box. When this option is not checked, the label will appear to the left of the text box.
Let's also narrow the width of the text box. The default value of 60 characters will create a wide text box. We only need the box to be wide enough to accept a few digits, so we change Display Width to 5.
We want to be sure participants tell us how old they are, and we want to be sure they give a valid response. Let's click the Response Guides tab to set up some rules to describe what constitutes an acceptable response to our question.
Make this item required by clicking "Always use the following setting for this item" and checking the Required option.
We can use the Text Bounds options to describe how many characters must be in an acceptable response, but in this case, since we are expecting a number as an answer, we're better off defining a numeric range. Assuming that anyone taking our survey is at least 3 years old, and at most 120 years old, we'll set the Lower Bound for this question to >=3 and the Upper Bound to <=120.
Now let's set an error message for this question: "You must indicate a number between 3 and 120 for your age." The error message appears whenever a participant provides an answer that does not meet the criteria we have just defined. The error message also appears when a participant tries to submit a page of the survey without answering a required question.
Click on the Data Dictionary tab. Here you'll see two fields: Unique Name and Description. When you create a new question, Illume assigns an id to the question. This question's unique name is "Q1."
Illume uses this id in various places to refer to the question "What is your age?" For example, when you use Illume's Web Console to download the your survey data, responses to the question "What is your age?" will appear under the variable name "Q1."
In most cases, you'll want to specify a more descriptive id. "AGE" is a good id for this question, so let's use that. Type "AGE" into the "Unique name" text box.
Note: A unique name must start with a letter, and can contain any combination of letters, numbers, underscores (_), or hyphens (-). Unique names must be 20 characters or less in length.
The description field enables you to describe the data submitted in response to this question. The description you type here will appear in Web Console's data dictionary, and in the data dictionary for any data you download in SAS or SPSS format.
You can leave the description blank, and Illume will use the question prompt as the description. In this case, the question prompt works well as a description, so we will leave it blank. Click OK to add your new question to the survey. The question editor closes, and your question appears in the right pane of the Survey Designer, just beneath the Login Collection.
Let's take a look at the question you just created. Click the Save button to save the survey, then click the Preview button to look at the question you just created.
The Survey Preview window appears, displaying an HTML version of the survey. Note that it may take a few seconds for the preview to appear the first time you use it. This is normal. Subsequent previews will appear more quickly.
If your survey includes a login screen, you can generally type anything into the login field and click the Start Survey button to begin. If your survey does not require a login, simply click the Start Survey button.
Except for the "Add/Edit comments" icon, the question in the preview appears exactly as it will when your survey is published. Note that the question is numbered. It includes the prompt you typed in, and the "years" label you added. The text box is 5 characters wide, as you specified, and there is a Progress Bar at the top of the preview, indicating how much of the survey you will have completed after you submit this page.
Remember that we added some requirements to this question. First, participants must answer the question. Second, the answer must be a whole number between 3 and 120.
Try clicking Submit Results without answering the question. You'll see the error message that you typed in earlier.
Type some nonsense into the text box, and try again to submit. Try again with an invalid number, like -4 or 800.
Try again with a valid number-- any whole number between 3 and 120. This time, when you click Submit Results, Illume will accept your answer and display a generic "Thank You" message.
Additional Information About the Previewer
The login page, the thank you page, and all of the images you saw in the preview are part of Illume's default template. You can customize each of these items for each survey you create. Illume surveys can contain images, Flash animations, Java applets, or any other media type that current browsers support.
The pencil icon that appeared to the left of the question number appears in the Previewer only. It provides a means for you, and others who are collaborating with you, to attach comments to survey questions. These comments will be available only to the people designing the survey; participants will never see them.
For more information about Comments, see the Comments section under Survey Designer.
Note also that there is a Reload button at the bottom of the Previewer. Click this any time to go back to the first page of the survey.
Let's return to the Survey Designer and create two more simple questions. First, let's ask if our participants are employed. Click the Question icon to create a new question.
Choose "Select One" as the display type, and type "Are you currently employed?" for the prompt.
Click the Response Options tab. You'll notice the response options tab is different from the way it appeared the last time we looked at it. When we created the age question as a text box, we were allowing participants to type in a response. Now we are creating a "Select One" question, and we have to define a set of options from which participants can select.
Choose "Whole numbers" as the data type. Under "Add/Edit Response Option", you'll see two text boxes separated by an equal sign (=). Type the number 0 in the box on the left side of the equal sign, then type "I am not currently employed" in the box on the right side of the equal sign. Click Add.
The Response Option you just entered appears in the list of response options with a value of 0 and a label of "I am not currently employed."
Type the number 1 into the text box on the left side of the equal sign, and "I work part time" in the text box on the right side. Click Add to add the option to the list.
Follow the same steps to add a response option with the value 2 and the label "I work full-time."
Go to the Data Dictionary tab and set the question's unique name to "EMPLOYED".
Click OK. The Question Editor closes, and you will see your new question in the survey editor, just below the age question.
Let's also add a question about gender. Click the Question icon to create a new question.
Choose "Select One" as the display type, and type "What is your gender?" for the prompt.
Click the Response Options tab. Choose "Whole numbers" as the data type. Under "Add/Edit Response Option", add the following response options:
1 = Female
2 = Male
Go to the Date Dictionary tab and give this question the unique id "GENDER."
Click OK. The new question will appear in the survey designer, as in the image below.
Save your changes by clicking the Save icon , then click Preview to take a look at the new survey. Try submitting the survey without answering the gender question or the employment question. Since we did not define a custom error message for either of these questions, you will see a default error message.
Additional Information
You can define survey-wide default messages for all types of validation errors in the survey preferences. These default error messages will apply to any questions where you do not define a specific error message.
Some questions are not relevant to all users. For example, a survey about lifestyle and health habits may include several questions about a participant's tobacco use. If a participant indicates that he doesn't use tobacco, these questions will be a waste of time, and the responses will not contribute any value to your results.
Illume surveys include Show-if logic to solve these problems. Let's assume we are not concerned with the employment status of participants under the age of 18 or over the age of 70. We'll define a Show-if condition for the employment question so that it appears only for participants who indicate an age between 18 and 70.
Double click the EMPLOYMENT question in the Survey Editor.
1. Click the Show-if tab in the Question Editor. Under "Show State," choose "Only show if...."
2. Click on the Root folder in the list of collections on the left side of the Question Editor. You'll see a list of all our survey questions a participant would answer before reaching the employment question. Click on the question "What is your age?"
3. To show this question only to participants 18 years or older, select >= (greater than or equal to) from the operator list, and type 18 into the text box next to the list. Click the Add button to add this Show-if condition to the employment question. The new Show-if condition now appears in the list of conditions at the bottom of the Question Editor.
4. Now let's add the second condition. Select <= (less than or equal to) from the list, and type 70 into the text box next to the list. Be sure the list at the bottom of the screen labeled "Group all expressions with" is set to "And." We want the EMPLOYMENT question to appear if the participant is at least 18 AND at most 70 years old.
The Show-if editor will resemble the image below.
5. Click Add to add the second condition. Click OK to return to the Survey Designer.
6. Save and preview the survey again. The employment question no longer appears on the same page as the other two questions. Illume automatically moves this question to a new page because Illume has to know how participants answer the AGE question before it knows whether or not it should even present the EMPLOYMENT question.
You'll notice now that if you enter a number less than 18 or more than 70 in response to the age question, you won't see the employment question.
Additional Information About Show-if Logic
You can apply multiple Show-if conditions to each question in your survey. You can also apply Show-if conditions to entire collections of questions. Questions that include Show-if conditions are marked with a yellow circle in the Survey Designer, like the C1 collection in the image below. Questions and/or collections that are set to be "Never shown" are marked with a red circle in the Survey Designer, like the C2 collection in the image below.
The survey previewer enables anyone collaborating in the survey design process to attach comments to questions.
Save this survey and click the Preview button .
Click the comment icon next to the first question, "What is your age?" and type a comment.
Click Done to close the survey previewer.
You'll see that a pencil appears next to the AGE question in the Survey Designer. Click it and you will see the comment you just added.
Attaching comments like this is especially useful when several people are reviewing or collaborating on the development of a survey.
Collections are groups of related questions. In the Survey Designer, collections appear as folders in the left pane. The items they contain appear in the right pane.
Grouping questions into collections provides three benefits:
You can easily reuse collections of commonly used questions: simply drag and drop the collection into a new survey.
You can apply show-if conditions to entire collections.
The Web Console has features to simplify querying and downloading data that has been grouped into a collection.
Let's create a collection called "Employment" with some questions about the participant's job.
Click the Collection icon in the Survey Designer toolbar. Next to Unique Name, type "Employment."
We want to show the questions in this collection only to participants who indicate they are currently employed. Click the Show-if tab. Under "Show State," check "Only show if..."
Click the ROOT folder to show the questions in the Root collection.
Click the EMPLOYED question.
Under EMPLOYED, select > (greater than) from the list of tests, and "(0) I am not currently employed" from the list of responses. Click the Add button, then click OK.
The new collection appears in the right pane of the Survey Editor with the label "Employment (0)." The zero indicates the number of items in the collection.
Click on the collection. The folder icon opens, and the right pane of the Designer window is blank.
With the EMPLOYMENT collection still selected, click the question icon in the tool bar to add a question to this collection.
In the General tab, set the Display Type to "Text Field", and type "What is your job title?" for the prompt.
Click the Response Options tab and set the data type to "Text."
Click the Data Dictionary tab, and type "jobtitle" for the unique name.
Click OK to add the question to the survey.
Next, we'll add a Question Table to this collection... Next >>
A Question Table contains questions that share the same display type and the same set of response options. Illume makes the creation and display of these questions very simple and efficient. Let's end our survey with a question block of questions about job satisfaction.
If you are not currently in the EMPLOYMENT collection, click on it so the folder icon that accompanies it is open.
Click the Question Table icon in the Survey Designer toolbar. You'll see the Question Block editor.
Choose "Select One" as the display type. (It should be selected already.)
Under "Instructions," type "Please indicate how satisfied you are with each of the following aspects of your job." These instructions will appear above the group of questions we are about to create.
Click the Prompts tab and type each of the following words into the prompts editor. After each word, click the Add button, or press the Enter key on your keyboard:
Responsibilites
Challenges
Salary
Benefits
Atmosphere
Click the Response Options tab, and add the following response options:
-2 = Very Dissatisfied
-1 = Dissatisfied
0 = Neutral
1 = Satisfied
2 = Very Satisfied
Click on the Data Dictionary tab and name this collection "Satisfaction." Click OK.
Save the survey and click the Preview icon. Remember that to see the new questions in the Employment collection, you will need to say you are between 18 and 70 years old, and that you are currently employed either part-time or full time.
Notice the satisfaction questions use a compact and readable display format that is easy to interact with.
Additional Information About Question Tables
Question Tables can use other display types, such as lists, checkboxes, and text boxes. You can apply show-if logic to individual items within a question block.
You can add custom text, images, Flash animations, Java applets, and other items to any part of your survey. Let's add a simple bit of text to this survey's login screen.
Click on the Root collection in the left pane of the Survey Designer.
Click the Text/HTML icon on the Survey Designer toolbar.
Type some simple text, like "Welcome to Our Survey!" You can highlight the text and apply formatting as you would in a word processor, changing font size, color, and other attributes. You can also add graphics and links.
Click OK to add the Text/HTML item to your survey.
Note that this item will be displayed to participants exactly where it appears in the Survey Editor. That is, if your Text/HTML item appears below the ID question in the Survey Editor, it will be displayed below the ID question in the survey. To make it display above the ID question, drag and drop it above the ID question in the Survey Editor.
Save and preview your survey. You will see that the login page includes the HTML you just created.
Additional Information About Text/HTML Items
You can apply show-if logic to Text/HTML items, just as you can to questions and collections. You can also view and edit the HTML source code for any of these items by opening it in the Text/HTML editor and clicking the View Source button.
After you create a survey, you must check it in to the Illume server before you can publish it. Checking a survey in also enables other users to preview it, edit it, and provide comments.
The Survey Designer enables you to create questions and Text/HTML objects, and to configure preferences for an entire survey.
The pages in this section describe how to use each of the Survey Designer's features.
This article outlines a specific set of practices to improve survey quality, describing the benefits of each practice and the consequences of neglecting each practice. These practices have the following goals:
To improve the quality of the data you'll be analyzing once the survey is complete
To improve the participant's experience while taking the survey.
To simplify the process of testing your survey
To simplify the process of maintaining your survey
To maximize the usefulness of the Web Console's analysis tools
Organize questions into collections
Group logically-related questions into collections with logical names. For example, if your survey contains 20 questions about travel, put all of those questions into a collection called TRAVEL. See Creating a Collection for details. Why
Collections make questions easier to find, both for the survey designer and for the data analyst, who will see the same set of collections in the Web Console.
Collections greatly simplifies show-if logic. For example, if the first question in your survey asks "Do you plan to travel in the next 6 months?" it's easier to hide the whole TRAVEL collection from those who answer NO than to set show-if conditions on each of the 20 questions in the TRAVEL collection.
Collections simplify the process of building queries in the Web Console. The Web Console enables analysts to select whole collections at once for analysis. This is much easier than manually adding 20 items to a query.
Choose the right display type
Use poplists for select-one type questions that have many options (generally more than 10). Use radio buttons for select-one type questions that have few options (generally less than 10). Use likert scales for select-one type questions that use a continuum (a scale of values that ranges from one extreme, such as "very likely" to the opposite extreme, such as "very unlikely"). Use text questions for any type of short free-form answer (up to 255 characters). Use commentary questions for longer verbal responses (more than 255 characters). See Setting a Question's Display Properties for more information. Use question tables for numerous questions that share a common set of response options. For example, if your survey includes 20 select-one questions with the options "For," "Against," and "Undecided," creating a single question table takes much less time than creating 20 separate questions. The question table layout presents the questions simply and clearly, enabling participants to answer the questions more quickly and easily. See Creating a Question Table for more information about Question Tables.
Choose the most specific data type available
If your question requires a numeric response, choose the most specific numeric data type that applies. This applies above all to Text questions. For example, a question that asks a participant's age should use the type "Whole Numbers >= 0" since age cannot be less than zero. When asking a participant's grade point average, choose the type "Decimal Numbers," since grade point average tend to include decimal components. See Setting a Question's Response Options for details. Why
When you analyze the data you've collected, you can be sure the data are valid. You will not have to spend time weeding out all of the responses in which participants said their age was less than zero. Weeding out bad data after it has been collected takes much more time than preventing bad data from being collected. This is one of the principles on which Illume was built.
Show-if logic elsewhere in your survey may depend on the value of the participant's response being of the correct type. For example, your survey includes a collection of questions called HEALTH with a show-if condition that says the questions should be shown to anyone whose age is greater than 50. If don't specify a numeric data type for the age question, someone who reports their age as "sixty" will not see the HEALTH questions because Illume cannot compare a number (50) to a word (sixty). In this case, specifying the wrong data type causes you to lose data.
Calculations elsewhere in your survey may depend on the value of the participant's response being of the correct type. If a calculation is supposed to add two numbers together, and one of the values is not a number (as in the age example above), the calculation will fail. In this case, specifying the wrong data type may result in missing data or bad data.
Illume's Web Console displays summary statistics for all numeric data. These statistics include minimum, maximum, and average values (among others). These are useful for getting a quick overview of survey results. The Web Console will not display summary statistics for non-numeric data. Therefore, choosing a non-numeric date type for the age question results in the data analyst losing some of the useful functionality of the Web Console.
Incorrect data types may cause problems in data exports and downloads. The Web Console will export data to a variety of formats, including Microsoft Excel, SAS, SPSS, HTML, text, and XML. Statistical analysis programs like SAS and SPSS may not import data sets that include textual data in a numeric field. Again, if the age question is not set to a numeric data type, it's possible that the data set will contain a mix of textual and numeric data. Cleaning these data after they have been collected is tedious, error-prone and time consuming-- especially if the data include thousands of submissions.
Assign specific response guides
Assigning specific response guides prevents bad data from getting into your survey results. For example, when asking for a participant's grade point average, assign lower and upper bounds that ensure a valid response. A reasonable lower bound would be 0; a reasonable upper bound may be 4 or 5, depending on the grading scale. See Setting a Question's Response Guides for details. Starting in version 2.2, Illume enables you to set dynamic bounds, which customize response guides for each participants. For example, one question called KIDS may ask, "How many children do you have?" A later question called KIDS_IN_SCHOOL may ask, "How many of your children are currently in school?" You can define upper bound (i.e. maximum allowable response value) for the second question as less than or equal to the answer to the first question. See Setting Dynamic Defaults and Bounds for specifics about dynamic bounds. Why
The more you can do to ensure valid data, the better. Finding and removing invalid data is much more difficult than preventing those data from entering the system in the first place. The data analyst will certainly not want to compare all of the responses to KIDS to all of the KIDS_IN_SCHOOL responses trying to find and remove invalid responses.
Your survey may include show-if logic and calculations that rely on the value of these variables falling within a reasonable range. Values outside the range may cause the show-if logic or the calculations to fail.
Require answers to questions used in calculations
In order to determine the value of a calculated variable, each of the variables used in the calculation must have a value. For example, a variable calculated as {Value:HEIGHT} / {Value:WEIGHT} cannot be calculated unless the participant has answered both the HEIGHT and WEIGHT questions. To get meaningful data in a calculated variable, you must require that participants answer the questions on which the calculation is based. The answers to those questions, as noted above, must be of the correct data type! See Setting a Question's Response Options for details on how to select a question's data type. See Setting a Question's Response Guides for help in setting the response guides, and Using Calculated Variables for more information on creating calculated variables.
Choose intelligent default values for calculated variables
Each calculated variable in Illume includes a default value. Whenever Illume is unable to perform a calculation, it sets the value of the calculated variable to the default value. For example, if the variable DRINKS_PER_WEEK is calculated as {Value:DRINKS_PER_DAY} * 7, Illume will not be able to calculate a value until the participant has answered DRINKS_PER_DAY question. If DRINKS_PER_DAY does not require an answer, Illume may never be able to calculate a value for DRINKS_PER_WEEK. If you assign a default value of 0 to the DRINKS_PER_WEEK calculation, then all participants who answered 0 to DRINKS_PER_DAY, and all participants who did not answer DRINKS_PER_DAY, will have a value of 0 for DRINKS_PER_WEEK. This is incorrect, and will result in invalid aggregate data for the DRINKS_PER_WEEK variable. A more intelligent design would set the default value of DRINKS_PER_WEEK to -1 (or any other number less than zero). Setting the calculation's default value outside the range of legitimate values enables analysts to identify which data to ignore. In this example, the analyst knows that when DRINKS_PER_WEEK is 0, it can only be because the participant answered 0 to DRINKS_PER_DAY. When DRINKS_PER_WEEK is less than 0, it can only be because the participant did not answer DRINKS_PER_DAY. The analyst can then ignore all values less than 0 and focus only on the valid data. See Using Calculated Variables for more information.
Choose the correct data type for preloaded variables
Preloaded variables are variables loaded from the participant list into the survey, as described in Preloading Participant Data. When creating a preloaded variable, the data type must match the type of data being loaded from the participant list, and the data type should be as specific as possible. For example, when loading a participant's year of birth into a variable called BIRTHYEAR, the data type should be set to "Whole Numbers," because a year is whole number. When loading data from a field that may include non-numeric data, set the data type of the preload to "Text." Why
If the data type of the variable in the participant list does not match the data type you specify for the preload, Illume will not preload the data. The only exception to this rule is for preloads of the "Text" data type. Preloads of type "Text" will load any type of data from the participant list.
Calculations and show-if logic in your survey may rely on preloaded data being of a specific type, such as "Date" or "Decimal Number." If you define the wrong type in the Preload Editor, the calculations and show-if logic may fail.
Avoid jumps
Except for the following cases, using show-if conditions is always preferable to using jumps:
You want a participant to jump directly to the end of the survey, submitting the survey in the process.
Setting a single jump condition will prevent you from having to set many show-if conditions.
Why
Surveys containing more than one jump are difficult to test. Testers (including even the survey designer) may not know why certain questions or groups of questions never appear.
Surveys containing more than one jump are difficult to maintain. You may add new questions to a survey with multiple jumps, and those questions may never appear. Redefining or deleting the jumps may alter the behavior of the rest of the rest of the survey in unintended ways.
Backward jumps can lead to infinite loops. For example, if a survey jumps from question #10 back to question #2, a participant may never be able to get beyond question #10.
Unlike jumps, show-if conditions are attached to specific survey objects and are displayed in the Survey Designer. This makes it much easier to see what conditions cause an object to be displayed or hidden.
Avoid the Date, Time, and Date/Time data types for questions
The Date, Time, and Date/Time data types rely on values having specific formats. Values that may appear valid may not be accepted because of formatting requirements, and this may frustrate survey participants. For example, the date "Thu, 03 Jan 2002" is valid, but "Thurs, 03 Jan 2002" is not. "Thursday, January 03, 2002" is valid, but "Thu January 03, 2002" is not. Try writing an error message that will explain this to a participant. The Date, Time, and Date/Time data types will accept a standardized set of date and time formats, and may reject or incorrectly interpret dates and times in non-standard formats. Dates may also be misinterpreted in cases where the participant is in a different cultural locale than the Illume server. (E.g. Servers in the US are configured to interpret 06/12/2005 as June 12, 2005. A participant in the UK typing in that date would mean December 6, 2005, but the date will show up in the survey results as June 12!) When asking a participant to supply a date, the best solution may be to specify a format. For example, "Please enter your date of birth (mm/dd/yyyy)." Another solution is to create three questions: a poplist containing the 12 months, a poplist containing 31 days, and a poplist containing a valid range of years. See Date and Time Data for more information.
Do use the Date, Time, and Date/Time data types when appropriate for preloading participant data
Because Illume uses Microsoft's .NET framework to interpret and store dates, Illume will correctly interpret and store dates that were produced by other Microsoft products running on computers whose locale is the same as the locale of the Illume server. Exporting data from Microsoft Excel, Access, or SQL Server into a participant list is generally safe. You can preload these dates (and times and datetimes) into a variable of type Date (or Time or Date/Time). Use the Date data type only for variables that must include a day, month, and year. If your variable requires only one of these values (day or month or year), choose the whole number or text data type. Choose Date/Time data type only for variables that require a day, month, and year value with an optional time value. See Date and Time Data for more information.
You may lose your connection to the Illume server after an extended period of inactivity, or if there is a problem with your network connection. To reconnect, simply choose the Reconnect option from the Survey Console's File menu. You will need to log in again.
If you have more than one Illume login and you want to switch to your other login while you are already connected, File > Reconnect will let you do that when it presents the login dialog.
The Survey Console lists surveys available for editing and review. The surveys that appear beneath the My Surveys tab are on your computer's hard drive and are available for editing. Surveys appearing in red type were checked out from the Illume server to which you are currently connected. Clicking on the Name column header sorts the surveys by name in ascending or descending alphabetical order.
The Survey Administration tab lists the surveys available on the Illume server, along with the status of each survey. From this list, you can preview surveys, check them out for editing, and (if you have sufficient privileges) publish or suspend surveys.
To create a new survey:
1. Choose New... from the Survey Manager's File menu, or right click in the My Surveys pane and select New... from the context menu.
2. Choose a template for your survey. The template determines how the survey will appear in a participant's web browser. If you are not sure which template to choose, choose the Default Template. You can change the template later if you want the survey to have a different look.
3. Type a name for your survey into the New Survey Name field. You must choose a name that is not already in use. (The survey manager lists the names of all of the available surveys.)
4. Click Create Survey.
To edit an existing survey, simply double-click on the survey name in the My Surveys tab of the Survey Console. If the survey does not appear under the My Surveys tab, you will have get a copy of it from the Illume server. See Checking Out a Survey for details.
Editing a Specific Language Within a Survey
If your survey includes more than one language, and you have translation tools enabled, you can view and edit the survey in any of its component languages. Simply choose Edit > Languages, and pick the language you want to work with.
The languages that appear in the list include all of the languages into which the survey has been translated. The language marked by an asterisk (*) is the survey default language.
To clone a survey, right click on the name of the survey in the Survey Manager and select the Clone... option from the context menu.
Type in a name for the new survey when prompted. Check the box next to "Do not include disabled items in clone" to omit survey items whose show-if condition is set to "Never shown (disabled)."
Click OK to create the clone.
To delete a survey, right click on the name of the survey in the Survey Manager and select the Delete option from the context menu.
When deleting from the My Surveys tab, you can only delete a survey that has not yet been checked in. To permanently delete a survey from the Illume server, use the link below to Deleting a Survey in the Survey Administration section.
To rename a survey, right click on the name of the survey in the Survey Manager and select the Rename... option from the context menu. Type in a new name for the new survey when prompted, and click OK.
A survey's description appears in the Web Console, on the survey console page, just below the survey name.
To edit this description:
Right click on the survey under the Survey Administration tab.
Choose Edit Survey Description... from the context menu.
Type the new description.
Click OK.
The End Page is the page participants see after they submit the survey. Illume enables you to define custom content for the end page. Each block of end page content can include show-if conditions so that it appears only to participants who meet specific criteria. For example, your survey may screen participants to see if they are eligible for a more detailed follow-up study. Those who qualify for the follow-up study will see on the end page an invitation to participate in the follow-up. Others will see only a message thanking them for their participation. You can determine which content a participant sees by attaching simple show-if logic to each end page content block. For example, the "invitation" may appear to all participants who answered yes to a certain question. Anyone who did not answer yes will see the thank you message.
Creating End Page Content
To create a End Page content, follow these steps:
Choose Survey > Add/Edit Survey End-Page Content... from the Survey Designer menu.
Click the Add button.
Use the HTML editor to create the content. (See Using the HTML Editor below for details.)
(Optional) Click the Show-if tab to set the show-if conditions under which this page should appear. (See the link below.)
(Optional) Click the Data Dictionary tab and enter a descriptive name for this page. This makes the survey easier to edit when you have many end pages.
Click OK in the HTML editor.
Click Done in the Survey End-Page editor.
Can a participant see content from more than one block of content on the end page?
Yes. If a participant meets the show-if conditions for more than one block of end page content, the content from each end page will appear in the same order that the content appears in the End Page Content Editor. All of the content appears on a single HTML page. For example, assume your survey has one question that asks "Which end page would you like to see?" The options are "blue," "red," and "green." You survey has the following four end pages:
Blue End Page Anyone who answers "blue" sees this page.
Red End Page Anyone who answers "red" sees this page.
Green End Page Anyone who answers "green" sees this page.
Default End Page All participants see this, no matter what they answer
When the End Page Content blocks are in this order...
participants will see the content from either the red or green or blue end page, followed by the content from the default end page. (Note that there is no show-if condition on the default end page content, so everyone sees it.) However, when the End Page Content blocks are in this order...
participants will see the default end page content first (i.e. at the top of the page), followed by either the red or green or blue end page content.
Survey redirects allow participants to be redirected to another web site or URL after they have submitted a survey. Survey redirects can also be used to chain one survey to another.
If you need the redirect to occur in the middle of a survey, a Jump object can added that specifies “Jump to the end and automatically submit” and the redirect will occur after the submit.
Click the Only active if… radio button and the Active-If… button if the redirect is to be conditionally performed based on the values of specific questions and calculations.
How redirects work
After a participant submits a survey each redirect is visited in top to bottom order in which they are specified in the Survey Designer. The participant is redirected to the first redirect that matches the criteria. Once a participant matches the criteria of one redirect, all redirect and end page processing stops. This means that if a redirect is being performed, no end page Text/HTML object content will be displayed. For SDK users this means that no runtime content objects in the end page will be processed.
It is important to note that order is very important when specifying redirects. To change the order of redirects, click on a redirect in the Survey Redirects dialog and drag it up or down.
The Survey Designer keeps track of up to 8 previous changes. You can undo any of these changes by choosing Edit > Undo from the Survey Designer menu, or by pressing Control-Z.
You can redo any action you have undone by choosing Edit > Redo from the Survey Designer menu, or by pressing Control-R.
How Illume Constructs the Data Dictionary
Every Illume survey includes a collection called Root, which contains all of a survey's items.
Each of the collections immediately below the Root collection becomes a Section in the Data Dictionary. The section name is the same as the collection name.
By default, each section of the Data Dictionary contains the contents of the top-level collection and the contents of any other collections within that top-level collection.
That is, if your survey contains collections C1, and C2 under the Root collection, the Data Dictionary will display sections C1 and C2. If C1 contains another collection called C1_Subsection, that sub-collection will not appear in the Data Dictionary. All of the questions in C1_Subsection will be listed with the items in C1.
This may not always produce the best results. In some cases, a single section of the data dictionary may wind up with hundreds of questions, making it difficult for data analysts to find specific items. Customizing the sections of the Data Dictionary solves this problem.
Customizing the Data Dictionary
You can make any collection in your survey appear as a section in the Data Dictionary, and you can customize the section's name.
Double click a collection in the right pane of the Survey Designer to bring up the Collection Editor.
Check Make this collection a section in the data dictionary.
Type a name in the Section title field.
Click OK.
To see how this appears in the Data Dictionary, choose Tools > Review Data Dictionary... from the Survey Designer menu.
To see your survey's Data Dictionary, choose Review Data Dictionary... from the Tools menu. This displays the same data dictionary that appears in the Web Console.
For more information, see the Related articles below.
Beginning in Illume 4.5, you can drag an entire survey out of the Survey Console and drop it into a folder or application. For example, you can drag a survey into Microsoft Outlook email message, and Outlook will attach the survey the email you are composing. The recipient of your email can then drag the attachment back into Illume for editing.
The survey that you drag into and out of Illume is an XML document. It's in a format that another Illume user can edit with the Illume Survey Designer. It's not in a format that a survey participant can fill out.
Because the survey is an XML file, the types of applications into which you can drag it include email clients (such as Microsoft Outlook), text editors (such as Notepad), and browsers (such as Internet Explorer and Mozilla Firefox).
Illume surveys include numerous customizable settings, such as page headers and footers, stylesheets, error messages, numbering styles, and more. To view and edit these preferences, choose Edit > Preferences... from the Survey Designer menu.
This brings up the Survey Preferences Editor, in which you can review and edit each of the preferences described below. Illume automatically saves your survey changes when you click OK in the Survey Preferences Editor.
To edit general survey preferences, choose Edit > Preferences... from the Survey Designer menu. The Survey Preferences Editor will appear with the General preferences tab showing.
A survey's general preferences include the following:
Survey Window Title
The title of the survey appears in the title bar at the very top of the participant's browser window, above the toolbar, and outside of the HTML page that contains the survey questions.
Question Numbering
Illume provides options for manually or automatically numbering questions. While manual question numbering offers more control, keep in mind that if you move questions that are manually numbered, you may have to re-number many items in your survey.
If you choose to have Illume automatically number questions, you will never have to reassign question numbers when you add, move or delete questions from your survey.
Automatic numbering provides the following options:
Sequentially number items as they appear Each item is assigned a number as it appears. If participants skip questions because of show-if logic, the participant sees no break or jump in the numbering sequence, and so has no idea that he skipped any questions.
Globally assigned numbering provides a number for each item based on its absolute position in the sequence of questions. For example, the 30th question in your survey will always have the number 30. If a participant skips questions 15-29 due to show-if logic, the participant will see the question numbers skip from 14 to 30.
Sequentially number items, restarting the sequence for each page This option starts the numbering at 1 on each page.
Question numbering style determines how the numbers will appear. Sub-question numbering styles determines how sub-question numbers will appear. This applies to the numbering of individual items within Question Tables.
The sub-question numbering options have the following effects:
Any formatted option will number items according the selected format. For example, if you choose option 1.1) 1.2) 1.3) ..., the items with Question Table #4 would be numbered 4.1, 4.2, 4.3, etc.
None will assign no numbers to items within the Question Table.
Number sub-questions in sequence will continue the survey's main numbering sequence straight through the sub-items in the Question Table. For example, if the Question Table is the 11th question on the survey, and it contains 4 items, those items will be numbered 11, 12, 13 and 14. The next question will be question #15.
You can turn off numbering altogether by checking the "Don't number questions' option on the General tab of the Survey Preferences Editor.
Number Styles
In addition to sequencing, you can choose a numbering style for your survey. Styles include Arabic and Roman numerals followed by different types of punctuation.
Simply choose the style you prefer from the list of available styles. Question numbering styles apply to question numbers, while sub-question numbering styles apply to the individual prompts of question blocks.
Setting an Image Next to Unnumbered Questions
If you choose not to number the questions in your survey, Illume will automatically add a small image to the left of each new question prompt. This serves as a visual marker to alert participants to the start of a new question. By default, the image is a small blue triangle. If you don't like the default, follow these steps to use your own image:
On the General Tab of the Survey Preferences editor, check Do not number questions.
Check Custom image URL.
Click on the button to choose an image.
If you have already added the image to your survey, it will appear in the list of Survey Resources. Simply select the image. If you have not yet added the image, see Working with Survey Resources for information on how to add a new image. If you would like to add an image from a publicly available URL, check the URL option and type in the URL.
Click OK to close the Survey Resource window.
Click OK to save your settings and close the Survey Preferences window.
Illume includes an HTML editor that enables you to customize the page header, page footer, and resume page of each individual survey.
Customizing the Survey Page Header
The page header appears at the top of every HTML page in your survey. To edit the page header:
Choose Edit > Preferences... from the Survey Designer menu
Click on the Page Text tab.
Select "Page Header" from the "Set text for" list.
Edit the header in the HTML editor.
Click OK
Customizing the Survey Page Footer
The page footer appears at the bottom of every HTML page in your survey. To edit the page header:
Choose Edit > Preferences... from the Survey Designer menu
Click on the Page Text tab.
Select "Page Footer" from the "Set text for" list.
Edit the footer in the HTML editor.
Click OK
Customizing the Survey Resume/Restore Page
Illume surveys include a resume/restore feature that allows participants to log back in to resume a partially completed survey. When a participant logs in and Illume finds a partially completed survey for that user, Illume presents a resume/restore page, which asks the user whether they would like to resume the existing survey where they left off, or start over with a new survey.
You can customize the message on the resume/restore page by following these steps:
Choose Edit > Preferences... from the Survey Designer menu
Click on the Page Text tab.
Select "Survey Resume/Restore Page" from the "Set text for" list.
Edit the page in the HTML editor.
Click OK.
Customizing the Survey Suspended Page
A suspended survey is one that has been published, but is not currently available to participants. The "Survey Suspended" page text is what participants will see if they come to your survey when the survey is suspended.
To customize the message on this page:
Choose Edit > Preferences... from the Survey Designer menu.
Click on the Page Text tab.
Select "Survey Suspended Page" from the "Set text for" list.
Edit the page in the HTML editor.
Click OK.
Customizing the Save Page
The save page appears when a participant clicks the Save button. This saves the participant's responses so he/she can continue the survey later. See Setting up Save and Restore for details.
Customizing the Cascading Style Sheet(CSS)/JavaScript Page
The Cascading Style Sheet(CSS)/JavaScript page is a place where custom CSS and/or JavaScript code can be set and included on every survey page. The content specified on this page is inserted between the tags on every page of the survey.
This page text can be edited by selecting the Edit > Preferences... menu option, clicking the Page Text tab, and then selecting the Cascading Style Sheet(CSS)/Javascript option in the Set text for: poplist.
Custom CSS styles must be defined between style tags. DatStat advises naming custom CSS styles with a custom prefix (e.g. “.__”) in order to avoid collision with the built-in DatStat survey styles.
Example of a custom CSS style:
This page can also be used to modify a built-in DatStat survey style. These styles are subject to change between versions of the product but such changes are not common. DatStat advises caution to customers changing the built-in styles and, if possible, recommends thorough testing of active surveys before upgrading to the next version. There are no guarantees that changing a built-in style will work on the next version of the product.
Custom JavaScript must be defined between script tags. This JavaScript code can either be inline or reference a resource. The JavaScript placed on this page cannot directly reference form elements because the content of this page is placed between the head HTML tags, however, form element objects can be passed as function arguments to JavaScript functions declared on this page.
Example of inline JavaScript:
Example of referencing JavaScript source from a resource:
Illume surveys include a standard set of buttons for common actions such as navigating forward or backward, submitting a survey, saving a survey, etc.
You can customize the text and positioning of these buttons, and configure them to use images instead of the standard browser buttons with text.
To customize survey buttons, follow these steps:
Choose Edit > Preferences... from the Survey Designer menu
Click on the Button tab.
Set the options for each button (described below).
Click OK.
Available Buttons
Illume surveys include the following buttons:
Launch The launch button appears on the launch page of surveys that run in a stripped down browser window. (That is, a browser window with no toolbar, no address bar, no forward and back buttons, etc. For more info on launching a survey in a stripped-down browser window, see the section on Embedding a URL to Launch the Survey with No Toolbar in the article Email Text.)
Login The Login button appears on the login page. Participants click this to log in to the survey.
Restore The Restore button appears on the Survey Resume/Restore page. When a participant logs in and Illume finds that he or she has a partially completed survey, the Resume/Restore page asks whether the participant would like to resume work on the incomplete survey, or start from the beginning with a new survey. Clicking the Restore button restores the incomplete survey, returning the participant to the page at which he or she left off.
Start Over The Start Over button appears on the Survey Resume/Restore, described in the previous bullet point. Clicking Start Over deletes the participant's incomplete survey and presents the participant with a new copy of the same survey.
Next The Next button is what participants click to go to the next page of the survey. In the default survey template, this button is located at the bottom right corner of the page. It appears on all but the last question page.
Previous The Previous button is what participants click to go to the previous page of the survey. In the default survey template, this button is located at the bottom left corner of the page. It appears on all but the first question page.
Save Participants can click this button to save their survey without fully submitting it. Illume stores all participant responses, even before the participant submits the survey. When a participant abandons a survey, Illume has captured all of the participant's responses except the responses on the last page the participant was working on. If the participant clicks Save, Illume does save the responses on the last page the participant was working on. After saving, a participant may resume the survey later. Authenticated participants can resume the survey by using the same URL they used to start the survey in the first place. Non-authenticated participants can choose request an email from Illume containing a special URL that will allow them to resume their survey. See Send Email, below.
Submit The Submit button submits a survey. This button appears only on the survey's final question page.
Close The Close button closes a browser window. This button appears only on the Survey End page (which participants see after they submit a survey), and only if the survey was launched in a popup window.
Resume Non-authenticated users can click the resume button to start answering questions where they had previously left off. This button has the same effect as the Resore button.
Send Email When a non-authenticated user clicks Save to his survey responses, he needs some way to get back to his survey if he ever wants to complete it. The Send Email button appears after the participant clicks save. If the participant supplies an email address and clicks this button, Illume will send him an email containing a special link back to his survey. To make the Send Email button appear, you must define button text or a button image, and you must check a placement option for both the Save and Send Email buttons. The Send Email button is not necessary for authenticated surveys. In other words, if your survey only allows participants from specified participant lists, you do not need to use the Send Email button. In authenticated surveys, each participant has a unique URL to access the survey. If they save and return later through the original URL, Illume will know who they are, and will give them the option of resuming their in-progress survey or starting over.
Setting Button Text
To set the text for any button, click on the name of the button in the Buttons list, then type the text in the Button Text field. Your changes will take effect when you click OK.
Setting Button Images
To replace a simple HTML button with an image:
Select the button from the Buttons list and enter a URL for the image in the Image URL field. The URL may point to either a survey resource or to an absolute URL.
Click the button with the 3 dots next to the Image URL field. This brings up the Button image editor.
To use a survey resource, check the Resource option and choose the image you want from the list of available resources. If the image does not appear in the list of available resources, click New Resource... to upload it. (See Working with Survey Resources for details on uploading images and other resources.)
To use a URL, check the URL option and type in an absolute URL. An absolute URL is one that like http://www.datstat.com/images/newlogo.gif that includes the http:// or https:// prefix and a full path to the image. The URL does not have to point to the same server, or even the same domain as your survey. It does have to point to a publicly accessible web server, or your participants may not be able to see it.
Click OK.
When you set a button image, the text in the Button Text field becomes that alt text of the button. Alt text appears when the mouse hovers over the button and when the browser is unable to load or display the image.
Placing Buttons
Each button can appear in more than one place on your survey pages. To place a button, select the button from the Buttons list, then check one or more of the Placement options.
Ordering Buttons
In some cases, you may have selected more than one button to appear in the same location on the page. For instance, you may choose to place the Previous, Save, and Next buttons in the bottom center of the page.
To set the order in which these buttons display,
Choose the placement group you want to order under Button Groups.
In the middle list under Button Groups, choose the group of buttons you want to order.
Note that in the image above there are two groups of buttons: "Previous, Next, Save" and "Restore, Start Over." These appear as separate entries, and can be ordered separately, because the appear on different pages of the survey. The Previous, Next, and Save buttons appear on survey pages that contain questions. The Restore and Start Over buttons appear only on the first page participants see when they return to complete a survey they started earlier.
Choose a button under the Order Buttons list on the right. Click Up to move the button up in the display order, or Down to move it down. Buttons are displayed left to right on the survey page, so the button at the top of the list appears furthest to the left, while the button at the bottom appears furthest to the right.
Click OK to save your changes.
Survey parameters are custom variables consisting of a name and a value. Generally, you use them to display data that may appear in several places throughout the survey and/or data that may have to change frequently.
For example, if you administer an employee satisfaction survey every quarter you may create a parameter called "quarter", and then change the value of this parameter from "Spring" to "Summer" to "Fall" to "Winter", as necessary.
In question prompts, text and HTML throughout your survey, place the marker {ParamValue:quarter} wherever you want the quarter to appear. Illume will automatically replace {ParamValue:quarter} with the value of the "quarter" parameter when it displays pages to survey participants.
Similarly, if your questions ask participants about a specific product, you may want to create a parameter for the product name. Then, if you want to ask the same questions about another product in the future, you can retrieve the questions from the repository, drop them into a new survey, and change the product name parameter in the survey to the name of the new product. Illume will then automatically insert the new product name into all the question prompts.
Adding and Editing Survey Parameters
To set survey parameters, follow these steps:
Choose Edit > Preferences... from the Survey Designer menu
Click on the Parameters tab.
To add a new parameter, click in the Parameter Name column in the last available row. (This is the row marked by a star.) To edit an existing parameter, click on the name of the parameter in the Parameter Name column.
Type the name of the parameter in the left column, and the value in the right column.
Click OK
Deleting Survey Parameters
To delete a parameter, click in the gray column to the left of the parameter name. This highlights the parameter name and value. Press the delete key on your keyboard.
Displaying Survey Parameters
To display a survey parameter in a question prompt or in the survey's HTML, simply type {ParamValue:NAME_OF_PARAMETER}, substituting the actual parameter name for NAME_OF_PARAMETER. Illume will display the proper parameter value when the survey appears in the previewer, or in a participant's browser. For more information about adding custom HTML to your survey, see "Using the HTML Editor."
All Illume surveys include a set of default error messages. These are messages that participants will see when they fail to provide a valid response to a survey question.
Note: You can also create a custom error message for any question in your survey. See Setting a Question's Response Guides. A default error message appears only for questions that does not have a custom error message.
To customize your survey's default error messages, follow these steps:
Choose Edit > Preferences... from the Survey Designer menu
Click on the Error Messages tab.
Choose the message you want to edit from the "Error message for" list. The items on this list are described below.
The message appears in the main text area. Edit the message as you please. Note that error messages may include some parameters enclosed in curly braces. These are described below.
Click OK
Default Error Message Types
Illume surveys include the following default error message types:
General validation error This message appears when a participant supplies an invalid response no more specific error messages is applicable.
Missing required response This message appears when a participant has not responded to a required question.
Minimum number of responses not met This message appears when a participant has not checked the minimum number of checkboxes required. For example, if you ask participants to check their top three reasons for choosing product X, those who indicate less than three reasons will see this error message.
Maximum number of responses exceeded This message appears when a participant has checked too many of the checkboxes in a single question. For example, if you ask participants to check their top three reasons for choosing product X, those who indicate more than three reasons will see this error message.
Minimum length of response not met This message generally applies to text questions, appearing when participants have not typed enough text.
Maximum length of response exceeded This message generally applies to text questions, appearing when participants have typed too much text.
Response less than minimum allowable value This message appears when a participant enters a numeric value that is less than the allowed minimum.
Response <= minimum allowable value This message appears when a participant enters a numeric value that is less than the allowed minimum.
Response more than maximum allowable value This message appears when a participant enters a numeric value that is more than the allowed maximum.
Response >= maximum allowable value This message appears when a participant enters a numeric value that is more than the allowed maximum.
Invalid date/time response This message appears when a question requires a date or time response, and the date or time that the participant provides is not valid.
Response is not a valid integer value This message appears when a question requires an integer response, and the participant's response is not a whole number.
Response is not a valid positive integer value This message appears when a question requires a positive integer response, and the participant's response is not a whole number greater than zero.
Response is not a valid currency value This message appears when a question requires a currency response, and the participant's response is not a valid currency value.
Response is not a valid floating-point value This message appears when a question requires a decimal response, and the participant's response is not a valid number. Note that both whole numbers and decimal numbers are valid floating-point numbers.
Response does not match specified format/meta-type This message appears when a participant's response does not match the meta-type you have defined for your question. Meta-types include common pieces of data that must conform to a pattern, such as phone numbers, email addresses, and zip codes.
Survey participant login failure This message appears when a participant tries to log in with an incorrect name and/or password.
Submission already exists for this survey participant This message appears when a participant tries to log in after having submitted a survey.
Login failure due to duplicate participant credentials This message appears when a participant tries to log in and the participant contains more than one entry for the participant's login id. For example, if your survey uses the CUSTOMID field from the participant list to uniquely identify participants, and the list contains two entries with the CUSTOMID 'jason555', anyone attempting log in with this id will see the duplicate credentials message. This happens because Illume has no way of knowing which jason555 is currently trying to log in.
Session from authenticated survey has timed out This message appears when a participant submits a survey page after an extended period of inactivity. The participant must log in again to continue to survey. Illume retains all of the participant's responses, even those submitted after the session expired. (The default session timeout for Illume surveys is generally set to 30 minutes. If you are running your own Illume server, you can change the session timeout by setting the SessionCacheTimeout variable in the Web.Config file for the Illume Collector application.)
The email address entered on the Save page is invalid This message appears if the participant enters an invalid email address. Illume will not try to send an email if the address is invalid. Notice that the message above uses the special tag {SavePageEmailAddress}. In the actual error message, this will be replaced with the email address that the participant entered.
There was a problem sending an email to the participant from the Save page This message appears after the participant clicks the Send Email button if Illume was not able to send the email.
An email was sent successfully to the participant from the Save page Illume displays this message to confirm that the email was sent.
Special Parameters for Default Error Messages
Default error messages include special parameters to make them meaningful for participants. Each of these parameters is replaced by a relevant value while the survey is running.
For example, if you define this default error message:
The value, {Response}, specified in question #{QNum} is greater than the maximum allowed value of {MaxValue}.
When a participant provides an invalid response, Illume replaces these three parameters with 1) the participant's response, 2) the number of question to which the participant was responding, and 3) the maximum allowed value for the particular question.
As a result, the actual error message that a participant sees will look like this:
"The value, 150, specified in question #12 is greater than the maximum allowed value of 100."
Default error messages can use the following parameters:
{QNum} The number of the current question.
{MinRequired} The minimum number of required responses, as specified in a question's Response Guides. This primarily applies to checkboxes, where a participant can select several answers to a single question.
{MaxRequired} The maximum number of allowed responses, as specified in a question's Response Guides. This too primarily applies to checkboxes, where a participant can select several answers to a single question.
{MinLength} The minimum number of typed characters required for a response to the current question, as defined in the question's Response Guides. This generally applies to text questions.
{MaxLength} The maximum number of typed characters allowed for a response to the current question, as defined in the question's Response Guides. This generally applies to text questions.
{MinValue} The minimum value required for a response to the current question, as defined in the question's Response Guides. This applies to questions requiring numeric responses.
{MaxValue} The maximum value allowed for a response to the current question, as defined in the question's Response Guides. This applies to questions requiring numeric responses.
{Response} The actual response that the participant supplied to the current question.
{SavePageEmailAddress} This is used on the Save page only, for the error message that appears if the participant enters an invalid email address.
Survey Styles
Illume's Survey Styles Editor enables you to define styles that will be applied throughout your survey. Style can be set broadly, at they survey level, or more narrowly to items such as buttons or question prompts.
Defining Survey Styles
To define styles:
Choose Edit > Style... from the Survey Designer menu.
In the left pane of the Survey Styles Editor, click on the name of the item whose style you want to set. For example, in the image below, Question Prompt is highlighted, so the image properties being defined will apply to all question prompts throughout the survey.
In the right pane, click the area to the right of each property you want to set, and choose from the list of available settings.
Repeat this for each of the survey objects for which you would like to set properties.
Click OK to save your settings.
After clicking OK, use the survey previewer to see how your survey looks with the new styles.
How Styles Are Applied
Illume uses Cascading Style Sheets (CSS) to define the fonts, colors, borders, and other stylistic elements of your survey. The styles you define will apply to the selected object and to all of the items contained within the selected object, except where you explicitly define those properties differently. To understand what this means, look at the left pane of the Survey Styles Editor. It shows a hierarchy of survey objects. At the top of the hierarchy is the object called Survey. If you choose the Survey object in the left pane and then define properties like font, color, etc., those properties will be applied to all objects within the survey, except where you explicitly define them differently. Similarly, if you define properties for Question, those properties will apply to Questions and to all of the sub-items below it in the hierarchy: Question Numbers, Question Prompts, Scale Labels and Values, Question Error Messages, etc. To override these settings in any of the Question sub-items, select the sub item and define the properties you want.
Overriding Styles: An Example
Example: You want your survey to use Verdana font throughout, and to display black text everywhere except in the question prompts. The question prompts should use bold blue text in the same Verdana font. To do this, you would follow these steps:
Choose Survey in the left pane of the Survey Styles Editor, and set FontFace to Verdana, and FontColor to #000000 (black).
Then choose Question Prompt in the left pane, and set FontColor to #3333CC (blue) and FontStyle to Bold.
Click OK.
Question prompts will now appear in bold blue Verdana font, while the rest of the survey will appear in black Verdana font. Notice that by not setting the FontFace property for Question Prompts, you are choosing to use the font face defined further up the hierarchy in the Survey object.
Survey Styles vs. Custom HTML
When you add a question prompt, a response option, or some custom HTML to your survey, Illume provides an HTML editor that enables you to format your text as you compose it. What happens if your Survey Style says the font color should be blue and you used the HTML editor to make some green text? The text will be green. Any formatting you apply in the HTML editor overrides the formatting from the Survey Styles Editor.
Survey Objects
You can set styles for the following objects. Note that not all styles apply to all objects. For example, you cannot set border properties for Radio Buttons and Checkboxes because these items do not have borders.
Object
Definition
Survey
Properties you apply to the Survey object will apply to all parts of your survey where those properties are not otherwise defined.
Header
The header appears at the top of each page of your survey. You define header content in the Page Text tab of the Survey Preferences Editor.
Progress Bar
The progress bar (if enabled) appears on all pages of the survey to indicate how far a participant has progressed.
Collection
Properties applied to a collection are applied to all elements within all collections.
Text/HTML
Properties applied to Text/HTML objects will affect all Text/HTML objects, but note that any formatting you apply within the HTML editor will override the style properties.
Collection Error Messages
These are error messages that are not associated with a particular question. Examples include messages for invalid logins and attempts to submit a survey more than once.
Question
Properties applied to questions will affect all parts of all questions (prompts, response options, question numbers, etc.) except where overridden.
Question Number
The Question Number appears to the left of each question prompt in the survey. (Question numbers will not appear of question numbering is disabled in the Survey Preferences.)
Question Prompt
The Question Prompt is the text to which participants respond.
Scale Labels and Values
Scale Labels are the response options from which a participant chooses when answering a question. Scale Values are the values associated with each label. Generally, only Labels are displayed to the participant.
Alternating Radio Scale Labels
This sets the background color of even numbered scale items in radio type questions.
Alternating Checkbox Scale Labels
This sets the background color of even numbered scale items in check all that apply questions.
Question Error Messages
Question Error Messages are the messages participants see when they have failed to supply a valid response to a question.
Note that most error messages for most users will appear as JavaScript alerts (the little pop-up dialog with the OK button). You cannot set styles for JavaScript alerts. This is a limitation of browser technology, not a limitation of the Illume product.
Any errors that are not caught by the JavaScript validation will be caught by the Illume server, and the server will display an error message in the current page of the survey. When you define styles for Question Error Messages, the styles are applied to these messages.
Input Controls
Input controls include items like text boxes and popup menus. Font properties apply to the text within the controls.
Radio/Checkbox Controls
The only property available for Radio and Checkbox controls is ControlSize. Set this to a numeric value to set the height and width of the controls.
A value of "20" will set the height and width to 20 pixels. A value of "20pt" will set the height and width to 20 points.
Question Tables
Question Tables are groups of questions that share a common set of responses. The prompts for each question appear in the first column of the table, and the response options appear in the following columns. Any attributes you set for Question Tables will apply to Row Headings, Column Headings, Alternating Row and Alternating Column, unless you specifically override the settings in any of those objects.
Sub-Question Number
Properties you define here apply to the question number that precedes the prompt of each item in a Question Table.
Prompts
Properties you define here will apply to each individual prompt within a Question Table.
Column Headings
Column Headings in Question Tables appear at the top of each of the columns that contains a response option. The text of the response options is printed in the column headers.
Alternating Row
Alternating Row properties will be applied to the even numbered rows in a Question Table.
Alternating Column
Alternating Column properties will be applied to the even numbered columns in a Question Table. The properties will not apply to the question prompts.
Alternating Question
The background against which survey questions appear alternates by default between white and yellow.
Button Box
The Button Box is the area around the buttons at the top and/or bottom of the page. It extends almost to the full width of the page, and is normally not visible. You can make it visible by setting a background color and border.
Buttons
The properties you set here will apply to all of the buttons in your survey.
Footer
The footer appears at the bottom of each page of your survey. You define footer content in the Page Text tab of the Survey Preferences Editor.
Valid Values for Style Properties
Most style properties present a list of valid values from which to choose. Those properties that do not display a list of valid values expect you to supply numeric values. Some properties, such as font size, allow you to ignore all of the items on the list and type in a number of your choosing. Numeric values use the following units:
Unit
Abbreviation
Description
Pixels
px
One pixel represents 1/72 of an inch (1/29 cm.) on most computer monitors, though it may represent 1/90 of an inch (1/36 cm.) on some monitors.
Points
pt
One point represents 1/72 of an inch (1/29 cm.).
Picas
pc
One pica is 12 points (1/6 in. or about 2/5 cm.)
Inches
in
One inch is 72 points, or approximately 2.5 cm.
Centimeters
cm
One centimeter is approximately 29 points, or 0.4 inches.
Millimeters
mm
One millimeter is approximately 3 points or 0.04 inches.
Em
em
Em-units are calculated relative to each participant's system-wide default font-sizes.
Ex
ex
An ex unit is the height of the letter x calculated from the participant's system-wide default font size. This height will differ for each font.
Percent
%
Percent values represent widths relative to the nearest block-level container. E.g. If you set the width of a button to 50%, the button will be half as wide as the table cell that contains it.
Of these units, pixels, em-units and percents are generally best for the Web because computers can scale these units as necessary for the participant's monitor.If you set the value of a property to a simple number, like 12, the Survey Styles Editor will assume points as the unit, and will set the value to 12.00pt. If you mean to set the value to 12 points, you should specify 12pt. If you mean to set the value to 12 percent, you should specify 12%.
Font Size and Section 508 Compliance
While you may set font sizes to a numeric value such as 12pt or 16px, Illume uses em values by default to comply with Section 508 of the US Rehabilitation Act. If your survey needs to comply with Section 508, you should use em values to define font sizes because em values set font sizes relative to each participant's system default font sizes. Participants who have difficulty reading text on a computer monitor will generally use a large font size as the default. Em values respect these settings. For example, and em value of 1.00 displays text at exactly the system default point size. An em value of 1.50 displays fonts at 1.5 times the system default font size.
Items which require participants to select a single answer, such as poplists and radio buttons, may include an "unanswered" option reminding participants to answer the question.
Generally, this is a simple message, like "Select One" or "Please Answer." It appears as the first option in a poplist. In a radio group, it appears as the first answer, and is displayed in red text.
To customize unanswered data labels, follow these steps:
Choose Edit > Preferences... from the Survey Designer menu
Click on the Responses tab.
Type in the label for poplist items and/or radio group items.
Click OK
Suppressing the "Unanswered" Option
If you do not want the "unanswered" option to appear, leave the unanswered data label fields blank.
Beginning in Illume 3.0, all surveys include a survey-wide default setting to indicate whether responses are required or optional. This default setting applies to each question in your survey*, unless you specify otherwise.
To set the survey-wide response requirement:
Choose Edit > Preferences from the survey designer menu.
Click the Responses tab.
Choose the desired option under Responses Required.
Click OK.
While this setting provides a default, individual questions can override the default. Follow the link to the article "Setting a Question's Response Guides" below for instructions on how to override this setting for an individual question or for a group of questions.
* Note: The survey-wide response requirement does not apply to attached text fields. These are always optional by default. You can make attached text fields required on a case-by-case basis. See "Setting a Question's Response Guides" below.
Beginning in Illume 3.0, all questions inherit a survey-wide "required" setting which describes whether questions are optional or required. Each individual question within a survey can override the survey-wide option. (See the links below for more information on survey-wide and question-specific settings.)
Illume also provides a convenient way to whole sets of questions as "required" or "optional."
Select sevaral items in the right pane of the survey editor. You can do this by holding down the Control key while you click on each of the items. You can also click a single item, then hold down the shift key while you click another item. Holding the shift key causes everything between the first and second items you clicked to be selected.
Right click anywhere within the selected group and choose Set Required... from the context menu.
Choose one of the two "Response Required" options to apply to the selected group.
The Use preferences setting option causes the questions to inherit the survey-wide default setting, which appears in red text.
The Always use the following setting option overrides the survey-wide setting.
If you selected a mix of questions and collections, and you want your setting to apply to all of the items within the collections you have selected, check the box labeled Include items in selected collections.
Click OK to apply the settings.
When you check the Always use the following setting option, the setting continues to apply to your selected questions, no matter what you do to the survey-wide "required" setting. The only way to change the setting is to manually change the "required" setting for the specific question or group of questions.
Note: The setting you apply to the selected group does not apply to attached text fields. These are always optional by default.
In the left pane of the Survey Designer, select the folder in which you would like to add the new collection. Click once on the name of the folder to select it.
Click the Add a collection... icon in the toolbar or choose Survey > Add Collection... from the menu.
(Optional) Give your collection a unique name. If you don't care about the collection's name, simply use the unique name that Illume has supplied.
(Optional) Choose a default name prefix. See below for more information about these prefixes.
(Optional) Type a description of the collection. The description can be helpful to you and others who maintain the survey.
(Optional) Click on the Show-if tab and set the conditions under which this collection will appear. See Setting Show-if conditions for more information.
Click OK .
Default Name Prefixes
If you define a default name prefix for a collection, then the variable names that Illume assigns to the questions in this collection will all begin with that prefix. This option can be useful when you are analyzing data, since it enables you to quickly identify related variables in your data set by their similar names.
For example, if you create a collection of questions about what type of car a person drives, you may choose to call the collection "Automobile", and set the default name prefix to "CAR."
If the collection has five questions, participant responses will appear in the data set under the variable names CAR1, CAR2, CAR3, CAR4, and CAR5.
Keep in mind that whether or not you set the default name prefix, you can always override Illume's automatic question naming with names of your choice. See Creating a Question for more information.
Randomized Collections
A randomized collection is one whose contents will be displayed in random order. When you randomize a collection, each participant will see the complete set of questions in a random order.
To randomize the items in a collection, check the box next to Randomize display of objects in this collection in the Collection Editor.
Notes and Restrictions for Randomizing Collections
When you randomize the display of items in a collection, ALL of the items will be randomized, including Text/HTML items. If you want a Text/HTML item to display before a set of randomized questions, put the Text/HTML item outside the collection.
Randomized collections cannot contain conditionally displayed items (items that have show-if conditions). The items must be either always shown or never shown.
Randomized collections cannot contain Jumps, and cannot be the target of a Jump.
You can also reach the Collection Editor using any of the methods listed below. In each case, be sure to first select the folder in which you want to add the collection by clicking on that folder in the left pane of the survey editor.
Choose Survey > Add Collection... in the Survey Designer.
Right click in the right pane of the Survey Designer and choose Add Collection from the context menu. The collection will be added as the last item inside of the current working collection.
Press Control+Shift+C . The collection will be added as the last item inside of the current working collection.
To edit a collection, double click on the collection in the right pane of the Survey Editor, or right click on the name of the collection in the left pane of the Survey Designer and choose Edit... from the context menu.
This presents the Collection Editor. See Creating a Collection for more information on how to use the Collection Editor.
The Login Collection
The Login Collection is used to authenticate participants and includes some special rules. See Configuring the Login Collection for details.
There are 3 ways to delete a collection:
Click once on the collection in the right pane of the Survey Editor and then press the delete key on your keyboard.
Click once on the collection in the right pane of the Survey Editor and then click the delete icon on the toolbar.
Right click on the name of the collection in either the right pane or the left pane of the Survey Editor and choose Delete... from the context menu.
Undoing a Delete
Immediately after deleting a collection, you can undo the deletion by choosing Edit > Undo Delete from the Survey Designer menu.
Moving a Collection Into Another Collection
To move a collection into another collection, simply drag it from it's current location and drop it into the desired folder in the left pane of the survey editor. You can drag and drop a collection from the right pane into the left pane, or from the left pane into the left pane.
Changing a Collection's Display Order
To change the order in which a collection is displayed:
In the left pane of the Survey Designer, select the collection that contains the collection you want to move. Click once on the collection to select it.
In the right pane of the Survey Designer, drag the collection from its current location and drop it into to its desired location.
In the left pane of the Survey Designer, select the folder in which you would like to add the new collection. Click once on the name of the folder to select it.
Click the Add Question icon in the toolbar.
Set the desired options for your questions. For details about available options, what they mean, and how to set them, see Setting a Question's General Options, Setting a Question's Response Options, Setting a Question's Display Properties, Setting a Question's Response Guides, Setting Data Dictionary Options and Setting Show-if Conditions.
Click OK .
Note that you can move a question from one collection to another by dragging and dropping it.
Mouse and Keyboard Shortcuts
Once you've selected the collection in which you would like to add a question, you can use any of the following methods to create a new question:
Right click in the right pane of the Survey Editor and select Add Question... from the context menu.
Select Survey > Add Question... from the Survey Designer menu.
Press Control+Shift+Q on the keyboard.
General options appear on the General tab of the Question Editor and include a question's display type and prompt. The prompt is the text to which you want the participant to respond: e.g., "What is your name?"
Your question's prompt will appear in a participant's browser exactly as you type it in the prompt field. Note, however, that HTML tags within a prompt will be ignored when the question is displayed.
Note that when you select a display type, an example of the display type appears in the yellow box to the right of the Display Type list. Display types include the following:
Select One Use this display type when you want a participant to select only one item from a list of available responses. The Select One display type can be either a poplist (sometimes called a pop-up menu) or a group of radio buttons. The Display Properties tab includes an option called "Select-one style" where you can choose whether to display your question as a poplist, radio group, or likert scale.
Check all that apply Use this display type when you want participants to be able to select more than one item from a list of options. This type is displayed as a set of checkboxes.
Text Field Use this item when you want participants to type short responses. Text field responses can be up to 255 characters in length. Use the Commentary display type if your question requires longer answers.
Yes/No Use this display type if your question requires a simple yes/no or true/false response. Yes/No questions are displayed as a single checkbox.
Commentary Use this item when you want participants to type responses that may be longer than 255 characters. Commentary responses can be several million characters in length.
If you are editing a multilingual survey, and you have the translation tools enabled, you will see a list of languages at the bottom of the Question Editor. Choose the language you want to edit from the list, and the prompt for that language will appear, if the question has been translated. You may edit the prompt, and your edits will apply to that translation of the prompt only.
Response options appear on the Response Options tab of the Question Editor. This is where you define a question's list of available responses.
The options available on this tab vary, depending on the type of the question. For Text Field and Commentary questions, the only item on the response options tab will be the Data Type list.
This section focuses on configuring response options for "Select One" and "Check all that apply" type questions. For information about configuring response options to Yes/No questions, see "Configuring Yes/No Response Options" at the end of this section.
To set response options...
Choose a data type. (You can choose a data type only if your question uses the "Select One" or "Text Field" display type.)
If you choose a numeric data type, add scale values, as described below. If you choose the Yes/No data type, define the Yes/No values, as described below.
If you want the response options for this question to be ordered randomly for each participant, check "Randomize Display Order."
Choosing a Data Type
The type of data you choose here is the type of data you will end up with in your data set for this particular question.
Generally, you use whole numbers for Select One type questions. Note that for display types Check all that apply and Yes/No , the only available data type is Yes/No. For the Commentary display type, Text is the only available data type. Text questions have the largest range of data types, permitting participants to enter almost any kind of data. See the section on Date and Time Data below for details about the date, time and date/time data types.
Sub-grouping and Response Option Headers
Users are now able to create Group Headers in Select One and Check All that Apply type questions. Group Headers label subgroups of response options.
To add a header:
On the Response Options tab type appropriate text
Check “Group header” box
Click Add
Drag where appropriate among the list of response options
Participants will see something like this:
NOTE: Group headers are purposely ignored when the question type is likert scale OR semantic differential
Group Headers and Randomization
Randomization may be implemented in questions utilizing Group Headers. Items will only be randomized per group. If a group is anchored then that group’s items will always be displayed in that position among the other groups.
Setting a Default Value
You can set a default value for your question by typing the value into the Default field. Default values are optional. The value you enter in the default field will be pre-selected the first time the participant sees this question on the survey. The participant is free to change accept the default selection. Use one of the following two methods to set the default value:
Type in the value of the default response. In the screenshot above, the default is 3, which means that when the question first appear, the option whose value is 3 (I work full time) will be selected. If you type in a default value that is not on the scale, Illume will ignore the value and will not set any default.
Pipe in the value of an earlier question using the {Value:QuestionId} tag. For example, if your survey contained an earlier question called EMP6 that asked "What was your employment status 6 months ago?" and included the same response options, you could make the participant's EMP6 response the default value of this question by setting the default to {Value:EMP6}.
Pipe in data from the participant list, using the {UserData:FieldName} tag. For example, if your participant list includes a field called LASTNAME, you can set the participant's last name as the default value by typing {UserData:LASTNAME} into the default field.
Pipe in the value of a survey parameter. You set the default value to the value of any survey parameter by typing {ParamValue:ParameterName}, where ParameterName is the name of the parameter whose value you want to pipe in.
See Piping Data for general information about piping, or Setting Dynamic Defaults and Bounds for more specific issues to consider when piping data into a question's default value of response guides.
Adding/Editing Scale Values
Scale values are the options from which participants may choose when responding to your question. To add numeric scale values, follow these steps:
Type the value in the small text box to the left of the equal sign.
Press the Tab key to move the cursor into the display text field, then type the text you want participants to see for this option.
Press the Enter key. This adds the value to the list of scale values below, and returns the cursor to the value text box.
Repeat steps 1-3 until you've added all of the options you want this question to have.
Note that for each response option, the value is what will be stored with your data set, while the display text is what participants will see when they are reading through the question's available answers.
If you don't want to type a value for each individual response option, and you know that the values will be in sequential order, check the box labeled "Generate values automatically", and indicate the number at which the values should begin. Then you can add response options simply by typing them into the display text field and pressing Enter.
Note: If you have translation tools enabled, and your survey includes multiple translations, you can set the scale values for each language individually. Simply choose the language you want to work with from the list at the bottom of the question editor, and then edit the scale values for that language.
Response Options for Check All That Apply Questions
For each checkbox in a "Check all that apply question," you must supply a name for the checkbox and the text that should appear next to the checkbox.
Choose a name for each checkbox that will be helpful during data analysis, so the data analyst can see instantly what the participant was saying yes to when they checked the box.
Mutually Exclusive Response Options for Check All That Apply Questions
A Check All That Apply question can include one or more mutually exclusive check box responses. Mutually exclusive check boxes allow survey designers to specify “Does not apply” or “Refuse to answer” type responses in Check All That Apply questions. When one of these responses is checked no other responses can be checked.
To make a response option mutually exclusive, click the Response Options tab in the question editor and then click the checkbox in the Exclusive column for the desired response option.
When JavaScript is enabled, the client web browser prevents having a mutually exclusive check box being checked when other check boxes are checked. If JavaScript is not enabled both types of check boxes (exclusive and non-exclusive) are able to be checked at the same time and this condition will be caught on the server and an error message will be displayed. The error message can be edited by clicking Edit > Preferences… and the Error Messages tab. In the drop-down menu select the error for: A mutually exclusive check box is checked when other check boxes are checked.
When a mutually exclusive checkbox is selected, the response guide for minimum # of responses is ignored if set to a value greater than 1.
Setting Show-if Conditions on Scale Values
You may want to display response options only under certain conditions. To set show-if conditions on a response option:
Click on the option in the list at the bottom of the Response Options tab.
Click on the Show-if... button to get to the show-if editor.
In this image above, the circle to the left of the first option is yellow because this option includes a show-if condition.
Once you click the Show-if button, the process is the same as setting a show-if condition for a question, which is described in detail in Setting Show-if Conditions.
Once you set a show-if condition for a response option, the Survey Designer displays a yellow control-type image next to the question to indicate that some response options have display conditions attached. In the image below, the question FREQ includes response options that display conditionally. For the other questions, all response options always appear.
Note that in multilingual surveys, show-if conditions apply across all translations. If you edit the show-if conditions within a single translation, the edited conditions will apply to ALL translations!
Group Headers and Show-If Logic
Show if logic can be applied to a Group Header. If the Group Header has show-if logic, the Header and all of the prompts below that header will not be shown unless the logic criteria are met. If all of the prompts under a specific Header are not shown due to show-if logic then the Group Header will not be displayed. At least one prompt must be visible for the Header to display.
Attaching a Text Field to a Scale Value
You may want to attach a text field to a scale value, so that participants can explain their responses. For example, if one of your response options is "Other (please specify)," you should give participants a place to specify what they mean by "other." If you have not yet added the response option to the list, create the option, as described above, then check the "Attach text field" box, and click the Add button to add the option to the list. In the list of response options, you'll notice that when an item has an attached text field, the Text Field box next that item is checked. If you want to add a text field to an item that is already in the list of response options, simply check the "Text Field" box next to the item in the list. You can delete the text field by unchecking the box.
Setting Properties for Attached Text Fields
After attaching a text field to a response option, you may want to set some properties for the text field. To do so, follow these steps:
In the list of available response options, click once on the option whose text field you want to configure.
Click on the Text Field Properties... button.
Set the desired properties (described below).
Click OK .
The General Tab of the Scale Text Question Editor enables you to configure the following properties:
Name Prefix: The name prefix is the name of the question to which your text field is attached, followed by a period. You cannot change this.
Unique Name: This name is attached to the Name Prefix to create the unique name for the attached text field. The unique name of the text field in the screenshot above is Q4.TEXT. You'll need to know this name if you want to pipe a response from this field into another part of your survey. (Hint: Use {Response:Q4.TEXT} to get the response. See Piping Data for general information about piping, or Setting Dynamic Defaults and Bounds for more specific issues to consider when piping data into a question's default value of response guides. When you attach multiple text fields to a question, Illume names the first field TEXT, and the following fields TEXT2, TEXT3, etc, in the order they were created. Thus, if Q4 had 3 attached text fields, they would be called Q4.TEXT, Q4.TEXT2, and Q4.TEXT3 by default.
Data Type The type of data a participant is expected to supply in the text box. See the section on Date and Time Data below for details about the date, time and date/time data types.
Precision This option appears only when you select Decimal Numbers as the data type. Set this to the maximum number of digits you want to appear after the decimal point. This can be a value between 0 and 4.
Label A text label to accompany the text box. This label will be displayed to the left of the text box, unless you check "Display label after."
Examples: A "$" label would precede a text box in which participants are expected to enter a dollar amount. A "%" label would follow a text box in which participants are expected to enter a percentage amount.
Display Width The width (measured in characters) of the text box.
Description A note to yourself, or anyone else who may be editing the survey, providing information about this text box.
The Response Guides tab of the Scale Text Question Editor enables you to configure the following properties:
The participant must respond to this item if applicable Check this if you want to require participants to type a response into the text box. The text box will require a response only if the scale value to which it is attached has been checked. That is, if this text box appears next to the "Other" option, it will require a response only if the participant selected the "Other" option. .
Minimum length The minimum length required for a valid response to this item.
Maximum length The maximum length allowed for a valid response to this item.
Format (Meta-type) Check this option and select a meta-type from the accompanying list if you want your participants' responses to be of a particular type (such as email address, phone number, etc.)
Lower Bound The minimum allowable value for a numeric response. Note that you may specify whether responses may not be less than (<) or may not be less than or equal to (<=) the minimum value.
Upper Bound The maximum allowable value for a numeric response. Note that you may specify whether responses may not be greater than (>) or may not be greater than or equal to (>=) the maximum value. You can set both the Upper and Lower bounds to compare against values that a participant has entered in response to prior questions. That is, you can say that the answer to the current question has to greater than (or less than) the answer to a previous question. See Setting Dynamic Defaults and Bounds for details.
Error Message This is the message participants will see if 1) they fail to enter a response when the response is required, or 2) the response they enter does not meet your validation requirements.
Attached Text Field Properties in Multilingual Surveys
If your survey includes multiple translations, you will obviously separate translations for any labels and error messages belonging to attached text fields. Generally, you would do this by creating a Translation Package, but in some cases, you may need to edit these items individually.
To set the label, description, and error message for an attached text in a specific language:
Open the question to which the text field is attached in the Question Editor.
Click the Response Options tab.
Choose the translation you want to work with from the list at the bottom of the Question Editor.
Click on the scale value whose attached text field you want to edit.
Click Text Field Properties....
Edit the label, description, and/or error message in the Scale Text Question Editor.
Click OK to close the Scale Text Question Editor.
Click OK in the Question Editor to save your changes.
The changes you make to attached text field properties affect only the language that was selected when you opened the Scale Text Question Editor.
Randomizing Display Order and Anchoring Options
By default, Illume presents response options to participants in the same order they appear in the Question Editor. If you check the Randomize Display Order box, Illume will present the options in random order. Even when response options are presented in random order, you may want to fix the location of certain options. For example, if your question includes an "Other" or "I choose not to answer" option, you may want this option to always appear last. You can ensure an option appears in a particular place within a randomized list by checking the option's Anchored box. In the screenshot above, the 4th option, "Other," is anchored as the last item on the list. While the other three options are shuffled around, "Other" will always appear as the last option. Checking the Anchored box caused the corresponding option to appear on the survey in the same position in which it appears in the Question Editor. Thus, clicking the Anchored box next to the second option in the list, "I work part time," would cause "I work part time" to always be displayed as the second option. Similarly, dragging "Other" to the top of the list of options, and leaving the Anchored box checked would cause "Other" to always be displayed as the first response option.
Editing an Existing Response Option
To edit an existing response option:
In the list of existing response options, click once on the text of the option you want to edit.
The option's text and value will be loaded into the editable fields above the list. Edit these as you please.
(Optional) Check Attach text field if you wish to attach a text field.
Click the Replace button. The old option details will be replaced by the new option details in the list of existing options.
Deleting a Response Option
To delete a response option:
In the list of existing response options, click once on the text of the option that you want to delete. The option should be highlighted after you've clicked on it.
Click the Remove button.
Configuring Yes/No Response Options
The only available data type for Yes/No questions is Yes/No. Unless you redefine these values, "No" answers are stored as zero (0) and "Yes" answers are stored as one (1) in the survey results.
You can change this if you want by assigning scale values as described below. In some cases, you may want the value 1 to represent No. For example, if you have a calculated variable that adds up all the No answers, you'll need to set No to 1, or the calculated variable will just keep adding up zeros... which doesn't do anyone any good.
The text you type next to the No option (i.e. next to the zero) will not be displayed in the survey . It will appear in the data dictionary to describe what it means when a participant did not check the checkbox for this question.
The text you type next to the Yes option (i.e. next to the one) will appear next to the checkbox in the participant's survey.
Setting the default state for a Yes/No item to "None" or to "0" leaves the checkbox unchecked by default. Setting the default to "1" leaves the box checked by default.
Date and Time Data
Text questions can be of virtually any data type, including Date, Time, and Date/Time. Illume use's Microsoft's .NET DateTime object to store dates and times. The .NET DateTime object can represent dates between 12:00 a.m. January 1, 0001 CE and 11:59:59 p.m. on December 31, 9999. Illume considers dates outside of this range to be invalid. You can narrow the range by setting minimum and/or maximum dates in your question's Response Guides. Non-existent dates are also invalid. For example, February 29, 2005 is invalid because 2005 is not a leap year. Participant must enter dates or times in a format that .NET recognizes. In general, for the United States locale, dates in the following formats are valid:
mm/dd/yyyy This is a 2-digit month, followed by a slash, followed by a 2-digit day, followed by a 4-digit year. E.g., 09/16/2006
Monthname Day, Year E.g. January 25, 2005
Other date formats will also work in the US. You should, however, suggest a format that you know will work in either your question prompt or in the question label. For example, a prompt that suggests a valid format would be: Please enter your date of birth (mm/dd/yyyy): Illume and .NET recognize both 12- and 24-hour time format, though Illume may ignore the seconds. The following time formats are valid in the US locale:
hh:mm This is a 24-hour time. E.g. 23:15
hh:mm am/pm This is a 12-hour time. E.g. 11:15 pm
.NET uses the same standard set of date and time formats that other Microsoft products use. This means that any Date, Time, or Date/Time format produced by an application like Microsoft Excel, Access, or SQL Server will work in Illume. Use the Date data type only for variables that must include a day, month, and year. If your variable requires only one of these values (day or month or year), choose the whole number or text data type. Choose Date/Time data type only for variables that require a day, month, and year value with an optional time value.
Dates, Times, and Localization
Illume and .NET use the locale settings of the Illume server to determine dates and times. This can cause some confusion if a survey is not designed correctly. For example, if you are administering a survey to participants in both the US and the UK, you should be aware that the two locales use different date formats. A US participant entering 06/12/2006 will mean June 12, 2006, while a British participant entering the same thing will mean December 12, 2006. If the survey is running on a server whose locale is set to EN-US (English, United States), the date will always be interpreted as June 12. If the server's locale is set to EN-GB (English, Great Britain), the date will always be interpreted as December 6. This will be a problem if your question includes a minimum and/or maximum date. The British user or the US user may not be able to get past the date question simply because the participant and the server do not agree on what the date means. One way to avoid date/time problems caused by local differences is to break dates and times into separate questions, each of which is of type whole number. For example, instead of asking for a participant's birth date, ask for his or her year of birth, then month of birth, then day of birth.
The Display Properties tab of the Question Editor enables you to control some aspects of your question's appearance. The available display options are described below.
Note: If you are editing a multilingual survey, and you have the translation tools enabled, you will see a list of languages at the bottom of the Question Editor. Choose the language you want to edit from the list, and the label for that language will appear, if the question has been translated. You may edit the label, and your edits will apply to that translation of the label only. Edits to other items on this tab, such as display width and height, will affect all translations.
Label
This option applies to Text Fields only. If you type in a label here, the text of the label will be displayed to the left of the text box, unless you check "Display label after," in which case the label appears to the right of the text field.
Examples: A "$" label would precede a text box in which participants are expected to enter a dollar amount. A "%" label would follow a text box in which participants are expected to enter a percentage amount.
Display Width
This property applies to Text Fields and Commentaries. This is the width, measured in characters, of the Text Field or Commentary.
Display Height
This property applies to Commentary questions only. This is the number of lines of text that can be displayed at one time in the commentary field. Note that if participants type in more text than the field can display, a scrollbar will appear.
Hide Text (Password Style)
This option applies to Text Fields only. If you check this, the text field will display only asterisks (*) as the participant types, just as a password field on an HTML form displays only asterisks when you type in your password.
Columns
This applies to Radio Groups and Checkboxes only. By default, Illume displays all of checkbox/radio options in a single column. You can override this by setting the number of columns here.
Column Width
This applies to Question Tables.
You can set the column width for question tables by typing a value in the Column Width box. The width you set here applies to each of the columns in the question table to the right of the prompts. That is, each column that contains a checkbox, radio button, poplist or text box.
To set the width to an absolute value, type in a whole number or a whole number followed by the letters px. For example, a setting of either 100 or 100px sets the width of each column to 100 pixels.
To set the columns to a relative width, use percent values like 15%. This sets the width of each column containing a response option to 15% of the total width of the table. (Keep in mind that the prompt occupies one column of the table, and this is generally the widest column, since it contains text.)
Columns with fixed width values (e.g. 100 or 100px will keep a constant width even as participants re-size their browswer windows. Columns with percentage widths will expand and contract as the participant changes the width of the browser window.
Note that if your question table includes text inputs, all browsers will force columns to be wide enough to accomodate the text boxes, regardless of the column width you assign.
Select-one style
This option applies to Select One type questions only. Select One questions can be displayed in any of the following formats:
Radio button - Radio buttons have the advantage of allowing participants to see all of the available options at once.
Likert scale - Likert scales convey to the participant that he or she is choosing a value from a continuum in which the two ends represent opposing extremes.
Semantic Differential - This format is similar to a likert scale, except that the value lables for the extrems appear at either end of the radio buttons rather than above them. Generally, only the extremes of the scale are labeled; there are no labels in the middle.
Poplist - Poplists have the advantage of being able to present a large number of options in a small amount of space.
The Response Guides tab of the Question Editor enables you to define what constitutes a valid response for a given question. This tab includes the following properties:
Note: If you are editing a multilingual survey, and you have the translation tools enabled, you will see a list of languages at the bottom of the Question Editor. Choose the language you want to edit from the list, and the error message for that language will appear, if the question has been translated. You may edit the error message, and your edits will apply to that translation of the error message only. Edits to all other items on this tab, such as whether the question requires a response, will affect all translations.
Response Required
This indicates whether the current question requires a response. By default, all questions inherit the survey-wide Required setting. In the example above, the survey-wide preference is set to Not Required. The question itself is set to Required.
Minimum length (chars)
The minimum number of characters required for a valid response to this item. This applies only to Text Field and Commentary items .
Maximum length (chars)
The maximum number of characters allowed for a valid response to this item. This applies only to Text Field and Commentary items .
Min # of Responses
The minimum number of items that must be checked in a group of checkboxes. For example, if you ask participants to select at least three items from the list of checkboxes, you would set Min # of Responses to 3. This applies only to questions of type "Check all that apply."
Max # of Responses
The maximum number of items that may be checked in a group of checkboxes. For example, if you ask participants to select no more than three items from the list of checkboxes, you would set Max # of Responses to 3. This applies only to questions of type "Check all that apply."
Format (meta-type)
Check this option and select a meta-type from the accompanying list if you want your participants' responses to be of a particular type (such as email address, phone number, etc.)
Custom Expression
If you want the participant's response to match a regular expression, enter the regular expression here. Writing regular expressions generally requires specialized knowledge. However, you can find regular expressions to validate US and international phone numbers, zip codes, and other types of meta-data by searching the Internet.
Illume uses Microsoft's .NET implementation of regular expressions, which is documented here: http://msdn.microsoft.com/library/default.asp?url=/library/en-us/cpguide/html/cpconregularexpressionexamples.asp
Lower Bound
The minimum allowable value for a numeric response. Note that you may specify whether responses may not be less than (<) or may not be less than or equal to (<=) the minimum value.
Upper Bound
The maximum allowable value for a numeric response. Note that you may specify whether responses may not be greater than (>) or may not be greater than or equal to (>=) the maximum value.
You can set both the Upper and Lower bounds to compare against values that a participant has entered in response to prior questions. That is, you can say that the answer to the current question has to greater than (or less than) the answer to a previous question. See Setting Dynamic Defaults and Bounds for details. If you are setting bounds for a question that uses the Date, Time, or Date/Time data type, see Date and Time Data in Setting a Question's Response Options for some important considerations.
Custom Error Message
This is the message participants will see if 1) they fail to enter a response when the response is required, or 2) the response they enter does not meet the question's validation requirements.
If you leave this blank, Illume will use the appropriate system-wide default error message defined in the Survey Preferences. (See Customizing Survey Error Messages for more information about survey-wide error messages.)
Illume enables you to pipe relevant data from the current question directly into a custom error message. This makes the error messages more useful to participants, and relieves survey designers of the burden of having to update error messages when questions change.
See the section on Piping Data for a detailed description of how to pipe data into custom error messages.
Enforcement of Response Guides
Illume surveys enforce response guides both in the participant's browser and on the server. If the participant's browser does not support JavaScript, response guides will be enforced by the server. When an error occurs, participants will be presented with the page they just submitted, with error messages printed above the question.
Users who have JavaScript enabled (typically more than 95% of users) will see both a JavaScript alert and the red-text error message.
Illume surveys include a data dictionary, which is available when you query and review the data your survey has collected. The data dictionary lists all variable names, question prompts, and response options.
For example, if you have a question called WINE that asks what type of wine a participant prefers to drink, the data dictionary will include an entry like this:
WINE "What type of wine do you prefer?" 0 = I don't drink wine 1 = Red 2 = White
Note: If you are editing a multilingual survey, and you have the translation tools enabled, you will see a list of languages at the bottom of the Question Editor. Choose the language you want to edit from the list, and the variable description for that language will appear, if the question has been translated. You may edit the description, and your edits will apply to that translation of the description only. Edits to other items on this tab, such as the question's unique name and whether it is "runtime only", will affect all translations.
Illume generates the data dictionary automatically. However, you may want to exercise some additional control over what goes into the data dictionary. You can do this through the Data Dictionary tab of the Question Editor, which enables you to set the following attributes:
Unique Name
This is the name of the variable in which responses to the current question will be stored. For example, if you name this question "HOMEPHONE," then the data that participants give in response to this question will be stored in a database field called HOMEPHONE.
The name you supply here will also appear as the name of the current question in the Survey Designer.
A unique name must start with a letter, and can contain any combination of letters, numbers, underscores (_), or hyphens (-). Unique names must be 20 characters or less in length.
Description
If you leave the description blank, Illume automatically uses the question prompt as the description in the data dictionary. At times, however, you may want to provide more information than the prompt can give.
If you type a description here, that description, rather than the question prompt, will appear in the data dictionary. This can help you quite a bit when you are analyzing your data and you're wondering how the variable AGE1 differs from AGE2.
Runtime Only
Check this box if you do not want responses to the current question to be stored with the rest of the data you collect in your survey. Runtime only data are available to Illume when a participant is taking a survey and are discarded when the survey is submitted. This type of data is often used in calculated variables and show-if conditions.
You can set conditions on when page breaks, Text/HTML items, questions, and collections will appear. Each of the editors for these items includes a Show-if tab that enables you to define when the item should be displayed, and when it should be hidden.
Warning: If you are editing a multilingual survey, be aware that any changes to an item's show-if conditions affect ALL translations of the survey. Each item in an Illume survey has one set of show-if conditions, and that single set of conditions applies across all translations!
The Show-if tab includes the following options:
Show State
An item set to "Always shown" will be presented to all participants, and will appear in the Survey Editor with a green circle next to its name. By default, all questions, collections, Text/HTML items and page breaks are always shown.
An item set to "Never shown" will not be shown to any participants, and will appear in the Survey Editor with a red circle next to its name.
Adding Show-if Conditions
An item set to "Only show if..." will be displayed only if the conditions you define are met. Follow these steps to set show-if conditions:
Check the "Only show if..." option at the top of the Show-if tab.
In the Collection list, click once on the name of the collection that contains the question you want to test. The questions in the collection will appear in the Item list to the right.
Click once on the question you want to test. The name of the question appears in bold blue type beneath the Collection list. Underneath the question name, you'll see a popup list with the words "was-not-answered".
Select the test type from the popup list. Notice that if you choose any test type other than "was-answered" or "was-not-answered," a list of responses to the selected question appears to the right. (This is true only if the question you are testing has multiple response options.)
Select the value you want to test from the list on the right. If you are testing a text or Yes/No question, you must type in the value you want to test. If you are testing whether the response "is-any-of" or "is-none-of," you can check multiple options in the list on the right.
Click Add to apply this condition.
(Optional) Add more conditions by repeating steps 2-6.
(Optional) If you defined more than one condition, you must decide how to group the conditions. If you select "And" from the list labeled "Group all expressions with," then the current question will be shown only when ALL of the conditions you've defined have been met. If you select "Or," the question will appear when ANY of the conditions have been met. You may also define custom groupings for your conditions.
Click OK to save the conditions.
Editing Existing Show-if Conditions
To edit existing Show-if conditions:
In the Survey Editor, double click on the item you want to edit.
Click on the Show-if tab.
In the list of conditions at the bottom of the Show-if tab, click on the condition you want to edit.
Follow steps 2-5 under "Adding Show-if Conditions" above.
Click Replace (not Add) to replace the condition.
Click OK to save your changes.
Removing Individual Show-if Conditions from an Item
To remove individual show-if conditions:
In the Survey Editor, double click on the item you want to edit.
Click on the Show-if tab.
In the list of conditions at the bottom of the Show-if tab, click on the condition you want to remove.
Click the Remove button.
Click OK to save your changes.
Removing All Show-if Conditions from an Item
To quickly remove all of an item's Show-if conditions:
In the Survey Editor, double click on the item you want to edit.
Click on the Show-if tab.
Check the "Always shown" option.
Click OK to save your changes.
Setting Show-if Conditions for Prompts within a Question Table
To set show-if conditions on the individual prompts within a question table, follow these steps:
In the left pane of the survey designer, click on the Question Table you want to work with. Note in the image below that the RAPI question table is selected in the left pane, and the prompts belonging to the RAPI question table appear in the right pane.
In the right pane, double click on the prompt you want to work with.
Click the Show-If tab in the Prompt Editor.
Follow the instructions under Adding Show-if Conditions above.
Click OK.
If you are creating a question table with many prompts that will share the same show-if conditions, you can save time by creating one prompt with the show-if condition, then copying it repeatedly and changing the prompt text. To copy a prompt, right click on the prompt and choose Copy, then right click again in the right pane of the Survey Editor and choose paste. Change the name and the prompt for the new item when you paste it. The new item will have the same show-if conditions as the original.
Custom Grouping of Show-if Conditions
Early versions of Illume required all show-if conditions to be grouped with AND or with OR. Illume versions 2.1.14 and higher support complex grouping of show-if conditions. Custom grouping enables you to mix AND and OR in your show-if conditions.
To use custom grouping,
Define all of the conditions you will want to test, as described above.
Choose the Custom group expression option under Expression Grouping.
Use labels, parentheses and the words "and" and "or" to group your expressions, as described below.
When you define the conditions you want to test, you'll see that the Question Editor assigns a label to each condition. In the image below, the test "AGE > 18" is labeled as test A. The test "DRINK = [Yes]" is labeled as test B and the test "SMOKE = [Yes]" is labeled as test C.
If we want our question to appear to all participants over the age of 18 who drink or smoke, we would type the following under Custom group expression: A and (B or C) This means, display the question if condition A is true (participant is over 18) and if either B or C is true (participant drinks or smokes). Note that parentheses are important here. Any items in parentheses will be evaluated before items not in parentheses. In this example, Illume will first check to see if either conditions B or C is true. If either one is true, Illume will go on to see if condition A is also true. If either one of B or C is true, and A is also true, Illume will display the question. The following grouping would give a completely different result: (A and B) or C In this grouping, Illume will display the question if both A and B are true (participant is over 18 and drinks) OR if C is true (participant smokes).
Further Notes about Custom Grouping
If your expression uses nested parentheses, the more deeply nested parentheses are evaluated first. For example, in the following expression: A and (B or (C and D)) Illume first checks to see if conditions C and D are both true. Illume then checks to see if B is true (if necessary-- this expression requires only that one item inside the blue parentheses be true). Finally, Illume checks to see if A is true. Each parenthesized expression is always reduced to a single true or false value. In the following example, let's assume that underlined conditions are false and non-underlined conditions are true. (A and (B and (C or D or (E and F)))) Here is how Illume interprets the expression: Starting within the purple parentheses, Illume sees that condition F is false. Because E and F are not BOTH true, the entire expression within the purple parentheses is then false. So now we have this: (A and (B and (C or D or false))) Illume then looks at the items in the red group. Because these are grouped with OR, if any one of the conditions is true, the whole parenthesized expression is true. Illume sees that false is not true. It sees that condition D is not true. It sees that condition Cis true. Now the entire group within the red parentheses is true. (A and (B and (true))) Illume then sees that both B and the condition that follows B are true, so the entire green expression becomes true. (A and (true)) Now Illume sees that both A and the condition that follows A are true, so the entire blue expression is true. (true) Illume has reached the outermost condition, and it is true, so Illume will display this item.
A question block is a group of questions that shares a common set of response options. Generally, a question block will have three components: instructions, prompts, and a set of response options.
Instructions tell the participant what type of response is expected. For example, "Please indicate the extent to which you agree or disagree with the following statements."
Prompts are the individual items to which participants respond. A question block that uses the instructions above may include prompts such as:
I have a strong understanding of current technology.
I read product reviews before selecting a product to buy.
I do not let others influence my purchasing decisions.
The final component in a question block is a set of response options shared by all of the prompts. In the example above, each of the prompts would include the following options:
Strongly Disagree
Disagree
Neither Disagree nor Agree
Agree
Strongly Agree
Note: If you are editing a multilingual survey, and you have the translation tools enabled, you will see a list of languages at the bottom of the Question Table Editor. Choose the language you want to work with from the list. You may edit most text properties (prompts, scale values, error messages, etc.) in each language individually (though it's much easier to create a Translation Package and do all of the translation at once). Display and show-if properties apply across all translations.
Choosing a Display Type
The general tab of the Question Table Editor provides a list of display types. When you choose a type from the list, you'll notice that a sample appears to the right of the list showing what the selected display type looks like.
The Select One display type actually shows two samples: one with radio buttons and one with poplists. When you choose the Select One display type, you must use the "Select-one style" list in the Display Properties tab to indicate whether the collection should use radio buttons or poplists.
Creating Instructions
Type the instructions for your question block into the Instructions entry under the General tab. These instructions will appear above the collection's set of prompts.
Creating and Editing Prompts
To add prompts to the collection, click the Prompts tab. For each prompt you want to add, type the prompt into the Prompts box and press Enter (or click the Add button). You'll see that each new prompt appears in the list of prompts at the bottom of the Question Table Editor.
To edit an existing prompt, click on the prompt in the list, make your changes to the prompt's text in the Prompts box, and click Replace . (Note that if you press the Enter key instead of clicking Replace, you will create a new prompt.)
Deleting Prompts
To delete a prompt, click on the prompt you want to delete (it should be highlighted against a blue background once you click on it) and then click the Remove button.
Setting Other Properties
To set other properties of a question block, see the descriptions of how to set question properties: Setting a Question's Response Options, Setting a Question's Display Properties, Setting a Question's Response Guides, Setting Data Dictionary Options, and Setting Show-if Conditions. You can set show-if conditions on the individual prompts within a question table! Follow the link to Setting Show-if Conditions below.
Sub-Grouping and Response/Prompt Headings in Question Tables
Questions Tables may have both Response Headers as well as Prompt Headers. Response Headers are labels that apply to multiple column headers, e.g. "Gender" might be a response header for the column headers "Male" and "Female".
Adding Response Headers to a Question Table
Response Headers are added to Question Tables in the same way as standard response options. They are only available for Select One and Check All That Apply Display Types.
To add a response header:
On the Response Options tab type appropriate text
Check “Group header” box
Click Add
Drag where appropriate among the list of response options
Adding Prompt Headers to a Question Table
Prompt Headers can be used with all of the Display Types in a Question Table. Prompt Headers are created by selecting the Prompts tab in the Question Table Editor and checking the “Group header” box. Prompts can me moved up and down in the list by clicking and dragging.
Example Question Table with Response and Prompt Headers
Every item in an Illume survey must have a unique name. Items include questions, collections, Text/HTML objects, page breaks, and survey resources.
Illume automatically assigns a unique name to each object when it is created, but you may want to assign a more meaningful name.
A unique name must start with a letter, and can contain any combination of letters, numbers, underscores (_), or hyphens (-). Unique names must be 20 characters or less in length.
To edit an existing question:
In the left pane of the Survey Editor, click on the name of the collection that contains the question you want to edit.
In the right pane of the Survey Editor, double click on the question you want to edit.
This brings up the Question Editor. For information about setting specific attributes of the question, see Setting a Question's General Options, Setting a Question's Response Options, Setting a Question's Display Properties, Setting a Question's Response Guides, Setting Data Dictionary Options, and Setting Show-if Conditions.
You can add comments to any question, Text/HTML item, or page break in a survey. Comments are available only to those editing the survey; participants cannot see them.
Once you check your survey in to the repository, any comments you added in the most recent round of editing become read-only. Others may contribute additional comments, but neither you nor anyone else can alter the comments you checked in.
Adding Comments from within Survey Designer
To add comments from within the Survey Designer:
In the right pane of the Survey Editor, click on the item to which you want to attach a comment. (If the item is not currently showing in the right pane, click on the collection that contains the item in the left pane of the Survey Editor.)
Click the Add/Edit Comments icon in the toolbar.
Type your comments in the Add Comments area at the bottom of the Comment Editor.
Click OK .
Adding Comments from the Survey Previewer
In the Previewer, you can add comments only to questions. To add comments from the Survey Previewer
Click the Comments icon next to the question prompt.
Type your comments in the Add Comments area at the bottom of the Comment Editor.
Click OK .
You can review and edit comments to any question, Text/HTML item, or page break in a survey. Comments are available only to those editing the survey; participants cannot see them.
You may edit any comments that have not yet been checked in to the repository, but you cannot edit comments that have been checked in.
Reviewing All Comments
To review all survey comments at once, select View > Review All Comments... from the Survey Designer menu.
Adding Comments from within Survey Designer
To edit or review comments from within the Survey Designer:
In the right pane of the Survey Editor, click on the item to which you want to attach a comment. (If the item is not currently showing in the right pane, click on the collection that contains the item in the left pane of the Survey Editor.)
Click Comments to the left of the item.
(Optional) You can add your own comments by typing them into the Add Comments area at the bottom of the Comment Editor.
Click OK to close the Comment Editor.
Adding Comments from the Survey Previewer
In the Previewer, you can add comments only to questions. To review or edit comments from the Survey Previewer, simply click the Comments icon next to the question prompt.
Checking the Text You Are Currently Editing
The spell checker checks spelling as you type in any of Illume's HTML editors, underlining misspelled words with a wavy red line. The spell checker checks spelling as you type in question prompts, response options, and Text/HTML items.
To correct the spelling of any misspelled word, right-click on the word, and choose one of the suggested spellings from the list.
If the correct spelling is not in the list, click within the HTML editor to make the context menu disappear, then manually correct the spelling.
If the spelling of the word is correct, but the spell checker identifies it as incorrect, the context menu provides two options:
Ignore all will ignore all further instances of the word in the current document. (Unless you are checking the entire survey at once, the current document includes the text in the current HTML editor.)
Add to Dictionary will add the word to your dictionary of known words. Microsoft Word and other Office applications share this system-wide dictionary, so any words you add from Illume will be added to your Word/Office dictionary as well.
Spell Check Options
When Include item descriptions is checked, Illume will find and replace text within the data dictionary descriptions of questions and question tables. This is the text that appears on the Description tab of the question editor and in the description field of each item in the data dictionary.
Checking an Entire Survey At Once
Illume can spell check an entire survey at once, including:
All question prompts
All response options
Text/HTML items
Header and footer text
End page content
The survey launch page
The resume/restore page
The "survey suspended" page
To spell check an entire survey at once click Tools > Spell Check... Illume will read through the survey, stopping at each potential misspelling. Illume loads the text containing the misspelling into the HTML editor, with the misspelled words underlined in red. Right-click on any misspelled word to view the list of suggested spellings.
The survey-wide spell checker includes a Revert to Saved button that will undo any changes made by the spell checker in the text currently displayed.
After correcting a word in the survey-wide spell checker, click Next Error to resume spell checking.
Checking Selected Items
You can limit the spell check operation to a single item or to a group of items by selecting the item(s) in the survey designer before choosing Spell Check... from the Tools menu.
To choose a single item for spell checking, simply click on the name of the item in the Survey Designer. To choose multiple items, hold the Control key and click each item individually. Holding the Shift key while you click selects every item between the the item you are clicking on and the last selected item.
When working within a group of selected items, checking Include items within selected collections will extend the find and replace operation into each of the collections that you have selected.
Known Issues
Because Illume uses Microsoft Word's spell checker, you must have Microsoft Word 2000 or later installed in order to use spell check.
When the spell checker replaces an individually formatted word (for example, an italicized, bolded or underlined word), Illume may not preserve the formatting when it replaces the word.
Multilingual Surveys
The spell checker will work for each language in a multilingual survey, provided:
You have Microsoft Word 2000 or later installed on your computer.
You have the Microsoft Word dictionary installed for the language you are checking.
The Survey Designer's Find and Replace feature can find and replace text in any of the following items:
Question prompts
Response options
Text/HTML items
Data dictionary descriptions
Variable references
By default, Find and Replace operates on the entire survey. You can limit the find and replace operation to a single item or to a group of items by selecting the item(s) in the survey designer before choosing Find and Replace... from the Edit menu.
To choose a single item for find and replace, simply click on the name of the item in the Survey Designer. To choose multiple items, hold the Control key and click each item individually. Holding the Shift key while you click selects every item between the the item you are clicking on and the last selected item.
Using Find and Replace
To find and/or replace all instances of word throughout your survey, follow these steps:
Choose Edit > Find and Replace...
Type the word you want to find into the Find field.
If you want to replace the word you are finding, type the replacement word into the Replace with field.
Click Find Next >> to find the next occurrence of the word. Click Replace to replace the next occurrence of the word. Click Replace All to replace all occurrences of the word throughout the survey.
Find Next and Replace display the next result of the word search in the HTML editor, giving you a chance to review the text before you decide to make a replacement. If you do want to replace the highlighted word, click Replace again to make the replacement.
Clicking Replace All will replace all instances of a word within the survey without asking you to confirm. Illume simply reports the number of occurrences replaced when the operation is complete. You cannot undo the Replace All operation.
The Start Over begins a new search from the beginning of the survey document.
Search Scope
By default, find and replace operates on your entire survey. If you selected one or more survey items before starting Find and Replace, you can check the Selected items only option to limit the operation to the items you have selected.
When working within a group of selected items, checking Include items within selected collections will extend the find and replace operation into each of the collections that you have selected.
Search Options
When Match Case is checked, Illume will perform a case-sensitive search in which upper- and lower-case letters must match exactly. E.g. A search for "Washington" will not find the word "washington" when Match Case is checked.
When Match whole word is checked, your search will match whole words only. E.g. A search for "was" will match only the word "was" when this box is checked; otherwise, the search will match words like "Washington" that simply contain the letters "was" in succession.
When Include variable references is checked, Illume will replace piping references. You should generally avoid this option unless you have a specific need like the one described under Replacing Variable References below.
When Include item descriptions is checked, Illume will find and replace text within the data dictionary descriptions of questions and question tables. This is the text that appears on the Description tab of the question editor and in the description field of each item in the data dictionary.
Replacing Variable References
The Include variable references is useful in surveys that include near-identical collections of questions.
For example, your survey may ask the same 10 questions about a participant's mother and father. The easiest way to build this survey would be to create a collection of the 10 "mother" questions first, and then to copy that entire collection and name the copy "father."
When you copy the collection, Illume asks you to rename each of the questions. In this example, the question names may change from "AGE_MOTHER," "OCCUPATION_MOTHER," etc. to "AGE_FATHER," "OCCUPATION_FATHER," etc. There may be several places in the original collection that pipe data from reponses to previous questions. The piping might look like this:
How many years has you mother been working as a {OCCUPATION_MOTHER:Response}?
In the collection of questions about the father, you would obviously want the reference in the new collection to look like this:
How many years has you father been working as a {OCCUPATION_FATHER:Response}?
Running Find and Replace with the Include variable references option checked will make this replacement for you.
Undoing Find and Replace
To undo a find and replace operation:
Click Done to close the Find and Replace dialog if it is not already closed.
Right click in the right pane of the Survey Editor and choose Undo Find and Replace from the context menu.
The Revert to Saved button at the bottom of the Find and Replace dialog undoes changes to the text currently being displayed in the HTML editor.
This article describes how to rename whole groups of questions, collections, and other survey items in a single operation.
A Quick Summary for the Impatient
Because the Rename feature includes so many options, the best way to understand how it works is to experiment. Follow steps 1 and 2 below, try various options, and click Generate Names. The Rename Summary display will show the new names produced by the various options you select. None of the new names will be applied until you click Rename, so you can experiment without affecting your survey.
Details
To rename a several questions at once, follow these steps:
Select the collection or the group of questions you want to rename in the right pane of the Survey Designer.
To choose a single item for find and replace, simply click on the name of the item in the Survey Designer. To choose multiple items, hold the Control key and click each item individually. Holding the Shift key while you click selects every item between the the item you are clicking on and the last selected item.
Right-click on the selected items and choose Rename... from the context menu.
If your selection includes collections, and you want to rename items withing those collections, check Include items within selected collections.
Choose the types of items you want to rename from the list of checkboxes. You'll notice that as you check and uncheck different options, the items subject to renaming appear or disappear from the Rename Summary at the bottom of the Rename dialog.
Make any changes as described in change options below.
Click Generate Names to preview the changes. The Rename Summary list at the bottom of the dialog shows the new names that will be applied to each of the selected items. You may have to scroll down to see the entire list.
If you are satisfied with the changes, click Rename to rename the items.
Renaming Options
Prefix will add whatever prefix you specify to the name of each item that appears in the Rename Summary list.
Suffix will append whatever suffix you specify to the name of each item that appears in the Rename Summary list.
Name enables you to apply prefixes and suffixes to the current variable names that appear in the Rename Summary list when you Use current name. You can also replace text within existing variable names when you choose this option.
The Generate sequence option will replace the current names in the Rename Summary list with a customizable alphabetic or numeric sequence. Prefixes and suffixes will be applied to the letters or numbers of the sequence.
The Adjust Current Name fields appear only when you choose the Use current name option. Illume will replace text you type into Replace with the text you type into With in all of the names listed in the Rename Summary list.
The Sequence options appear only when you choose Generate sequence from the Name list. The Numeric option generates a numeric sequence starting with the number in Start sequence with and using at least the number of digits specified in Minimum digits. (Illume adds leading zeroes until the minimum number of digits is satisfied.) The Alphabetic option starts an alphabetic sequence starting with the letter you specify in Start sequence with. When using sequences, any prefixes and suffixes you specify will be applied to the sequence.
Undoing a Rename Operation
As noted above, Illume does not actually rename any items until you click the Rename button.
If you do rename items and then want to undo the changes, choose Edit > Undo Rename Items from the Survey Designer menu, or press Control-Z.
You may not undo the rename operation after performing another undoable action such as Spell Checking or Find and Replace.
Beginning in Illume 3.0, all questions inherit a survey-wide "required" setting which describes whether questions are optional or required. Each individual question within a survey can override the survey-wide option. (See the links below for more information on survey-wide and question-specific settings.)
Illume also provides a convenient way to set whole groups of questions as "required" or "optional."
Select sevaral items in the right pane of the survey editor. You can do this by holding down the Control key while you click on each of the items. You can also click a single item, then hold down the shift key while you click another item. Holding the shift key causes everything between the first and second items you clicked to be selected.
Right click anywhere within the selected group and choose Set Required... from the context menu.
Choose one of the two "Response Required" options to apply to the selected group.
The Use preferences setting option causes the questions to inherit the survey-wide default setting, which appears in red text.
The Always use the following setting option overrides the survey-wide setting.
If you selected a mix of questions and collections, and you want your setting to apply to all of the items within the collections you have selected, check the box labeled Include items in selected collections.
Click OK to apply the settings.
When you check the Always use the following setting option, the setting continues to apply to your selected questions, no matter what you do to the survey-wide "required" setting. The only way to change the setting is to manually change the "required" setting for the specific question or group of questions.
Note: The setting you apply to the selected group does not apply to attached text fields. These are always optional by default.
In a multilingual survey, response guides, such as whether or not a question is required, apply across all translations of the survey. You may set error messages individually for each translation, as described in Setting a Question's Response Guides.
To quickly find a survey item by name, use the Go to item list at the bottom of the survey designer. Start typing the name of the item you want to find, or simply click the arrow to browse the list. The survey designer will find and highlight the item selected in the list.
Quota management is an add-on module that provides survey designers with a mechanism to control the number of survey respondents, meeting a specified set of criteria, who are allowed to participate in a given survey. When purchased, this module can be enabled with a license modification from DatStat Customer Support.
Quota Management Overview
A survey may have one or more quota group objects, each containing multiple quotas, which define the criteria limiting the number of respondents submitting data for that survey.
To add quotas the user must create at least one Quota Group Object. The Quota Group Object will set the criteria for the quotas it contains.
The position of the Quota Group Object in the survey should be carefully considered, as the Quota Group Object and the Quotas it contains will be evaluated wherever it is placed in the survey.
Adding a Quota Group Object
The first step in adding a quota is to create the Quota Group Object.
In the Illume Survey Designer go to Survey/Add Quota…
Give the Quota Group a unique name...
Decide on the quota options that you would like to define
Defining Quotas
One or more quotas can be defined for a quota group object
In the Quota Group Object click on the Quotas tab
Give the Quota a unique name
Describe the Quota
The Description will be visible in the Quota Description window and in the Web Console.
Set the Quota limit and Test data quota limit for the desired Quota
Click the Add Button
Highlight the newly added quota
Click the Quota Condition… button to set the conditions for the Quota that was just added to the Quota Group Object. The Quota Condition specifies the characteristic(s) of respondents who meet the Quota.
Click OK when you have finished adding conditions.
Repeat if you wish to have multiple Quotas in this Quota Group Object.
NOTE: The ordering of quotas may be used to determine priority if a maximum number of quotas is specified (see below) and the quota selection rule is determined by the order in the list. The ordering of the quotas can be changed by simply selecting a quota and dragging it up or down in the list.
Quota Conditions
There are three conditions that can be set on a Quota:
None – Participants are always considered to be included in this quota. This option is normally used in conjunction with a Quota Maximum (below) so that the participant is only included in 1 or more quotas that are determined to have a higher priority (like least filled).
Disabled – When the quota is disabled participants are never considered to be included in this quota. The quota variable is retained in the data dictionary and available for querying in case that the quota has been used in the past.
Include if… - Participants are only considered to be included in this quota if the participant meets this criteria. Please note that even though a participant meets this quota criteria they still may not be included in the quota if quota minimums or maximums are used (see below). e.g. Include participant data if GENDER = Male NOTE: Expressions can be grouped using And, Or, or a Custom parenthesized expression using both AND and OR.
There are a number of options that apply solely to an entire quota group. See the segments below for more information on these options.
Auto-Suspend
The Auto-Suspend Options are used to suspend the survey when one or more of the quotas are filled. Users are limited to one option being selected per Quota Group Object.
The options are:
Suspend the survey when all quotas are filled
Suspend the survey when the quotas filled equals "Number" - A dropdown will allow the Designer to select a number of quotas out of the total created in that Quota Group. The maximum number that can be entered will be equal to the number of currently-active quotas (eg. the Quota Condition is not set to ‘disabled’)
Do not automatically suspend survey - The survey continues to collect data after quotas are fulfilled.
NOTE: Testing the Auto-Suspend Options is only possible in a published version of the survey.
Quota Minimums
The Quota Minimums ensure that participants meet a minimum set of the created quotas to either continue with the survey or for their data to be counted in any quota limits.
Checking the box under “Quota Minimums” will activate the Quota Minimums limit. Once checked, using the drop-down box users may select the minimum number of quotas to be met before the participant may continue.
Users may then select what should happen if the participant does not meet this minimum limit. The choices are:
Do not count towards any quota(s) and auto submit the survey: when executed this will immediately end the survey for the participant and this participant will not count towards any quotas.
Do not count towards any quota(s): this survey submission will not be part of any quotas but the participant will be able to continue through the survey.
Quota Maximums
The Quota Maximum puts a limit as to the number of quotas that a participant can be included. If this number is exceeded then only the maximum number of quotas specified will be selected using a quota selection rule.
Checking the box under “Quota Maximums” will activate the Quota Maximums limit. Once checked, using the drop-down the users may select from the Maximum number of quotas the participant may meet, based on the number created in the Quotas tab.
After evaluating the quota conditions, if a participant exceeds this maximum number of quotas, only the maximum number of quotas determined to have a higher priority will be selected. The following lists these rules and how the priority is determined:
The least filled by percentage: this will add participants who meet the quota to the least filled quota condition based on a percentage. The percentage is calculated by the limits set for each quote in the Quota Object.
The least filled by count: this will add participants based on the specific number of participants in each Quota condition.
Their order in the quota list: this will add participants sequentially based on the order in the list of quotas.
If one of your survey items exists in the repository, you will not be able to edit certain properties of that item. Repository items are marked by one of the following icons:
Repository Question
Repository Text/HTML Item
Repository Collection
Repository Collection (Open) If you must edit these properties, you can break the item's link to the repository.
Click on the item in the right pane of the Survey Editor.
Choose Break Repository Link from the Repository menu. (This option is also available from the context menu.)
Repercussions
One of the benefits of repository items is that they are guaranteed to be the same in all of the surveys that use them. This makes them ideal for Cross Survey Views, which show responses to similar questions across multiple surveys.
An Alternative to Breaking the Repository Link
One alternative to breaking the question's link to the repository is to update the question directly in the repository, and then to get the latest repository version. Updating the question in the repository will not affect any existing surveys that use the repository item. All future surveys, however, will use the newest version of the item. Note that updating repository items may require special privileges. For more information, see Editing Repository Items and Getting the Latest Repository Version.
If your survey includes an item from the repository, and the item has been updated in the repository after you added it to your survey, you will need to manually retrieve the updated version if you want to include it in your survey. Repository items are marked by one of the following icons:
Repository Question
Repository Text/HTML Item
Repository Collection
Repository Collection (Open)
This is by design. Illume will not automatically update repository items in your surveys, for reasons described in the Editing Repository Items. To get the latest repository version of an item, simply click on the item in the right pane of the Survey Designer and choose Get Latest Repository Version from the Repository menu. (This option is also available from the context menu.)
If there is a newer version to get, Illume will display a message confirming that it has retrieved the latest version. Otherwise, Illume will not present any message.
Piping usually refers to the practice of inserting the response from one question into the prompt of another question. For example, if a participant indicates in question #3 that he drives a Toyota, that information can be piped in to the prompt for question #10, which may ask "How satisfied are you with your Toyota?"
Illume expands on this idea, enabling you to pipe several types of data into a variety of locations.
How to Pipe Data
You can pipe data by including a variable name enclosed in curly braces in the text where you want the data to appear. Illume will replace the variable with its value while the survey is running. See the specific descriptions and examples below for more information.
Where Can Data Be Piped?
Illume can pipe data into question prompts, scale values, Text/HTML objects, error messages, question default values, and the upper and lower bounds of a question's response requirements.
What Data Can Be Piped
Illume supports piping of:
Participant Responses - You can pipe a participant's answer to one question into another part of the survey.
User Data - You can pipe user data (data from your participant list) into your email jobs and surveys.
Preloaded/Hidden Data - You can pipe the values of variables defined as preloads or hiddens into your survey.
Survey Parameters - You can set survey-wide variables called survey parameters and pipe the values of those variables into your survey.
Current Question Attributes - You can pipe certain attributes of the current question into the question's error message.
Each of type of piping is described in more detail below.
Participant Responses
To pipe a participant response into a question prompt, or into a Text/HTML object, use the tag {Response:QuestionId}, where QuestionId is the unique name of the question whose response you want to pipe in.
For example, you have a question with the unique name "AUTOMOBILE" that asks what type of car a participant drives. The list of responses includes Ford, Chevy, Toyota, etc.
You want to pipe this question's response into a later question that asks how satisfied a participant is with his or her automobile. You would write the prompt for the satisfaction question like this:
How satisfied are you with your {Response:AUTOMOBILE}?
Participants who indicated that they own a Ford will see "How satisfied are you with your Ford?" Those who said they own a Chevy will see "How satisfied are you with your Chevy?"
Piping tags are not case sensitive. That means {RESPONSE:QUESTIONID} and {response:questionid} will yield the same result.
If you need to pipe data from text fields attached to checkboxes or radio buttons, see Piping Data from Attached Text Fields below.
Special Behavior for Checkboxes
Because checkbox questions permit a participant to select multiple responses, the Response tag produces a comma-separated list of responses. For example, a checkbox question FOODS asks a participant to check each of the foods he or she has eaten in the past week. If the participant checks 10 items, then {Response:FOODS} will produce a comma-separated list of those 10 items. The list includes the labels that the participants saw, not the numeric codes that will be stored in the database. So you {Response:FOODS} would produce a piece of text like Peas, Carrots, Potatoes, Apples, Chocolate, etc.. The {Value} tag also behaves differently when applied to checkboxes, returning the number of items checked. Continuing the example above, the tag {Value:FOODS} would return the number 10 because the participant checked 10 items in the list.
User Data
Illume enables you to upload participant lists, which define the login names and/or passwords of participants who will be permitted to take your survey.
These participant lists may contain additional information about participants, such as first and last names, email addresses, or any other data you choose to include.
You may want to pipe this user data into your survey; for example, to welcome participants by name, or to display their email address as a pre-selected response option (so they don't have to type it in themselves).
Let's assume your participant list includes a piece of user data called FIRSTNAME that contains a participant's first name. To greet participants after they log in, you would include a Text/HTML object with the following text:
Greetings {UserData:FIRSTNAME}! Thank you for taking the time to visit our survey! Note that the following built-in variable exist for all participants on all Illume surveys, whether or not you have assigned them a value:
{UserData:ID} Illume's internally assigned globally unique identifier for each participant. No two participants will ever have the same ID.
{UserData:EMAIL} The participant's email address.
{UserData:FIRSTNAME} The participant's first name.
{UserData:LASTNAME} The participant's last name.
{UserData:CUSTOMID} A unique identifier that you define for your participants. For example, if participants are students, you may decide to put each participant's student id in this field as a unique identifier.
Preload/Hidden Data
Preloaded and hidden data can have several purposes. For example:
Illume can preload data from the participant list into the participant's survey.
Illume can read data appended to the survey URL and store it in a hidden variable.
Custom software developed with the Illume SDK (software development kit) can read and set values stored in hidden variables.
When you want the value of a hidden or preloaded variable to appear in a hidden input on a survey page, use the {Hidden} tag.
For example, adding the tag {Hidden:IQ} to a Text/HTML object causes Illume to output the following hidden HTML element on the survey page:
Q9$1" value="<current value>" />
Note that current_value will be the current value of the variable IQ. Q9$1 is the internal variable name. Generally, you cannot anticipate what this name will be.
Once the hidden variable is on your survey page, you can get the value of the hidden variable through JavaScript using the following:
var iq = document.DatStatForm.{FormElement:IQ}.value;
When you set this value with JavaScript, Illume will save the value when the participant submits the current page (i.e. clicks next, previous, save or submit).
Parameter Values
Parameter values are described in detail in the article Working with Survey Parameters. To pipe parameter values into your text, use the tag {ParamValue:PARAMNAME}, where PARAMNAME is the name of the parameter whose value you want to pipe in.
Attributes of the Current Question
You can pipe the following information about a question into the question's custom error message:
{Response} The label associated with the participant's response to the current question. For example, if the participant selected the response labeled "Toyota," {Response} will contain the text "Toyota." For checkbox questions, {Response} contains a comma-separated list of all of the items the participant checked. For text questions, {Response} contains the text the participant typed into the text box.
{Value} The value associated with the participant's response to the current question. For example, if the participant selected the response labeled "Toyota," and that response has a value of 4 in the scale values for the current question, {Value} will contain the number 4. For checkbox questions, {Value} contains the number of options the participant checked. For text questions, {Value} contains the text the participant typed into the text box.
{Score} For text, numeric, and date/time questions, {Score} yields the value of the response, just like {Value} above. However, {Score} will never be null. If a question was not answered, the {Score} will be zero. This is useful for arithmetic calculations in which null variables may cause problems. For Check all that apply questions, the {Score} tag gives the number of items checked. For individual checkboxes, the {Score} tag yields a value of 1 if the item is checked and 0 if the item is not checked.
{RScore} The response's reverse score. See the article on Calculations for details on how to use {RScore}.
{QNum} The number of the current question (as displayed on the HTML page that the participant sees).
{MinValue} The minimum value allowed as a response to the current question. (Applies to all question types except checkboxes.)
{MaxValue} The maximum value allowed as a response to the current question. (Applies to all question types except checkboxes.)
{MinRequired} The minimum number of options that must be checked in a group of checkboxes. (Applies to checkboxes only.)
{MaxRequired} The maximum number of options that may be checked in a group of checkboxes. (Applies to checkboxes only.)
{MinLength} The minimum length (in characters) allowed in response to the current question. (Applies to Text Fields only.)
{MaxLength} The maximum length (in characters) allowed in response to the current question. (Applies to Text Fields only.)
For example, if your question requires a numeric answer between 1 and 100, you may write a custom error message like this:
The value "{Value}" that you entered for question #{QNum} is not valid. Please enter a value between {MinValue} and {MaxValue}.
Participants will see an error message like this:
The value "I don't know" that you entered for question #12 is not valid. Please enter a number between 1 and 100.
This type of custom error message is helpful to both participants and survey designers. The message is specific enough to inform the participant of exactly what is wrong, and where.
The use of parameters ensures that the designer will not have to rewrite the error message if the question's minimum and maximum values change, or if the question is assigned a new question number.
Piping Responses into Other Questions
As noted under Participant Responses above, you can pipe the response from one question into the prompt for another question. You can pipe values into the default value of a question. For details, see Setting a Question's Response Options. In addition, you can pipe values into the upper and lower bound fields of a question's response requirements. This enables you to say that the answer to question C must be a value greater than the answer to question A and less than the answer to question B. For details, see Setting a Question's Response Guides.
Piping Data from Built-in Objects
Illume surveys include three built-in objects that can be piped in to question prompts, responses, error messages, and/or Text/HTML objects:
{ProgressBar} An image representing how far a participant has progressed toward the completion of the survey. Because this is an image, you cannot embed it in an error message.
{PercentComplete} A numeric value indicating the percentage of survey questions the participant will have completed upon submitting the current page.
{IpAddr} The participant's IP (Internet Protocol) address. This is a usually looks something like "192.168.1.212."
{FormElement} This tag gives the id of the question's HTML form element. For example, to get the id the form element for a question called AGE, use {FormElement:AGE}. This is useful primarily for client-side JavaScript. See the article on Custom Validation for a practical example.
Piping Data from Attached Text Fields
You can pipe data from a text box that is attached to a checkbox or radio button. For example, you have the following question whose name is ASSOCIATION:
You can pipe the text a participant entered into the text fields attached to each of the "Other" options by referring to one of the following variables: {Response:Association.Text} Retrieves the response from the text box next to Other Professional Association. {Response:Association.Text2} Retrieves the response from the text box next to Other Amateur Association.
{Response:Association.Text3} Retrieves the response from the text box next to Other Misc. Association. If your radio button or checkbox question has only one attached text field, the tag to retrieve the text from that field will always be {Response:QuestionID.Text}, where QuestionID is the unique name of your radio button or checkbox question. You can get the text from any subsequent attached text fields by using {Response:QuestionID.Text2}, {Response:QuestionID.Text3}, etc.
Note that the number of the text field (Text2, Text3, etc.) refers to the order in which the field was created, not the order in which the field appears. This allows you to reorder the responses to your checkbox/radio button question without having to modify any of the piping tags that exist elsewhere in your survey.
If you ever find yourself in a situation where you cannot figure out which attached text field is Text2, which is Text3, etc., do this: Open Microsoft WordPad. This is a free application that comes with Microsoft Windows. It's available from the Accessories section of the Windows Start menu. Drag the radio button/checkbox question out of the Survey Designer and drop it into WordPad. This will reveal the XML behind the question.
Each attached text field in the question includes a Description element and an attribute called textQuestionName. Look for the description that matches the textfield you're interested in, and get the field's name from textQuestionName (which usually appears on the line above the description).
All Illume surveys contain the following built-in variables. Note that variable names are not case sensitive.
User Data
User Data comes from participant lists uploaded through the Illume Web Console. These are data that you supply about your participants. Illume surveys always include the following variables for each participant on a participant list. Except for ID, if you do not define these variables, they will simply contain empty values.
{UserData:ID} Illume's internally assigned globally unique identifier for each participant. No two participants will ever have the same ID. There is currently no way for you to access or display this variable.
{UserData:EMAIL} The participant's email address.
{UserData:FIRSTNAME} The participant's first name.
{UserData:LASTNAME} The participant's last name.
{UserData:CUSTOMID} A unique identifier that you define for your participants. For example, if participants are students, you may decide to put each participant's student id in this field as a unique identifier.
Note that you access each of these variables using {UserData:VariableName}, where VariableName is one of the variables listed above. See Piping Data for examples of how to display User Data variables.
Participant Response Data
Participant response data refers to data that an individual participant has submitted in response to a survey question. These data are not available until the survey is running. You can access any participant response using the variable {Response:QuestionName}, where QuestionName is the question's unique name. See Piping Data for practical information on how to pipe participant responses into custom text or into the prompt of a new question.
Attributes of the Current Question
{Response} The label associated with the participant's response to the current question. For example, if the participant selected the response labeled "Toyota," {Response} will contain the text "Toyota." For checkbox questions, {Response} contains a comma-separated list of all of the items the participant checked. For text questions, {Response} contains the text the participant typed into the text box.
{Value} The value associated with the participant's response to the current question. For example, if the participant selected the response labeled "Toyota," and that response has a value of 4 in the scale values for the current question, {Value} will contain the number 4. For checkbox questions, {Value} contains the number of options the participant checked. For text questions, {Value} contains the text the participant typed into the text box.
{Score} For text, numeric, and date/time questions, {Score} yields the value of the response, just like {Value} above. However, {Score} will never be null. If a question was not answered, the {Score} will be zero. This is useful for arithmetic calculations in which null variables may cause problems. For Check all that apply questions, the {Score} tag gives the number of items checked. For individual checkboxes, the {Score} tag yields a value of 1 if the item is checked and 0 if the item is not checked.
{RScore} The response's reverse score. See the article on Calculations for details on how to use {RScore}.
{QNum} The number of the current question (as displayed on the HTML page that the participant sees).
{MinValue} The minimum value allowed as a response to the current question. (Applies to all question types except checkboxes.)
{MaxValue} The maximum value allowed as a response to the current question. (Applies to all question types except checkboxes.)
{MinRequired} The minimum number of options that must be checked in a group of checkboxes. (Applies to checkboxes only.)
{MaxRequired} The maximum number of options that may be checked in a group of checkboxes. (Applies to checkboxes only.)
{MinLength} The minimum length (in characters) allowed in response to the current question. (Applies to Text Fields only.)
{MaxLength} The maximum length (in characters) allowed in response to the current question. (Applies to Text Fields only.)
These attributes can be very helpful in crafting informative error messages. See Piping Data for examples.
Attributes of Other Questions
{Response:QuestionId} The label associated with the participant's response to the question named QuestionId. For example, if the participant selected the response labeled "Toyota" for the question whose unique name is "AUTOMOBILE," {Response:AUTOMOBILE} will contain the text "Toyota." For checkbox questions, {Response:QuestionId} contains a comma-separated list of all of the items the participant checked. For text questions, {Response:QuestionId} contains the text the participant typed into the text box.
{Value:QuestionId} The value associated with the participant's response to the question whose unique name is QuestionId. For example, if the participant selected the response labeled "Toyota" for the "AUTOMOBILE" question, and that response has a value of 4 in the scale values for the current question, {Value:AUTOMOBILE} will contain the number 4. For checkbox questions, {Value:QuestionId} contains the number of options the participant checked. For text questions, {Value:QuestionId} contains the text the participant typed into the text box.
Miscellaneous Built-ins
{ProgressBar} An image representing how far a participant has progressed toward the completion of the survey. Because this is an image, you cannot embed it in an error message.
{PercentComplete} A numeric value indicating the percentage of survey questions the participant will have completed upon submitting the current page.
{IpAddr} The participant's IP (Internet Protocol) address. This usually looks something like "192.168.1.212."
{Hidden:QuestionId} This tag creates a hidden HTML input element on the survey page. The value of the hidden input will be the value of the question or preloaded variable whose id is QuestionId. You can use JavaScript and the {FormElement} tag to get and set the value of the hidden variable. See Piping Data for more information on how this {Hidden} and {FormElement} work together.
{FormElement:QuestionId} This tag gives the id of the question's HTML form element. For example, to get the id the form element for a question called AGE, use {FormElement:AGE}. This is useful primarily for client-side JavaScript. See the article on Custom Validation for a practical example.
ProgressBar and PercentComplete appear in the header of the default survey template to remind participants of how far they have progressed through the survey.
{SurveyURL} This is used within the message body of an email job. Illume replaces this with a unique URL for each participant that takes the participant to the survey and automatically logs him/her in. This tag produces a clickable link. For example, {SurveyURL:Click Here to Start} produces a link with the text Click Here to Start.
{SurveyRawURL} This is used within the message body of an email job. Illume replaces this with a unique URL for each participant that takes the participant to the survey and automatically logs him/her in. This does not produce a clickable link. It produces a URL suitable for cutting and pasting into a browser.
{LaunchPageURL} This is used within the message body of an email job. Illume replaces this with the URL of the survey launch page. This is for surveys you want to run in a browser window that has no forward and back buttons, no menu or address bar, and no other user controls. This creates a clickable link. E.g. {LaunchPageURL:Click Here} produces a clickable link with the text Click Here.
{LaunchPageRawURL} Used in the message body of an email job, Illume replaces this with the full (non-clickable) URL to the survey launch page. (See LaunchPageURL above.) This does not produce a clickable link; it does produce a URL suitable for cutting and pasting in a browser.
Special Built-ins for the Save Page and Save Email
{SavePageEmailAddress} This is used in on the Save page only, in the error message that appears when a participant enters an invalid email address.
{SavePageEmailText} This tag is for the Save Page. Illume replaces it with a text entry box in which a participant can type his or her email address. After supplying an email address and clicking the Send Email button, Illume sends the participant a message containing a link back to their survey in progress.
{ResumeURL} This appears on the Save Page or in the Save Email. The Save Page appears after a participant sees after clicking the Save button. The Save Email is an email from the Illume system to the participant containing a link or URL the participant can use to resume a saved survey. Illume replaces this tag with a clickable link the participant can use to resume his or her survey. For example, Illume replaces {ResumeURL:Finish Your Survey} with a clickable link that says Finish Your Survey.
{ResumeRawURL} This appears on the Save Page or in the Save Email. Illume replaces this tag with a unique URL the participant can use to resume his or her survey later. The URL will be a clickable link in most email clients (such as Microsoft Outlook). Participants can also cut and paste it into a browser to resume their survey.
Note: The Save Email that Illume sends to the participant is an HTML formatted email. Illume does not send a plain text version.
Parameters
These are not really built-ins. Parameters are variables whose names and values you define for an individual survey. For example, if you want surveyadmin@yourcompany.com to be the email address to which participants write for help, you can define a parameter called "help" and set its value to surveyadmin@yourcompany.com. You can display the variable on any page of the survey, or in the header or footer, or in a question prompt or error message by using the placeholder {ParamValue:help}. Like built-ins, parameter names are not case sensitive, so {ParamValue:help} works the same as {PARAMVALUE:HELP}. If you ever need to change the help contact, simply change the value of help parameter, and Illume will update it everywhere it appears in your survey. See Working with Survey Parameters for details on how to define parameters. See Piping Data for information on how to display parameters in your survey.
Overview of Dynamic Defaults and Bounds
In versions 2.2 and later, Illume supports dynamic question default and bounds. This means you can set a question's default response, upper bound, or lower bound to a value from one of the following sources:
Participant Response Data - Data the participant has entered in response to a prior question. This includes calculated variables, so long as Illume has enough data to calculate the variable before piping it in.
User Data - Data associated with this participant in your participant list.
Survey Parameters - Data from survey-wide variables that you assign in Survey Preferences.
Use the following tags to pipe values into defaults and bounds:
{Value:QuestionId} - This will pipe in the value of any question the participant has answered. Change QuestionId to the name of the question whose answer you want to pipe in. E.g. {Value:HEIGHT} will pipe in the answer to the question named HEIGHT.
{UserData:FieldName} - This will pipe in data from your participant list. Change FieldName to the name of the field you want to pipe in. For example, if your participant list includes a field called LASTNAME for each participant, you can pipe the current participant's last name by typing {UserData:LASTNAME}.
{ParamValue:ParameterName} - This will pipe the value of a survey parameter. Survey parameters are survey-wide variables. Each has a name and single value that will be the same for all participants. To pipe the value of a survey parameter called PRODUCT, use the tag {ParamValue:PRODUCT}.
Case does not matter for these tags: {Value:HEIGHT} and {value:height} produce the same result. The curly braces do matter! Piping tags must be enclosed in curly braces {}!
Dynamic Bounds
Questions that use a numeric data type allow you to define the upper and lower bounds of a valid response. You set the bounds in the Response Guides tab of the Question Editor, or in the Response Guides tab of the Attached Text Field editor (if you are working with a text field that is attached to a select-one or check all question).
For example, assume you have a question called CURRENTWEIGHT that asks a participant's current weight. Earlier questions asked for the participant's minimum weight (MINWEIGHT) and maximum weight (MAXWEIGHT) over the past 12 months. If you want to ensure that the participant enters a current weight that is between his minimum weight and maximum weight, you would set the Lower Bound of CURRENTWEIGHT to {Value:MINWEIGHT} and the Upper Bound to {Value:MAXWEIGHT}.
When the participant is taking the survey, Illume substitutes the participant's answers to the MINWEIGHT and MAXWEIGHT questions for the {Value:MINWEIGHT} and {Value:MAXWEIGHT} tags. There is some risk in doing this: if the participant did not answer MINWEIGHT or MAXWEIGHT, or if the answers to those questions were not numeric, Illume will not try to validate the answer. If you are going to take advantage of dynamic bounds, you should adhere to the following practices:
The question for which you are setting bounds must have a numeric data type. Any numeric type will work. E.g., An appropriate data type for CURRENTWEIGHT would be "Whole numbers > 0."
The question whose answer you pipe into the bounds should have the same data type as the question itself. E.g. When setting the bounds for CURRENTWEIGHT, whose type is "Whole numbers > 0," you should be sure that MINWEIGHT and MAXWEIGHT also use data type "Whole numbers > 0." The validation may work if the data types do not match, but the chances are significantly better if the data types do match.
The piped questions (MINWEIGHT and MAXWEIGHT) should require a response. If a participant doesn't answer these questions, Illume has no data to pipe into the bounds and cannot perform the validation. In fact, Illume will not even try to perform the validation if it does not have all of the data it needs.
When setting defaults and bounds, you should generally avoid piping from checkbox questions. When applied to checkbox questions, the {Value} tag actually returns the number of items checked. The {Response} tag returns a comma-delimited list of the labels associated with each checked item in a checkbox question. Generally, this is not what you want for defaults, and will certainly not work with bounds.
Dynamic Default Values
Dynamic default values work just like dynamic bounds: you can pipe a participant response using the {Value:QuestionId} tag, data from the participant list using the {UserData:FieldName} tag, or a survey parameter using the {ParamValue:FieldName} tag.
As with dynamic bounds, there are a few things to keep in mind when piping one question's response into the default value of another question:
The question whose answer you pipe into the default value have the same data type as the question itself. E.g. If the current question uses the whole number data type, the value you pipe into the default should be a whole number.
Use the {Value:QuestionId} tag to get the numeric value associated with the item a participant selected in a select-one question. This is usually what you want when you are setting the default of a question whose data type is numeric.
Use the {Response:QuestionId} tag to get the text that appeared next to the option the participant chose. This is usually what you want when you are setting the default of a question whose data type is text.
The question from which you are piping should require a response. If Illume has no data to pipe into the default, then it will leave the default value empty.
When setting defaults and bounds, you should generally avoid using the {Value} tag to get the value of a checkbox question. When applied to checkbox questions, the {Value} tag actually returns the number of items checked. The {Response} tag returns a comma-delimited list of the labels associated with each checked item in a checkbox question. Generally, neither of these values are useful in setting defaults.
Other Notes About Default Values
If a question uses response options and no default option is set, the option that will be selected when a participant first sees the question is the "unanswered" option. You can set the text of the "unanswered" option on the Data tab of the Survey Preferences editor. See Customizing Labels for Unanswered Items. The "unanswered" option exists only when the text for the unanswered option is not empty. To remove the default value, simply delete whatever is typed into the default field.
To add text, HTML, or images to your survey, or to embed items like Flash animations, movies, Java applets or sound clips, use the HTML editor.
To add any of these elements to your survey:
In the right pane of the Survey Editor, click on the item after which you want your text or HTML to appear. (If the item is not currently showing in the right pane, click on the collection that contains the item in the left pane of the Survey Editor.)
Click the Add Text/HTML icon in the toolbar.
Create the HTML in the HTML Editor. You'll find detailed information about how to use the HTML Editor under "Using the HTML Editor."
Click OK to save your work.
Describing Text/HTML Items for the Data Dictionary
You'll notice that the Text/HTML editor includes a Data Dictionary tab. While you can give the Text/HTML item a unique name and a description, this information does not actually go into the data dictionary. The information is simply for your own reference.
Controlling Where and When Text/HTML Items Appear
Text/HTML items will be shown to all participants, appearing in the same order in which they appear in the Survey Designer. That is, if the Text/HTML item appears after the question called "INCOME" in the Survey Designer, it will appear after the question called "INCOME" in the participant's survey.
You can move a Text/HTML item to any location in your survey by simply dragging it from its current location and dropping it into the desired location. Moving the item up will cause it to be displayed earlier; moving it down will cause it to be displayed later.
You can also apply show-if conditions to a Text/HTML item, so that it will be displayed only when the conditions you describe are met. For information on how to create Show-if conditions, see Setting Show-if Conditions.
Illume's HTML editor enables you to create HTML pages, or parts of pages, without any knowledge of HTML.
What You See is What You Get
Except for parameters and built-in survey variables, any content you create in the HTML editor will appear in a participant's browser exactly as it appears in the editor.
In the HTML editor, survey parameters and built-in variables appear as variable names enclosed in curly braces, such as the built-ins {PercentComplete} and {ProgressBar}. When a survey is running, Illume automatically calculates and displays the values of these parameters, so that survey participants see an actual progress bar and their current completion status. While {PercentComplete} and {ProgressBar} are built in to all Illume surveys, you can define other parameters as you please. See the section on Parameters for more information.
The HTML editor works like a word processor. For example, to set the font of a section of text, first highlight the text by clicking and dragging the mouse across it. Then choose the font, color, size, justification, or other attributes you wish to apply. Click once anywhere in the editable area to deselect the text, and you will see that the formatting has been applied.
Note: If you are working on a multilingual survey, and you have translation tools enabled, you will see a list of languages at the bottom of the Text/HTML editor. Choose a language to edit the Text/HTML for that specific translation. Any changes you make the Text/HTML, or to the Description (on the Data Dictionary tab) will apply only to the selected translation. Any changes you make to the unique name of the Text/HTML item, or the the show-if conditions, will apply to ALL translations.
Adding Tables
To add an HTML table, move the cursor to where you want the table to be, and click the Insert table button on the toolbar. Currently, the editor supports only tables consisting of a single row and a single column. If you understand HTML, you can create more complex tables by editing the HTML directly, as described below.
Adding Images
To add an image to your HTML, follow these steps:
Move the cursor to the position at which you want to insert the image.
Click the Insert image button.
If the image you want to insert has already been added to your survey, it will appear in the Select Resource list. Simply click on the name of the image and skip to step 9 below.
If the image already exists on a web server that will be available to your participants, you may want to simply enter the URL of the image. The image will appear in the participant's survey just like any other image.
If the image you want to insert does not appear in the Select Resource list, click New Resource... to add the image.
In the resource editor, click Upload to upload the image into the survey. This brings up a file selection dialog from which you can choose the file you want to upload. When you find the file, select it and click Open . Illume will upload it into your survey.
The name of the image will appear in the Unique Name field. You can edit this if you please. Note that once an image is uploaded, it will appear in the "Select Resource" list under its unique name, and will be available for reuse anywhere in the survey.
You may provide an optional description for the image. A good description can help you or other survey editors determine whether the image is appropriate for use elsewhere in the survey.
Click OK .
Your image now appears in the list of available resources. It is selected, and the width and height are automatically filled in.
Set the image attributes as you please. These are described below.
Click OK , and the image will be added to the document. You can move the image to another place in the document by simply dragging and dropping.
Defining Image Attributes
You can define the following image attributes:
Width The width of the image, in pixels. Illume sets this automatically to the actual width of the image, but you can reset it as you please. See "Constrain width/height" below.
Height The height of the image, in pixels. Illume sets this automatically to the actual width of the image, but you can reset it as you please. See "Constrain width/height" below.
Constrain width/height If you check this box before changing an image's width or height attributes, Illume will automatically ensure that the image maintains its original proportions when you resize it. That is, if you reduce the image's width by 20%, Illume will automatically reduce the height by 20% as well. This ensures that the image displays correctly after being resized.
HSpace This is the horizontal space, measured in pixels, that on the left and right sides of the image. If your text runs up against the edge of your image, increase the image's hspace attribute to provide more space. Setting this to 10, for example, will create an empty margin 10 pixels wide on the left and right sides of the image.
VSpace This is the vertical space, measured in pixels, that appears above and below the image. Setting this to 10, for example, will create an empty margin 10 pixels high immediately above and below the image.
Border This is the thickness of the border, measured in pixels, that surrounds your image. A value of zero means the image will have no border. Most browsers will apply a gray border to images. The only way to override this is to define a different color in a CSS stylesheet.
Alignment This determines how the image will be aligned on the page.
Baseline aligns the bottom of the image with the bottom of the line of text that precedes or follows the image.
Left aligns the image on the left side of the page, or on the left side of the table cell, if the image is in a table.
Right aligns the image on the right side of the page, or on the right side of the table cell, if the image is in a table.
Center aligns the image in the center of the page, or in the center of the table cell, if the image is in a table.
Alternate Text The alternate text property provides a description of the image. Normally, participants see this description when they mouse over the image, or when their browser is waiting to load the image. If a participant's browser cannot display images, it will display the image's alternate text instead.
Note : The alternate text attribute is important for visually impaired participants, whose computers may read the survey pages aloud to them. Because the computer cannot "read" an image aloud, it reads the description of the image contained in the alternate text attribute.
If you are creating a survey aimed at government employees, or funded by the Federal government, the US Government's Section 508 Usability guidelines require that you provide an alternate text description with all images. You can find out more about the Section 508 guidelines at http://usability.gov/accessibility/508.html
Deleting an Image
To delete an image in the HTML editor, simply click on the image and press the delete key.
Adding Links
To add a link to your HTML, follow these steps:
Select the text or image to which you want to attach the link. (If you do not select any text or image, the HTML editor will automatically insert the link's URL as the text of the link.)
Click the Insert Link button.
Select the type of link you want to insert. This will generally be one of the following:
http This is a link to a normal web page.
https This is a link to a secure web page.
mailto This is an email link.
Type in the link's URL. For example, if you were linking to Yahoo, you would choose "http" as the links type, and type in "www.yahoo.com" as the URL. Note that the URL already has the prefix you selected from the type list.
Click OK .
Note that when a participant clicks on a link, the page will load in the participant's current browser window. This means that if the URL is not part of your survey, the participant will leave your survey when he or she clicks on the link!
For this reason, you may want to add external links only to the Survey End Page.
You can force the URL to load into a separate browser window by editing the HTML directly (see below). To do this, locate the link in the HTML, and add the attribute target="_blank".
Select the text or image to which the link is attached.
Click on the Insert Link button.
Change the URL as needed.
Click OK .
Deleting Links
To delete a link:
Select the text or image to which the link is attached.
Click on the Insert Link button.
Delete the entire URL.
Click OK .
Copying and Pasting from Microsoft Word
You can copy and paste text directly from Microsoft Word into the HTML editor, and your formatting will be preserved. You can also highlight a section of a Word document and drag this highlighted text into the HTML editor. This has the same effect as copying and pasting, bringing both the text and formatting from Word.
Editing the HTML Directly
To edit HTML directly, click on the WYSIWYG/HTML button, on the right side of the toolbar. You can switch back to WYSIWYG mode by clicking on the button again.
Illume automatically determines where page breaks are required, and creates them while the survey is running. For example, if question number 10 asks a participant's age and question 11 should ask the participant's employment status only if the participant is between 18 and 65 , then Illume will create a page break between questions 10 and 11, because it cannot know whether to present question 11 until after it receives the response to question 10.
In these situations, you cannot prevent Illume from creating page breaks. You can, however, insert your own page breaks wherever you please. To insert a page break:
In the right pane of the Survey Editor, click on the item after which you want the page break to appear. (If the item is not currently showing in the right pane, click on the collection that contains the item in the left pane of the Survey Editor.)
Click the Add page break... icon in the toolbar.
The page break appears after the item you selected. You can move it to another location by dragging and dropping it.
You may add resources such as images, videos, Flash files, and sound files to your survey. The first step is to upload the resource into the survey:
Adding a Resource to Your Survey
Follow these steps to add a resource to your survey:
Choose Survey > Survey Resources... from the Survey Designer menu
Click Add.
In the resource editor, click Upload to upload the file into the survey. This brings up a file selection dialog from which you can choose the file you want to upload. When you find the file, select it and click Open. Illume will upload it into your survey.
The name of the file will appear in the Unique Name field. You can edit this if you please. Note that once a resource is uploaded, it will appear in the Select Resource list under its unique name, and will be available for reuse anywhere in the survey.
You may provide an optional description for the resource. A good description can help you or other survey editors determine whether the image is appropriate for use elsewhere in the survey.
Click OK .
Image resources appear in the preview pane. Simply click on the name of an image in the Survey Resources list to make it appear.
To preview a text or HTML resource, click the name of the item in the list, then click the Show Text/HTML button. This button appears in the preview pane only when you've selected a text or HTML resource.
Making a Resource Appear in Your Survey
Once a resource is included in your survey, use the HTML Editor to make the resource appear where you want it to appear. See Using the HTML Editor for more information.
Editing a Survey Resource
If you need to change the name of an existing survey resource, or upload a newer version of the resource, follow these steps:
Choose Survey > Add/Edit Survey Resources... from the Survey Designer menu
Double click on the name of the resource you want to edit.
Type a new unique name, if you wish.
Click Upload if you need to upload a newer version of the resource. This brings up a file selection dialog from which you can choose the file you want to upload. When you find the file, select it and click Open . Illume will upload it into your survey.
Click OK .
Deleting a Survey Resource
Follow these steps to delete a resource from your survey:
Choose Survey > Add/Edit Survey Resources... from the Survey Designer menu
Click once on the name of the resource you want to edit.
Click Delete .
Click OK when asked if you really want to delete the resource.
Click OK to close the Survey Resources editor.
Resources and Translation
Text from uploaded resources will appear in translation packages only if the uploaded resource is text-based. For example, an HTML page uploaded as a resource will become part of a translation package. Text appearing in binary resources, such as images and Flash files, will not become part of a translation package.
You can preview your entire survey at any time. When you preview a survey, you will see the survey almost exactly as a participant will see it. The only differences between what you see and what a participant will see are 1) your preview appears in a special preview window, rather than in a full browser window, and 2) the previewer puts a "Comments" icon next to each question.
The preview version of the survey also behaves exactly as the participant's will behave. All of the response requirements are enforced, all of the response validation messages work, and all of the show-if conditions apply.
To preview a survey, simply click on the Preview icon in the toolbar. Your survey will appear in the preview window. If your survey includes more than one language, use the language list in the lower right corner of the previewer to choose which language to display.
Adding Comments to a Question
Click on the Comments icon next to any question, and the comments editor will appear. The comments editor displays a description of the question and any existing comments. It provides a space for you to add new comments.
Simply type your comments and click OK to add them to the question. The comment icon will appear next to this question in the Survey Designer, and the comments you typed will be available for review to anyone editing the survey.
Show All Pages (Preview Layout)
Check this box if you want to see the entire survey at once, complete with page breaks. Checking this box presents the same view you see when you select the Preview Survey Layout option from the Survey Designer's File menu. This mode displays jumps and show-if conditions, along with the logic attached to each.
Print Preview
The Print Preview button at the bottom of the Preview window displays the current survey page as it would appear when printed on paper.
Print
The Print button at the bottom of the Preview window sends the current survey page directly to your printer.
Reload
Click the Reload button to go back to the first page of the survey.
Done
Click the Done button to close the Preview window.
Previewing a Non-local Survey
To preview a survey that you have not checked out:
Click the Survey Administration tab in the Survey Console.
Right click the name of the survey and choose Preview Selected Survey... from the context menu.
This preview shows the survey in print mode, rather than in interactive mode. That is, the entire survey appears on a single scrolling page, complete with question ids and comments.
If the survey includes more than one language, use the list in the lower left corner of the previewer to choose which language to display.
You can preview any question or Text/HTML item in your survey:
Right-click on the item and select "Preview Selected..." from the context menu, or
Select the item with a single click and then click the Preview Selected Item icon from the toolbar.
Note that when you preview an individual item, the previewer does not substitute actual parameter values for parameter value placeholders. It simply displays the placeholders. If you want to preview the item with the actual parameter value instead of the placeholder, you must preview the entire survey. See "Previewing a Survey" for details.
You can preview all survey pages at once by selecting Preview Survey Layout... from the Survey Editor's File menu. This presents all of the items in your survey, and displays where all page breaks will occur. Note that automatically generated page breaks are labeled "Auto-Pagebreak," while those you added manually are labeled "Pagebreak."
Unlike the regular Survey Preview, the Layout Preview does not apply show-if conditions or validate response requirements. It does however display jumps and show-if conditions, along with the logic attached to each. The purpose of this preview is to display all questions in order, and to provide a means of printing out all of the questions in a single document.
As in the normal preview mode, you can add comments to questions.
Print Preview
The Print Preview button presents a preview of a printout of all survey questions, in order.
Print
The Print button prints the entire survey, as it appears in the print previewer.
Reload
The Reload button reloads the survey into the Preview window.
Done
The Done button closes the Previewer.
To view a published survey:
Click the Survey Administration tab in the Survey Console.
Right click the name of the survey and choose View Published Survey... from the context menu.
Click the Save icon in the Survey Designer toolbar to save the latest changes to your survey.
Select File > Preview Survey Layout... .
Click the Print button at the bottom of the Layout Previewer.
Note that the printed version of the survey will differ from the browser-based version in the following ways:
The page header and footer of the live survey will not appear.
The navigation and submission buttons that appear at the bottom of each survey page in the live version will not appear.
Parameter placeholders will appear, rather than the actual parameter values that appear in the live version of the survey.
Special markers indicating page breaks will appear. Those labeled "Auto-Pagebreak" are created automatically by Illume, while those added manually are labeled "Pagebreak."
A comment icon appears next to the prompt of each question.
You can print any individual question or Text/HTML item in your survey by following these steps:
In the right pane of the Survey Editor, right-click on the item to which you want to attach a comment. (If the item is not currently showing in the right pane, click on the collection that contains the item in the left pane of the Survey Editor.)
Choose Preview Selected Item... from the context menu.
Click the Print button in the Previewer.
Illume is designed so that survey objects can be easily reused. There are three ways to reuse questions, question blocks and Text/HTML objects. Note, however, that the second method has some distinct advantages.
Copy from Survey to Survey
One way is to copy items from one survey to another. Simply open both surveys and drag the item you want to reuse from one survey into the other.
Copy Items from the Repository
You may also drag items out of the repository into your survey. If the item you want to use exists in the repository, this is the preferred method of reuse.
The major advantage of reusing items from the repository is that repository items permit cross-survey queries. You'll find more detailed information about this in the Repository Overview.
Note that if a repository item appears with red text, it has not yet been approved for reuse, and you will not be able to drag it into your survey. Only approved repository items (those appearing in black) may be reused.
Sharing Items Through Email
You may drag an item out of an existing survey and drop it into the text of an email. When you do this, Illume inserts an XML description of the object into your message.
The recipient of the message can highlight the XML, then drag it into his or her own Illume survey. The Survey Designer will read the XML description and create an exact copy of the object inside the new survey.
If your survey requires special symbols, accented letters, or characters that do not belong to the Latin alphabet, use Microsoft's built-in character map to add the characters to your survey.
From the Windows toolbar, choose Start > Accessories > System Tools > Character Map
For each character you want to add, click on the character and click Select to copy it into the Characters to copy field.
Once you've selected all of the characters you want to copy, click the Copy.
Click once in the Question Designer, or HTML editor and move the cursor to the point at which you would like to insert the special characters.
Hold down the control key and press the letter v (Ctrl-V) to paste the special characters into your text.
Note: You can paste special characters into almost any Windows application using this method.
Illume Surveys are stored as XML documents in C:\Documents and Settings\YOUR_USER_NAME\Application Data\DatStat\Survey Cache\localhost. (Substitute your Windows login name for YOUR_USER_NAME.)
Open the XML file in any text editor to edit the XML by hand. You should not edit the XML file if the Survey Designer is open, because your text editor and the Survey Designer may try to save conflicting changes to the same file.
If want to edit only a single survey item, you can drag the item from the Survey Designer into a text editor, and the XML will appear in the editor. After editing, select all of the XML and drag it back into the Survey Designer. The Survey Designer may ask you to give a new name to the item you are dragging in.
If you edit any Survey XML by hand, be sure to validate the survey before you start editing it again the Survey Designer. See Validating a Survey.
To check whether a survey is valid, choose Tools > Validate Survey... from the Survey Designer menu. If the Survey Validator finds any problems, it will explain them.
A survey may become invalid when any of the following occur:
Someone edits the survey XML by hand and leaves the XML malformed. The survey is invalid because the XML is invalid.
Question B includes text piped in from the response to question A, and then question B is moved from its original location, so that it now appears before question A. The survey is invalid because question B relies on information that it cannot possibly obtain.
Question B includes a show-if condition that evaluates the response to question A, and then question B is moved from its original location, so that it now appears before question A. The survey is invalid because question B relies on information that it cannot possibly obtain.
This article describes how to create hidden variables in your Illume survey. Hidden variables store data that can be used for calculations, and can be saved with a participant's submitted survey.
Participants do not explicitly answer questions to set the value of hidden variables. Instead, data for hidden variables comes from one of three places:
Illume can preload data from the participant list into the participant's survey.
Illume can read data appended to the survey URL and store it in a hidden variable.
Custom software developed with the Illume SDK (software development kit) can read and set values stored in hidden variables.
Creating Hidden Variables and Preloading Data from Participant Lists
Participant Lists include a list of all the participants invited to take your survey, along with a unique id for each participant and optional additional information. It may be useful at times to preload data from the participant list into a participant's survey. For example, if you want your survey to greet each participant by name, you can preload the name and display it when the participant logs in. Sometimes you may want to pre-load data that will never be displayed to the participant, but that will end up in the data that is submitted with the participant's survey. To preload data from a participant list into a survey, follow these steps:
From the Survey Designer's Survey menu, choose Preload/Hidden Variables...
Click Add... to add a new variable.
Type in a name for the variable you are loading. This should be a descriptive name, like "USERNAME" for a participant's name. The variable name must be unique: that is, no other questions or objects in your survey can have the same name as this variable.
Choose the Value Type that you will be using
Single-value will utilize the data type that you choose from the drop-down menu. This refers to a preload/hidden variable that will have exactly one value. Data type Text will work for any value that you pre-load from a participant list. However, if you are going to use the preloaded data in a numeric calculation later in your survey, you should choose either Whole Numbers or Decimal Numbers. Illume will not attempt to perform numeric calculations on Text data.
Multi-Value (Check All) assumes that data will be passed into your survey in a comma-delimited fashion and, the values correspond to the scale that you define in the Scale tab. If you are using this preloaded/hidden variable in a MultiControl component, your scale is capable of dynamically generating your table. See the section on MultiControl for more information on this topic.
Choose a default value for the variable. The following options are available:
None - When participants start the survey, the variable will have no value.
User data - When each participant begins the survey, the variable will be set to a value found in the participant's participant list entry. Participant lists include the columns FIRSTNAME, LASTNAME, EMAIL, CUSTOMID, and any custom columns you define.
You must enter the name of the participant list column from which to populate the data. In the image above, the value for the variable PL_YOB comes from the participant list column called BIRTH_YEAR. When a participant starts the survey, Illume copies the participant's birth year from the participant into a hidden variable in the survey.
Custom - Choosing Custom enables you to set the default value of the variable to any value you choose. Simply enter the value in the box next to the word Custom. Illume will set the value of this variable to the value you entered for all participants starting the survey.
When choosing the Custom option, be sure the value you enter matches the variable's data type. For example, if you've chosen Whole Numbers as the data type, be sure to enter a number as the default value; otherwise, the default value will be "unanswered."
(Optional) Check any of the checkbox options described under Special Options for Preloaded Data below.
(Optional) Type a description for this variable. Unless this is a runtime only variable, the description will appear in the data dictionary along with the descriptions of all other survey questions.
Steps to Create a Multi-Value Preload/Hidden Variable
To add a Preload/Hidden Variable begin by selecting Survey > Preload/Hidden Variables
Click Add
The Unique name can be anything you like
Select the Value Type as Multi-Value
The Default Value should be User Data, with the field being the same as the column in the participant list
Enter a Prompt Description
Click the Scale Tab
Enter the Name and visible text for each Scale Value and Click Add
You should see the Scale Values in the lower field as they are added.
After you have added all of the Scale Values, Click OK
NOTE: There is only a need for one column in the Participant list for this variable if you are filling it with data from the Participant List.
Special Options for Preloaded Data and Hidden Variables
Disable this preload - This disables the preload without deleting. This may be useful for temporarily turning off a preload.
Automatically generate a scale as unique values are discovered - This option is useful if you know ahead of time that the number of possible values for this variable will be limited. For example, if you are preloading the US state in which a participant lives, there are only 51 possible values (including DC). The scale that Illume generates appears in the Web Console's Data Dictionary. In the Web Console, items with scales can be included in cross-tab queries and summary statistic results. This is one of the most common reasons for generating scales for preloaded data.
If the number of possible values is very large, checking this option may cause Web Console queries to run slowly.
Runtime only (do not store the value of this item) - This option makes the preloaded value available while the survey is running, but does not submit the value to the database when the participant submits the survey. This can be useful for data that are required for calculations, show-if conditions, or run-time display but that should otherwise be kept separate from results.
Conditions Under which Preloads Will Fail
Illume will not preload data if either of the following conditions are true:
There is no data to preload for the current participant. E.g. Your survey preloads each participant's phone number from the participant list into the survey, but the participant list has no phone number for participant 9999. The preload for participant 9999 will be empty.
The data that Illume is trying to preload do not match the data type you specified in the preload variable. E.g. Your survey preloads each participant's weight into a variable called WEIGHT, whose data type is "Whole Number." In the participant list, participant 9999's weight appears as "N/A". Because "N/A" is not a whole number, Illume loads no value into the WEIGHT variable for participant 9999.
The second problem is most likely to occur with variables of type Date, Time and Date/Time. Date and time values must be properly formatted before they can be loaded. See Date and Time Data for more information.
Preloading Data through the Survey URL
You can pre-load data by embedding it in the URL a participant uses to access your survey. For details, see Passing Data though the Survey URL. There are two things to keep in mind pre-loading data through the URL:
You must first create the variable in the Preload Editor. Otherwise, Illume has no place to store the value it receives in the URL.
If the variable name exists in both the participant list and in the URL, Illume will use the value in the URL if it is available. If there is no value in the URL, Illume will use the value in the participant list, if available.
Passing data to a Multi-Value Preload/Hidden Variable from a Query String
Like all Preload/Hidden Variables, it is possible to pass the information directly from a Query string into the variable.
Use the name that you added in the Multi-Value Preload/Hidden Variable Userdata field and the Scale Values separated by commas. If the Scale value is not passed it will be assumed to be not selected.
In the example Query String, the Multi-Value Preload/Hidden Variable CRITERIA will be Yes for OPTION1 and OPTION2 and No for OPTION3
An Illume survey can capture any data passed in through the query string of the survey URL. These data are treated as if they came from the participant list. Participant list data and data that come in through the query string of the survey URL have the following characteristics:
The data are NOT saved with the participants' responses, unless you explicitly make this happen (see Saving Data From the Query String below)
The data are available throughout the survey for use in piping, calculations, and show-if conditions.
A Practical Example
Assume you have a survey with 2 different email invitations: one invitation offers participants a free music CD for completing your survey, and the other invitation offers participants a $10 check. You want to know which invitation has the higher response rate. The first invitation includes the following survey URL: https://www.datstat.com/Collector/Collector.ashx?LoginId=abc123&INCENTIVE=FREECD The second invitation includes this URL: https://www.datstat.com/Collector/Collector.ashx?LoginId=abc123&INCENTIVE=CHECK&CRITERIA=OPTION1,OPTION2 Anyone accessing the survey through either of these links causes a UserData variable called INCENTIVE to be created as well as a Multi-Value variable called CRITERIA with OPTION1 and OPTION2 set to Yes. You can get the values of these variables anywhere in your survey by typing {UserData:Incentive} or {UserData:Criteria.OPTION1}. (The case of the letters does not matter. The curly braces do!) You can create a question in your survey that asks which music CD the participant would like to receive, and you can set a show-if condition on that question so that it appears only when {UserData:Incentive} equals "FREECD". While variable names in the URL are case-sensitive in most web-based applications, variable names in the URL of an Illume survey are not case sensitive. The Illume server does not differentiate between INCENTIVE=CHECK and incentive=CHECK.
Saving Data from the Query String
Like data from the participant list, data from the query string are not automatically saved with the participant's responses. If you wanted to save the Incentive data from the example above, follow these steps:
Decide ahead of time what the name of the variable will be! For this example, we will use the variable name INCENTIVE.
In the Survey Designer, choose Survey > Preload/Hidden Variables....
Click the Add button.
Enter a unique name for the data. This name will appear in the Data Dictionary and will be the name of the variable in which the data are stored in the Web Console. For this example, we will call the variable PAYMENT_TYPE.
Choose a data type that matches the data you are expecting to passed in the query string. For the INCENTIVE example above, you should choose Text.
Under Default Value, choose the User data option.
In the text box next to User Data type the name of the variable that will appear in the URL. For example, if the variable in the URL is called INCENTIVE, then type INCENTIVE here. This tells Illume to take the data from the INCENTIVE variable in the survey URL and to store them in the variable PAYMENT_TYPE when the participant submits the survey.
(Optional) Click the Scale tab and choose a scale option for this variable. A scale can be useful for creating calculated variables, show-if conditions, and data queries. The scale options include:
Do not use a scale for this item. This is a good choice when the list of potential values for the variable is large.
Automatically generate a scale as unique values are discovered. This is useful if the the variable may include an unknown set of responses within a limited range. For example, if you are passing the name of a partner site through the URL, you may not know ahead of time who all the partner sites will be, but you do know that there will not be more than a few dozen of them.
Predefined. Use this if you know ahead of time all of the possible values that the variable may store.
Click OK.
Note: The Preload Editor first looks in the participant list for the field you named in User data name, and then it looks at the contents of the survey URL. If your participant list already contains a field called INCENTIVE, and you pass in an INCENTIVE value on the URL, then {UserData:Incentive} will contain the value passed in through the URL rather than the value from the participant list. In short, the value from the URL overrides the value from the participant list.
General Notes about URLs and Query Strings
The query string portion of a URL consists of everything after the first question mark in the URL. In the example below, the query string appears in bold italics: https://www.datstat.com/Collector/Collector.ashx?product=gadget&incentive=freecd&source=yahoo+shopping This query string includes 3 variables: product (this might indicate the type of product the participant purchased), incentive (which may indicate the type of payment the participant has been promised) and source (which may indicate the page or web site on which the link to your survey appeared). Each variable is represented by the variable name, followed by an equal sign =, followed by the variable's value. Each name-value pair in the query string is separated by an ampersand &. Variable names should include only letters, numbers and underscores. Spaces in variable values must be represented by a plus sign +. (Notice that the source in the URL above, yahoo shopping, appears as yahoo+shopping.)
Reserved Words
The following variable names are reserved for use by the Illume server. You cannot use these variable names in your URL:
Name
Path
XmlDocument
LoginId
PageLayout
PrintPreview
Words with Special Meaning
The following words have special meaning in the URL. You may use them, but you should understand first what they do.
TESTDATA If this is set to 1, the survey will be marked as test data when it is submitted. See Adding a Test Data Flag in the URL, below.
LCID This has the same effect as Translation above.
Adding a Test Data Flag in the Survey URL
If the URL used to access a survey includes TESTDATA=1 in the query string, the data from that survey will be marked as test data. For example, in a survey that uses the variable customid to authenticate participants, the following survey URL would give participant 9999 access to the survey: https://www.datstat.com/Collector/Collector.ashx?customid=9999 When the participant submits the survey that he or she accessed through this link, the data will be saved as normal response data. For testing purposes, the participant could access the survey through this URL: https://www.datstat.com/Collector/Collector.ashx?customid=9999&TESTDATA=1 Any data the participant submits after accessing the survey with this URL will be treated as test data. The Web Console separates normal participant data and test data so that test data does not skew actual results.
Note Each participant can only take an authenticated survey once, unless this participant is a test participant or the survey session is marked as a test session by appending "&TESTDATA=1" to the URL. Avoid using real participants to submit test data, because doing so could prevent the participant from being able to take a survey and will possibly skew your non-test data.
Overview
A jump causes a participant to jump from one part of a survey to another, skipping everything in between. Jumps can be conditional, occurring only when a participant meets certain criteria, or unconditional, in which case they always happen for all participants. A jump can move a participant forward or backward through a survey. Each survey can contain multiple jumps.
Warnings
While jumps are convenient, they can make a survey excessively complex, difficult to test, and difficult to maintain. In general, you should use show-if conditions rather than jumps, for these reasons:
Show-if conditions appear as yellow circles next to survey objects in the survey designer. That means you always know where they are, and can easily see the conditions attached to them. This makes them easier to maintain and edit.
Unlike show-if conditions, jumps are not attached to any particular object. While a show-if condition can suppress only the object to which it is attached, a jump can suppress all objects between its point of origin and it's destination. If a certain question is not appearing in your survey, it's easy to look at the question to see if a show-if condition is attached. It's much more difficult to hunt through the entire survey looking for a particular jump that contains a condition that might cause your question not to display.
Poorly implemented jumps can leave participants in an infinite loop. For example, if a jump sends certain participants back to question #2 after they answer question #10, some participants may never be able to get past question #10 of your survey.
When to Use Jumps
There are two particular cases in which jumps are preferable to show-if conditions:
When you want a participant to go directly to the end of a survey.
When a single jump will prevent you from having to create many identical show-if conditions.
How to Use Jumps
To add a jump to your survey, follow these steps:
In the Survey Designed, choose Survey > Add Jump...
(Optional) Give the jump a unique name. A descriptive name will help you to remember the purpose of this jump.
(Optional) Type in a description. This can help you understand the reason for the jump.
Choose the jump's destination. Jump to the end of the survey goes to the last page of the survey without submitting. No questions will appear on this page; only the Submit and Back buttons. If this jump has no jump-if conditions (that is, if it always appears), the submit button will appear on the bottom of the page that contains the jump, rather than on the bottom of the jump's destination page. Jump to the end of the survey and automatically submit submits the participant's survey and displays the end page (the page participants see after submitting a survey). Participants cannot go back from the end page. Jump to the selected survey item jumps to the survey item you select in the Select Survey Item list.
If you chose Jump to the selected survey item in step 4, select the item to which the participant should jump. This can be any type of item: a question, a collection, or a text/HTML item. You can even jump to another jump, but you will almost surely regret doing so.
Set the Jump-if conditions. Participants will jump only if the conditions you specify are met. Set Jump-if conditions in the same manner as you would set show-if conditions. See Setting a Question's Show-if Conditions for specific details.
Click OK to close the Jump Editor and save your changes.
Move the jump to the point in the survey where the jump should occur. For example, if you want the jump to occur after a participant completes the Intro collection, then drag the jump in the Survey Designer so that it appear immediately beneath the intro collection, as in the image below.
Notice that in the Survey Designer, the Jump appears with its name: JMP1, its destination: Jump-to: C1 and its description: Participants who don't drink alcohol jump directly to C1. The yellow circle to the left indicates that this jump is conditional. Hold the mouse pointer over the yellow circle to see the jump-if condition.
This article describes how to set up Save and Restore on unauthenticated surveys. Save and Restore enables survey participants to save a survey in progress and resume work on it later.
Authenticated Surveys
Authenticated surveys are surveys that are associated with one or more participant lists. Only participants on the lists can take the surveys, and Illume keeps track of which survey belongs to which participant.
Authenticated surveys always have the restore feature enabled, so there is no need to set it up. When a participant comes to your authenticated survey, Illume always checks first to see if the participant has a survey in progress. If so, Illume gives the participant the option to restore the survey in progress, or to start over.
You may want to add the Save button even for authenticated surveys for two reasons: its presence lets participants know that they can save the survey and resume it later, and it enables them to save responses on a page they've only partially completed. Without the save button, Illume saves only the participant's last completed page. (The last page on which they clicked the Next button.)
Unauthenticated Surveys
Unauthenticated surveys are open to the public. They do not need to have an associated participant list. They simply grant access to everyone.
You must set up Save and Restore for Illume to be able to reconnect an unauthenticated participant with the survey he or she had been working on.
To set up Save and Restore for your unauthenticated survey, follow these steps:
Choose Edit > Preferences... from the Survey Designer Menu.
Click the Buttons tab of the Preferences Editor.
Choose Save from the Buttons list on the left side of the Preferences Editor.
Type the text for the Save button in the Button Text entry. Whatever you type here will appear as the text of the Save button.
Check at least one Placement option for the Save button.
Choose Send Email from the Buttons list.
Type the text for the Send Email button in the Button Text entry.
Check at least one Placement option for the Send Email button.
Click the Page Text tab.
Choose Save Page from the Set text for list.
Compose the text you want to appear on the Save Page. This is the page participants see after clicking the save button. Note that the sample below uses two special tags:
{ResumeRawURL} will be replaced in the live survey by the actual unique URL the participant can use to resume his or her survey.
{SavePageEmailText} will be replaced in the live survey by a text box in which the participant can enter his or her email address. Illume will validate the email address.
Click the Save Email tab.
Compose the email message you want Illume to send to the participant. Note that the sample below contains two special tags.
{ResumeUrl:Click Here To Resume} will be replaced in the actual email with a clickable link that says "Click Here To Resume." Clicking the link takes the participant back to his or her survey in progress. Note that whatever text you type after the colon in this tag becomes the text of the clickable link.
{ResumeRawUrl} will be replaced in the actual email with the full URL the participant needs to resume his or her survey. This full URL will appear as a clickable link in most email clients (such as Microsoft Outlook). The participant may click the link, or cut and paste the URL into a browser to resume their survey.
Note: The Save Email that Illume sends to the participant is an HTML formatted email. Illume does not send a plain text version.
Click OK to save your changes.
When a participant clicks the Save button, they will see a page like the one below.
If the participant chooses to have the URL emailed, Illume will attempt to send the email immediately.
Error Messages for the Save Email
Illume includes some special customizable messages for the Save Email.
Click on the Error Messages tab of the Survey Preferences editor to set the text of these messages.
From the Error message for list, you set text for any of the following items pertaining to the Save page.
The email address entered on the Save page is invalid. This message appears if the participant enters an invalid email address. Illume will not try to send an email if the address is invalid. Notice that the message above uses the special tag {SavePageEmailAddress}. In the actual error message, this will be replaced with the email address that the participant entered.
There was a problem sending an email to the participant from the Save page. This message appears after the participant clicks the Send Email button if Illume was not able to send the email.
An email was sent successfully to the participant from the Save page. Illume displays this message to confirm that the email was sent.
Illume can perform calculations while a survey is in progress, and can store the result of the calculation with the rest of the survey data it collects. Calculated variables are particularly useful for identifying whether a respondent fits a particular profile.
For example, in a survey on depression, respondents may receive a certain number of points for each question to which they answer yes. A calculated variable can keep track of the points as the survey progresses, adding them all together to produce a sum that indicates the respondent's overall level of depression.
To implement this type of logic, you must first create a calculated variable, as described below. Then you would create a question (or collection of questions) with a show-if condition that tests your calculated variable. See Setting Show-if Conditions for more information about how to set the conditions under which questions or collections will appear.
Participants may be required to answer (or allowed to skip) questions or entire sections of a survey based on calculated variables. Continuing the example above, respondents whose calculated depression scores are beyond a given threshold may be required to answer follow-up questions that those with lower calculated scores may skip.
Defining a Calculated Variable
To define a calculated variable, follow these steps:
Choose Survey > Survey Calculations... from the Survey Designer menu
Click the Add button to add a new calculated variable, or double click on the name of an existing calculation to edit it.
In the Calculation Editor, give your calculated variable a unique name if it does not already have one. You can also provide an optional description to help you and others remember what this variable means.
Choose a data type. The data type you choose depends on what result you expect your expression to produce. Mathematical operations and any true/false expression produce numbers, so these require a numeric data type. (True expressions are equal to 1; false expressions are equal to 0.) Expressions that return text data require a Text data type.
Assign an optional default value. This will be the value of the calculation when there are not enough data to perform the actual calculation. For example, if your calculation is the sum of A, B and C, the calculation will contain the default value until the participant has answered questions A, B and C.
Click Insert Expression to select survey variables to include in your calculation.
In the Expression Calculator, choose the variables required to perform the calculation. To select more than one variable, hold down the Control key while you click on each variable you want to include. Note that the selected variables appear in an expression below the variable list. The expression uses only addition. You will be able to change this in a moment.
After choosing all of the variables you want to include in your calculation, click Paste. Your expression will be pasted into the Calculation Editor. Beneath the Insert Expression button, you should see the message "Calculation is valid and evaluated successfully."
You can now edit the calculation by hand. Illume will evaluate any simple and complex JScript.NET expressions. Expressions cannot include user-defined objects or functions, but they can include built-in JScript.NET objects, datatypes, methods and operators. Note JScript.NET is the version of JavaScript used by Microsoft Windows and Internet Explorer. It is essentially a superset of standard JavaScript (a.k.a. ECMAScript). See Microsoft's JScript.NET Language Reference for more information about JScript.NET. If there is a problem with the calculation, a message describing the problem will appear below the Insert Expression button, and the offending part of the calculation will be highlighted in red. If the calculation is valid JScript.NET but the calculation editor does not have enough information to evaluate it, you'll see the message Calculation is valid but failed to evaluate. The calculation will be evaluated while the survey is running, if there is enough information to perform the evaluation. (I.e., if the participant answered the questions to which the expression refers.) Note: Illume uses parentheses to determine precedence when evaluating calculations. This is described under "Using Parentheses in Calculations" below.
Click OK .
How Calculations Work
For each calculation, Illume creates a variable with the same name as the calculation. Illume attempts to evaluate all of the calculations in the survey each time a participant moves from one page to the next.
Illume substitutes the value of the named variable for each of the {Value} tags. For example, if a participant entered "200" in response to the question named WEIGHT that asked "What is your weight (in pounds)?", Illume substitutes 200 for the tag {Value:WEIGHT}.
Illume will perform value substitutions on any variables for which it has data. It does not matter whether that data came from a participant response, from a variable appended to the survey URL, or from data that was pre-loaded from the participant list. (See the articles on Preloading Participant Data for details on how to get data from your participant list into your survey. See Passing Data Through the Survey URL for information on how to pass in survey data through a link.)
If Illume cannot perform the calculation, the value of the calculation will be the default value you set for the calculation in the Survey Calculations Editor. There are three conditions under which Illume cannot perform a calculation:
The expression is invalid. The Survey Calculations Editor will tell you if your calculation is invalid before you save it.
The expression includes variables whose values are unanswered or unknown.
The calculation would result in an error. The most common causes of this are attempting divide by zero and supplying a value of the wrong data type. For example, if your calculation is {Value:HEIGHT} / {Value:WEIGHT}, you must design your survey to allow only numeric values for the height and weight questions. Illume can divide by the numeric value "150" but it cannot divide by the text value "one hundred and fifty."
The calculation itself is a JScript.NET expression, or a series of JScript.NET statements. Illume evaluates the JScript.NET using the eval() function and sets the value of the calculated variable to whatever eval() returns. There are two things to note about eval() in JScript.NET:
eval() returns the value of the last expression in the script.
eval() does not permit a return statement.
The following calculation determines the total price for a quantity of some material, then applies a discount of 5%:
var weightInGrams = {Value:KILOGRAMS} * 1000; var pricePerGram = 0.13; var totalPrice = weightInGrams * pricePerGram; var discount = 0.05; totalPrice * (1 - discount);
Notice that the value to be returned is expressed on the last line as totalPrice * (1 - discount), and that there is no return statement. Because JScript's eval() returns the value of the last expression, the result of your calculation will be the value of the last expression in the calculation.
Calculation Operators
The following operators are available for calculated variables:
Arithmetic Operators
+ (Plus Sign) Used for addition.
- (Minus Sign) Used for subtraction.
* (Asterisk) Used for multiplication.
/ (Forward Slash) Used for division.
% (Percent Sign) Modulo operator, used to find the remainder of a division operation
Math.pow(num, exp) Raises a number(num) to a power (exp). E.g. Math.pow(5,3) is 5 to the third power, or 125.
Though you can use JScript date objects in calculations, date and time calculations can be tricky. Calculations that use the current time must take into account the fact that Illume re-calculates calculated variables every time participants move from one page to the next. This means that if you are not careful, the calculation will change every time the participant goes to a new page.
Date calculations are tricky because programmers often make incorrect assumptions about units of time. For example, because the JScript date object uses milliseconds as its unit of time, you might think it's easy to measure a span of years by converting years to milliseconds and performing simple arithmetic on the milliseconds. This may lead to incorrect calculations, since leap years are longer than standard years.
Months are notoriously irregular. They can have 30 days, or 31, or 28, or in some cases, 29.
Days irregular as well. In most parts of the US, the first Sunday in April is a 23-hour day, and the last Sunday in October is a 25-hour day.
The following JScript calculates a participant's age on the date of the survey. This calculation assumes that the variable BIRTHDATE is a variable of type Date:
var today = new Date(); var dob = new Date({Value:BIRTHDATE}); var yearDiff = today.getFullYear() - dob.getFullYear(); var monthDiff = today.getMonth() - dob.getMonth(); var dayDiff = today.getDate() - dob.getDate(); if(monthDiff < 0 || (monthDiff == 0 && dayDiff < 0)) yearDiff--; yearDiff;
If BIRTHDATE were a text variable, and had the format mm/dd/yyyy, the calculation would be as follows:
var today = new Date(); var dob = {Value:BIRTHDATE} + ""; var dateParts = dob.split(/\D/); var month = parseInt(dateParts[0], 10); var day = parseInt(dateParts[1], 10); var year = parseInt(dateParts[2], 10); if(year < 100) year += 1900; var yearDiff = today.getFullYear() - year; var monthDiff = today.getMonth() - ( month - 1); var dayDiff = today.getDate() - day; if(monthDiff < 0 || (monthDiff == 0 && dayDiff < 0)) yearDiff--; yearDiff;
Note that the value of the value of the calculated variable is set to the value of the last expression evaluated in the JScript. In the examples above, that is the variable yeardiff. Keep in mind that because Illume uses eval() to evaluate the JScript in calculated variables, you do not need a return at the end of the script.
Reverse Scoring
While the {Value} tag yields a question's selected response value, the {RScore} tag yields the reverse score.
To get a question's reverse score, use the {RScore} with the question id. For example, to get the reverse score of the question SATISFACTION, use the tag {RScore:Satisfaction}.
Reverse scoring is generally used on questions that have both negative and positive items in the scale, though Illume permits reverse scoring of any items.
For questions with numeric scales, the reverse score is the score in the same position at the opposite end of the scale. The following tables illustrate reverse scores for items with numeric scales.
Score
Reverse Score
-1
1
0
0
1
-1
Score
Reverse Score
1
4
2
3
3
2
4
1
For Check all that apply questions, the {Score} tag gives the number of items checked. The {RScore} tag gives the number of items NOT checked.
For individual checkboxes, the {Score} tag yields a value of 1 if the item is checked and 0 if the item is not checked. The {RScore} yields the opposite values.
For non-question items (such as calculations and pre-loaded variables), the {Score} tag yields the item's value. The {RScore} tag always yeilds one of the "not set" values described below.
Reverse Scoring Values for Unanswered/Unset Items
If a question has not been answered, or has no value, the {RScore} will return one of the following values, depending on the item's data type:
For all Numeric items that are unanswered or have no value, the {RScore} will be 0 (zero).
For all Yes/No items that are unanswered or have no value, the {RScore} will be 0 (zero). (Note that zero is equivalent to an answer of False or No in most computer systems and applications.)
For all Date, Time and Date/Time items that are unanswered or have no value, the {RScore} will be the current date with hours, minutes and seconds set to zero. (E.g. June 23, 2005 00:00:00.)
For all Text types that are unanswered or have no value, the {RScore} will be an empty string ("")-- that is, a text value with a length of zero.
Using Parentheses in Calculations
Illume calculations use parentheses to determine which parts of a calculation should be evaluated first. If your calculation uses only addition and subtraction, parentheses do not matter. If your calculation uses multiplication or division, parentheses matter very much.
Illume will scan a calculation from right to left (that's the opposite of the direction in which most Western languages are read), evaluating all expressions in parentheses, followed by all multiplication operations, then all division operations, then all addition operations, and finally all subtraction operations.
This would be an incorrect calculation for the amount of income tax a person pays. If salary is 40000 and bonus is 2000 and tax rate is 0.28, this calculation will produce the following result:
40000 + (2000 * 0.28) = 40000 + 560 = 40560
The correct calculation uses parentheses to add salary and bonus before applying the tax rate.
When using multiplication or division, use parentheses to explicitly define the order in which your calculation should be evaluated!
Text Calculations
You can use calculations to test and assemble text values. The following expression tests whether someone typed "California" in response to question Q2: {Value:Q2} == "California" This expression returns a whole number: 1 if the value does equal "California" and 0 if the value does not equal California. Beginning in Illume 3.0, text calculations are not case sensitive!
This means the calculation above will be true whether the participant typed California, california, or CALIFORNIA.
The expression below creates an email address by adding @company.com to whatever the user typed in response to the LASTNAME question: {Value:LASTNAME} + "@company.com" This expression returns a Text value that ends with @company.com
Complex Expressions
Illume supports complex expressions that use the ?: operator. This operator tests an expression and returns one of two values, based on whether the expression is true or false. If the expression before the question mark is true, the expression returns the value before the colon. If it is false, it returns the value after the colon. For example, the following expression returns the value "yes" because the expression before the question mark is true: (10 > 5) ? "yes" : "no"; This expression returns "no" because the expression before the question mark is false: (5 > 10) ? "yes" : "no";
A simple way to remember this syntax is: Is this true ? "Yes Value" : "No Value";
You may include multiple complex expressions within a single calculation, as in this example, which calculates the cost of an order as the number of items times the cost per item, plus a fixed rate of either $20 or $12 or $8, based on the type of shipping: {Value:NumberOfItems} * {Value:CostPerItem} + ({Value:Shipping} == "Overnight" ? 20 : 0) + ({Value:Shipping} == "3-day" ? 12 : 0) + ({Value:Shipping} == "USPS" ? 8 : 0) Assuming that the Shipping question is required and that participants can choose only one shipping option, one of the three complex expressions will be true, and the other two will be false. The true expression will add either 20 or 12 or 8 to the value of the calculation. The two false expressions will both add 0 to the calculation. Complex expressions are especially useful in calculations that must be applied differently to different participants. For example, calculations of lean body weight and blood alcohol content use different constants for men and women.
If you check "Disable this calculation," the calculation will not be performed. This option is provided in case you want to disable a calculation that you may need to re-enable later.
Runtime Only Option
If you do not want the result of the calculation to be stored with the results of the survey, check the "Runtime only" option. The results of the calculation will be available while the survey runs, and will be discarded when the participant submits the survey.
DatStat Object Overview
The survey calculation DatStat object is new in version 4.7 and it consists of many very useful methods that can be called from survey calculations that were formally only exposed using the SDK. These methods allow for more capability and flexibility within a survey calculation, and in some cases, problems can be solved by just using a survey calculation where previously it would have required use of the runtime SDK.
Limitations The survey calculation editor does not currently color code any of the DatStat object methods. Variable name references used in the DatStat object methods will not be updated when using the survey rename capability unlike the tags (e.g. {Value:GENDER}).
How to Use
Almost all of the DatStat object methods exposed share the same signatures as those used by our runtime SDK. To make a call just prefix the method or property with “DatStat.” (case sensitive). The methods are also type aware so make sure you pass variables of the proper type to them (eg if the method is expecting an integer, do not pass a string to it).
Reference Guide
Method Name
Returns
Description
GetHttpFormElement(name : String)
String
This method retrieves the name of an Http form element.
var val = DatStat.GetHttpFormElement(‘MYHIDDEN’);
GetParameter(parameterName : String)
String
This method signature is equivalent to the HookContext.GetParameter() method. It retrieves a survey parameter string value.
var parameter_text = DatStat.GetParameter(‘MYPARAM’);
GetRandomizationMap(variableName : String)
String
This method retrieves the randomization map for a specific variable that is randomized. The value returned is a comma delimited list of ordinals (e.g. 3,1,0,2).
var order = DatStat.GetRandomizationMap(‘CUSTOMER_EVAL’);
GetResponse(variableName : String)
Object
This method signature is equivalent to the HookContext.GetResponse() method. This method retrieves the response code and is equivalent to using a {Value} tag.
var val = DatStat.GetResponse(‘Q55’);
GetResponseLabel(variableName : String)
String
This method signature is equivalent to the HookContext.GetResponseLabel() method. This method retrieves the response label.
var theResponse = DatStat.GetResponseLabel('Q55');
GetUserData(dataName : String)
String
This method signature is equivalent to the HookContext.GetUserData() method. It will return the value for the specified piece of User Data from a participant list.
var userData= DatStat.GetUserData(‘LOCATION’);
IsOnPage(variableName : String)
Boolean
This method will return true if the item identified by the variableName parameter appears on the page of the set of responses that are being currently processed.
if(DatStat.IsOnPage('Q55')) { // do something }
PageItemNames()
String[]
This method returns an array of variable names that appear on the page of the set of responses that are currently being processed.
var items : String[] = DatStat.PageItemNames();
QuotaCountGet(quotaName : String)
int
This method returns the current count for the specified quota.
var count = DatStat.QuotaCountGet('MALE');
QuotaLimitGet(quotaName : String)
int
This method returns the quota limit defined for the specified quota. If the current survey session happens to be a test participant then the test data quota limit is returned.
var limit = DatStat.QuotaLimitGet('MALE');
QuotaStatusGet(quotaName : String)
int
This method returns a ‘0’ or ‘1’ that designates the quota status for the sepecified quota. A value of ‘0’ means that the specified quota hasn’t yet met the limit. A value of ‘1’ means that the specified quota has met or exceeded the quota limit.
var status = DatStat.QuotaStatusGet('MALE');
ResponseReplacement(input : String)
String
This method signature is equivalent to the HookContext.ResponseReplacement() method. This method replaces all tags to their proper values.
var surveyName = DatStat.ResponseReplacement(‘{SurveyName}’);
This method signature is equivalent to the HookContext.SetResponseData() method. This method sets a specific variable to a particular value. A value of true is returned if the variable was set properly, otherwise a value of false is returned. Setting a value to ‘null’ is equivalent to clearing the value.
Ranking validation requires survey participants to enter sequential numeric responses for a minimum and/or maximum number of question items. Here is an example of a ranking question:
Sum check validation requires survey participants to enter numeric values for a group of questions whose sum equals some value or is between some specified minimum and maximum values. JavaScript code can also be supplied to update a running total that is displayed in the survey. Here is an example of a sum check question:
Ranking and sum check validation is normally performed using a group of questions which are normally part of a question table. Ranking and sum check validation requires that the data type of the questions be “Whole Numbers” or “Whole Numbers >= 0” and the display type of the questions be “Text Field”, “Select One – Poplist”, or “Select One – Radio Button”.
In order to use Ranking/Sum Check validation, Multi-Control component validation, or other custom client validation, a survey must have originated from a version 4.7 survey template or the following conditions must be true:
ClientValidation.js must be included as a survey resource.
The following javascript code must be included on the Cascading Style Sheet(CSS)/JavaScript page:
<script type="text/javascript"> // Include ClientValidation.js only if the DatStat object is defined // if (typeof(DatStat) != "undefined") { document.write('<script type="text/javascript" src="SurveyResource/ClientValidation.js"><\/script>'); } </script>
The following example demonstrates how to add ranking validation:
Add 5 questions to a question table and set the variable names to 'Q1' through 'Q5'.
Make sure the data type of these questions is Whole Numbers and the display type is set to Text Field.
Add a Text/HTML object IMMEDIATELY FOLLOWING all the ranking questions and/or the question table.
Click the Source tab of the Text/HTML object created in the previous step and insert the following content:
<script type="text/javascript"> DatStat.addClientValidationCheck(new DatStat.RankingValidation( ['{FormElement:Q1}', '{FormElement:Q2}', '{FormElement:Q3}', '{FormElement:Q4}', '{FormElement:Q5}'], /* Question List Array */ 'You must uniquely rank between 3 and 5 items.', /* Error Message */ 3, /* Required minimum rank items */ 5, /* Maximum rank items */ true /* Sequential ranking (true or false) */ )); </script>
RankingValidation parameters
The RankingValidation parameters are separated by commas and must appear in the order as listed below.
Question list array
This value should be a comma-delimited list of single-quoted text values that are the form element names of the questions to be ranked all enclosed between beginning and end brackets ('[' and ']'). The {FormElement:} tag is normally used to specify the form element names for each of the questions.
This is a text message enclosed in single-quotes. It is displayed if the user fails to uniquely rank the minimum and maximum number of items.
Required minimum rank items
This is the minimum number of items that are required to be ranked. This number is adjusted to the number of question items displayed on the page if that number is less than the minimum. An error message will be displayed it the survey participant fails to uniquely rank this minimum number of items.
Maximum rank items
This is the maximum number of items that can be ranked. An error message will be displayed if the survey participant ranks more than this specified maximum.
Sequential ranking
This is a true/false option. Set this option to true if you require ranking values to be sequential numbers starting with 1. This option is especially important if the ranking questions are of display type text field.
The following example demonstrates how to add sum check validation. In this example, let's assume we want the sum of these questions to add up to 100.
Add a Text/HTML object IMMEDIATELY FOLLOWING the question table created above.
Click the Source tab of the Text/HTML object created in the previous step and insert the following content:
<script type="text/javascript">
function setTotal(total, ok) { var display = document.getElementById("TOTAL"); if(!display || typeof display == 'undefined') return; display.innerHTML = total + "%"; if(ok) display.style.color = 'green'; else display.style.color = 'red'; }
DatStat.addClientValidationCheck(new DatStat.SumCheckValidation( ['{FormElement:Q1}', '{FormElement:Q2}', '{FormElement:Q3}','{FormElement:Q4}', '{FormElement:Q5}'], /* Question array list */ 100, /* Minimum sum */ 100, /* Maximum sum */ setTotal, /* Callback function */ 'Total must equal 100. Current total is {0}.' /* Error Message */ ));
</script>
SumCheckValidation parameters
The SumCheckValidation parameters are separated by commas and must appear in the order as listed below.
Question list array
This value should be a comma-delimited list of single-quoted text values that are the form element names of the questions to be ranked all enclosed between beginning and end brackets ('[' and ']'). The {FormElement:} tag is normally used to specify the form element names for each of the questions.
This is a numeric value that is the minimum allowed by the sum check validation code. This value should be less than or equal to the maximum allowed sum (i.e. the next parameter).
Maximum allowed sum
This is a numeric value that is the maximum allowed by the sum check validation code. This value should be greater than or equal to the minimum allowed sum (i.e. the previous parameter).
Callback function
This is an optional argument. If not set to null, this argument should be a JavaScript function object that accepts 2 arguments: 1) the current running ‘total’; and 2) whether or not this value is ‘ok’ and fulfills the sum check minimum/maximum requirements. This function is called whenever the sum of the questions changes.
Error message
This is a text message enclosed in single-quotes. It is displayed if the sum of the responses isn’t between the required minimum/maximum values. This error message can contain the following tag: {0} which will be replaced with the current total.
The Multi-Control Component allows for complex questions and question tables containing multiple UI controls to be easily created. For single questions this component allows for a more flexible layout of the controls and allows them to be placed either on the same line or different lines. For question tables this component allows for multiple controls to be displayed in columns of the same table as well as row header elements and text fields within the prompt column.
NOTE: You do not need to have purchased the Software Development Kit (SDK) in order to utilize the Multi-Control tool. Even though you may not have the SDK, you will see an SDK Menu item (Add Runtime Content...) in the Survey Designer which will allow you to create Multi-Control questions and question tables.
Creating the Preload/Hidden Variables for the Multi-Control Fields
To add a Preload/Hidden Variable, begin by selecting Survey --> Preload/Hidden Variables
Click Add
The Unique name should match the variable names used in the Hook Data XML Code
If creating a single question, your hook data will define a variable name and the variable name defined needs to match exactly the name of the variable in the Preload/Hidden UNIQUE name field.
If creating a question table, your hook data will define a variable prefix and a number of rows (eg prefix="Q_" and you have 3 rows with Q_ corresponding to a text field). You will define your preload/hidden variables as "Single-Select" of type Text. You will have 3 of them (Q_1, Q_2, Q_3) which correspond to the number of rows that that item is present in
Select the Value Type as either Single-Value or Multi-Value(Check All). If of type Single-Value, select the Data Type as well for the field.
Keep the Default Value as None
Enter a Prompt Description of the field.
Click OK
Repeat Steps 1-7 for each field in the Multi-Control Question/QuestionTable
Inserting a Multi-Control Question into Your Survey
Add a Runtime Content Hook object in a particular location of a survey. This is done by selecting the Survey --> Add Runtime Content... menu option. NOTE: A Runtime Content object needs to be created for each Multi-Control Question
Edit the Runtime Content object for this question
Begin by assigning this object a Unique Name
Select the location of the Components.dll file (in \DatStat\DatStat Illume 4.7\Previewer\Bin\Components.dll)
In the "Class" drop-down menu, select either the MultiControlQuestion class to design a single-question or the MultiControlQuestionTable class to design a question table.
Check the box "Display as a question" option
Set the Progress bar weighting to a value that is equal to the number of question in your Multi-Control question. NOTE: The Progress bar weighting determines how the progress bar recognizes the fields in the Multi-Control question. Does it count the question as one question or does it count each field or (if using a question table) does it count each row?
Specify hook data to display the desired question or question table elements. The hook data is specified as a specific XML grammar that is described in more detail later in this document.
Create a hidden/preload variable for each field in the Multi-Control object. These will be used in storing the responses of the questions asked by the Multi-Control component.
Click OK in the Runtime Content editor to save your changes.
Preview the survey and make sure that you visually inspect the questions created using this component. During preview mode, additional validation is performed that checks for XML language syntax errors. Error messages are presented in the same space where the question would normally be displayed in the survey.
Here is the Runtime Content Editor window:
NOTE: If you plan on localizing your survey into multiple languages (through the use of a Translation Package), you should not enter text directly into the various elements of MultiControl questions. Rather, replace the text with {ParamValue:param1} and set the associated parameters in Edit-->Preferences-->Parameters. The parameters are included in a translation package whereas Runtime Content Hooks are not.
Using Show-If Logic with a Single Multi-Control Question or QuestionTable
The Runtime Content Object uses a Run-if statement instead of Show-if, but the logic functions the same.
If you want to use the response for a Multi-Control Question in Show-If Logic, you will have to link it to the Preloaded variable that you created for the specific field.
Using XML
NOTE: XML is case sensitive so be very careful in how you are entering your elements and information.
When using the Multi-Control component, you must specify XML data using a specific XML grammar in the Hook Data field of the Runtime Content editor. It is a good idea to preview your surveys in the Survey Designer for testing purposes, because details of any syntax errors are displayed when in preview mode.
If you haven’t used XML before you need to adhere to a few simple rules:
An XML element tag is placed between angle brackets, e.g.
All element tags must have an end tag which includes a slash after the first angle bracket, e.g.
XML element can contain zero or more attributes. Attributes have the form: name="value", e.g.
XML element and attribute names are case-SENSITIVE.
An element can contain nested data or other elements. In this case you MUST include an end tag.
Some elements only contain attributes and do not contain nested data or elements. In this case the end tag does NOT have to be included and an abbreviated version can be used instead. For example, the following two lines are 100% equivalent:
This section details the XML grammar required for a single question multi-control component.
The Question Element
The Question element consists of 1 or more Row elements. The Question element MUST appear on the first line of the Hook Data.
The "Row" element consists of 0 or more "Data" elements. Use of this element will create a "tr" (or row) tag within an HTML table.
Attribute Name
Required
Values
style
No
Contains CSS Styles
The Data Element
The "Data" element consists of 0 or more "Prompt", "TextField", "Checkbox", or "Poplist" elements. Use of this element will create a "td" (or data cell) tag within an HTML table and facilitates different layout options and control.
Attribute Name
Required
Values
colspan
No
A numeric value that corresponds to the colspan attribute of the "td" tags in HTML tables.
style
No
Contains CSS Styles
The Prompt Element
The "Prompt" element is most often used in the first row of the question.
Attribute Name
Required
Values
value
Yes
A text value to be displayed as the prompt.
style
No
Contains CSS Styles
The TextField Element
The "TextField" element displays a text field control and can contain 0 or more "RequiredValidation", "NumericValidation", or "TextValidation" elements.
Attribute Name
Required
Values
variableName
Yes
Refers to a variable defined in the Survey as a preload hidden.
size
No
The size of the text field.
maxLength
No
The maximum number of characters that can be entered in this text field.
style
No
Contains CSS Styles.
labelBefore
No
Text value that precedes the text field control.
labelAfter
No
Text value that follows the text field control.
The Checkbox Element
The "Checkbox" element consists of zero or more "RequiredValidation" elements. Use of this element will create a single checkbox control.
Attribute Name
Required
Values
variableName
Yes
Refers to a variable defined in the Survey as a preload hidden.
style
No
Contains CSS Styles.
labelBefore
No
Text value that precedes the text field control.
labelAfter
No
Text value that follows the text field control.
The Poplist Element
The "Poplist" element consists of zero or more "PoplistOption" elements followed by zero or more "RequiredValidation" elements. If the "Poplist" element does not contain any "PoplistOption" elements, then the options are created by reading the scale values of the hidden variable.
Attribute Name
Required
Values
variableName
Yes
Refers to a variable defined in the Survey as a preload hidden.
unansweredResponse
No
The name or label given to an unanswered response in the poplist control.
style
No
Contains CSS Styles.
labelBefore
No
Text value that precedes the text field control.
labelAfter
No
Text value that follows the text field control.
The PoplistOption Element
Optional elements contained within "Poplist" elements.
Attribute Name
Required
Values
code
Yes
This value should be the same response code as defined in the hidden question used in this "Poplist" control.
response
Yes
This is the poplist option value viewed by the survey respondent.
The RequiredValidation Element
Use of the "RequiredValidation" tag will enforce input validation rules using javascript on the control in which this tag is contained within. In this case a response to a particular parent control will be required.
Attribute Name
Required
Values
errorMessage
Yes
Error message displayed to the user if the input constraints are violated.
The NumericValidation Element
Use of the "NumericValidation" tag will enforce numeric input validation rules using javascript on the control in which this tag is contained within.
Attribute Name
Required
Values
errorMessage
Yes
Error message displayed to the user if the input constraints are violated.
required
No
This value can be either “true” or “false”.
minValue
No
This is a numeric value that is the minimum value allowed in the parent control.
maxValue
No
This is a numeric value that is the maximum value allowed in the parent control.
The TextValidation Element
Use of the "TextValidation" tag will enforce text input validation rules using javascript on the control in which this tag is contained within.
Attribute Name
Required
Values
errorMessage
Yes
Error message displayed to the user if the input constraints are violated.
required
No
This value can be either “true” or “false”.
minLength
No
This is a numeric value that is the minimum length of the input entered.
maxLength
No
This is a numeric value that is the maximum length of the input entered.
regEx
No
A regular expression value that the input value must match.
This section details the XML grammar required for a question table multi-control
object. If you haven’t used XML before please refer to the topic called Using XML
in the
Multi-Control Overview section.
The QuestionTable Element
The "QuestionTable" element consists of an "Instruction" element,
followed by 1 or more control elements ("TextField", "RadioGroup",
"CheckAll", "Checkbox", "Poplist", or "Empty"),
followed by 1 or more row elements ("Row", "RowHeader", or "RowTextField").
The "QuestionTable" element MUST appear on the first line of the Hook
Data.
Attribute Name
Required
Values
xmlns
Yes
This value must be: "http://www.datstat.com/2008/MultiControl.xsd"
width
No
Set the width of this QuestionTable.
numbering
No
A text phrase can be entered. “{0}” will be replaced with the alpha row number (e.g.
“a.”, “b.”, etc…) and “{1}” will be replaced with the numeric row number (e.g. “1.”,
“2.”, etc…)
promptHeader
No
Contains an optional text phrase that is used in the prompt header position of the
question table.
randMethod
No
Accepts one of the following arguments: ‘all’, ‘reverse’, ‘previous’ Note: ‘all’ randomizes ALL items, ‘reverse’ randomly displays the items either in the same order OR in reverse order, and ‘previous’ displays the items in the same order as a previous survey object whose items have been randomized.
randArgs
No
Only valid if ‘randMethod’ is set to ‘previous’. When the ‘randMethod’ is set to ‘previous’, set the randArgs attribute to the name of a previous Question or Collection object that is randomized.
The Instructions Element
This element contains text instructions that are displayed before the question table.
The TextField Element
The "TextField" element displays a text field control and can contain
0 or more "RequiredValidation", "NumericValidation", or "TextValidation"
elements.
Attribute Name
Required
Values
variablePrefix
Yes
The prefix used along with the row number ordinal to form the name of the variable
used to store the response for this particular row/column.
heading
No
Text displayed in the heading of this control
columnWidth
No
Width of this control column
size
No
The size or width of this text field control.
maxLength
No
The maximum number of characters that can be typed in this text field.
labelBefore
No
Text to be displayed before the control. E.g. “$”
labelAfter
No
Text to be displayed before the control. E.g. “$”
The RadioGroup Element
The "RadioGroup" element displays a group of radio buttons and contains
zero or more "RadioOption" elements followed by zero or more "RequiredValidation"
elements. If the "RadioGroup" element does not contain any "RadioOption"
elements, then the options are created by reading the scale values of the hidden
variable.
Attribute Name
Required
Values
variablePrefix
Yes
The prefix used along with the row number ordinal to form the name of the variable
used to store the response for this particular row/column.
heading
No
Text displayed in the heading of this control
columnWidth
No
Width of this control column
randMethod
No
Accepts one of the following arguments: ‘all’, ‘reverse’, ‘previous’ Note: ‘all’ randomizes ALL items, ‘reverse’ randomly displays the items either in the same order OR in reverse order, and ‘previous’ displays the items in the same order as a previous survey object whose items have been randomized.
randArgs
No
Only valid if ‘randMethod’ is set to ‘previous’. When the ‘randMethod’ is set to ‘previous’, set the randArgs attribute to the name of a previous Question or Collection object that is randomized.
The RadioOption Element
Optional elements contained within "RadioGroup" elements.
Attribute Name
Required
Values
code
Yes
The response code defined in the hidden question used with this Radio button control.
heading
Yes
Text displayed in the heading of this specific radio button control.
The Checkbox Element
This element is used to display a single checkbox. It can contain zero or more "RequiredValidation"
elements.
Attribute Name
Required
Values
variablePrefix
Yes
The prefix used along with the row number ordinal to form the name of the variable
used to store the response for this particular row/column.
heading
No
Text displayed in the heading of this control
columnWidth
No
Width of this control column
The CheckAll Element
This element is used to display a grouping of checkboxes so that multiple selections
can be made. It contains zero or more "CheckAllOption" elements followed
by zero or more "CheckAllValidation" elements (order is important if both
types of elements are specified). If the "CheckAll" element does not contain
any "CheckAllOption" elements, then the check box options are created
by reading the scale values of the hidden variable.
Attribute Name
Required
Values
variablePrefix
Yes
The prefix used along with the row number ordinal to form the name of the variable
used to store the response for this particular row/column.
heading
No
Text displayed in the heading of this control
columnWidth
No
Width of this control column
style
No
CSS style
randMethod
No
Accepts one of the following arguments: ‘all’, ‘reverse’, ‘previous’ Note: ‘all’ randomizes ALL items, ‘reverse’ randomly displays the items either in the same order OR in reverse order, and ‘previous’ displays the items in the same order as a previous survey object whose items have been randomized.
randArgs
No
Only valid if ‘randMethod’ is set to ‘previous’. When the ‘randMethod’ is set to ‘previous’, set the randArgs attribute to the name of a previous Question or Collection object that is randomized.
The CheckAllOption Element
Optional elements contained within "CheckAll" elements.
Attribute Name
Required
Values
heading
Yes
Text displayed in the heading of this specific checkbox control.
name
Yes
This value is the response name of the checkbox as defined in the hidden questions
used by this CheckAll or “Select all that apply” question.
The Poplist Element
This element is used to display a poplist control. It contains 1 or more "PoplistOption"
elements followed by zero or more "RequiredValidation" elements. If the
"Poplist" element does not contain any "PoplistOption" elements,
then the options are created by reading the scale values of the hidden variable.
Attribute Name
Required
Values
variablePrefix
Yes
The prefix used along with the row number ordinal to form the name of the variable
used to store the response for this particular row/column.
heading
No
Text displayed in the heading of this control
columnWidth
No
Width of this control column
unansweredResponse
No
Text that is displayed in the poplist control when no value is selected.
randMethod
No
Accepts one of the following arguments: ‘all’, ‘reverse’, ‘previous’ Note: ‘all’ randomizes ALL items, ‘reverse’ randomly displays the items either in the same order OR in reverse order, and ‘previous’ displays the items in the same order as a previous survey object whose items have been randomized.
randArgs
No
Only valid if ‘randMethod’ is set to ‘previous’. When the ‘randMethod’ is set to ‘previous’, set the randArgs attribute to the name of a previous Question or Collection object that is randomized.
The PoplistOption Element
Optional elements contained within "Poplist" elements.
Attribute Name
Required
Values
code
Yes
The response code defined in the hidden question used with this poplist control.
response
Yes
Text displayed in the poplist control for this response.
The Empty Element
This element is used to add an empty column in the question table.
Attribute Name
Required
Values
heading
No
Text displayed in the heading of this control
columnWidth
No
Width of this control column
headingStyle
No
CSS style applied to the header of the "Empty" element.
cellStyle
No
CSS style applied to each of the TD cells of an "Empty" element.
The RequiredValidation Element
Use of the "RequiredValidation" tag will enforce input validation rules
using javascript on the control in which this tag is contained within. In this case
a response to a particular parent control will be required.
Attribute Name
Required
Values
errorMessage
Yes
Error message displayed to the user if the input constraints are violated.
The NumericValidation Element
Use of the "NumericValidation" tag will enforce numeric input validation
rules using javascript on the control in which this tag is contained within.
Attribute Name
Required
Values
errorMessage
Yes
Error message displayed to the user if the input constraints are violated.
required
No
This value can be either “true” or “false”.
minValue
No
This is a numeric value that is the minimum value allowed in the parent control.
maxValue
No
This is a numeric value that is the maximum value allowed in the parent control.
The TextValidation Element
Use of the "TextValidation" tag will enforce text input validation rules
using javascript on the control in which this tag is contained within.
Attribute Name
Required
Values
errorMessage
Yes
Error message displayed to the user if the input constraints are violated.
required
No
This value can be either “true” or “false”.
minLength
No
This is a numeric value that is the minimum number of characters allowed in the
parent control.
maxLength
No
This is a numeric value that is the maximum number of characters allowed in the
parent control.
regEx
No
A regular expression value that the input value must match.
The CheckAllValidation Element
This element will enforce “check all that apply” input validation rules using javascript.
Attribute Name
Required
Values
errorMessage
Yes
Error message displayed to the user if the input constraints are violated.
minRequired
No
The minimum number of checkbox selections allowed.
maxRequired
No
The maximum number of checkbox selections allowed.
The Row Element
This element will add a “normal” row to the question table. This row contains a
prompt followed by controls.
Attribute Name
Required
Values
prompt
No
Value displayed in the prompt column.
showIf
No
This is a simple ShowIf expression of the form:
"variable" "op" "value"
Where:
"variable" is the name of a survey variable
"op" is any of the following operators:
‘_eq_’ is equals
‘_ne_’ is not equals
‘_lt_’ is less than
‘_gt_’ is greater than
‘_lteq_’ is less than or equals
‘_gteq_’ is greater than or equals
‘_ans_’ is answered
‘_nans_’ is not answered
"value" is a required value except if the _ans_ or _nans_ operators are
used.
Example: GENDER _eq_ 1
maxRequired
No
The maximum number of checkbox selections allowed.
The RowHeader Element
This element will add a content row to the question table. This row will not contain
any controls.
Attribute Name
Required
Values
value
No
Value displayed in the row.
style
No
CSS style applied to the row header.
showIf
No
This is a simple ShowIf expression of the form:
"variable" "op" "value"
Where:
"variable" is the name of a survey variable
"op" is any of the following operators:
‘_eq_’ is equals
‘_ne_’ is not equals
‘_lt_’ is less than
‘_gt_’ is greater than
‘_lteq_’ is less than or equals
‘_gteq_’ is greater than or equals
‘_ans_’ is answered
‘_nans_’ is not answered
"value" is a required value except if the _ans_ or _nans_ operators are
used.
Example: GENDER _eq_ 1
maxRequired
No
The maximum number of checkbox selections allowed.
The RowTextField Element
This element will add a text field control in the prompt column.
Attribute Name
Required
Values
prompt
No
Value displayed in the prompt column.
variableName
Yes
Variable name used by this text field control.
size
No
Size of the text field control.
maxLength
No
Maximum number of characters that can be entered in the text field control.
labelBefore
No
Text value displayed before the text field control.
labelAfter
No
Text value displayed after the text field control.
showIf
No
This is a simple ShowIf expression of the form:
"variable" "op" "value"
Where:
"variable" is the name of a survey variable
"op" is any of the following operators:
‘_eq_’ is equals
‘_ne_’ is not equals
‘_lt_’ is less than
‘_gt_’ is greater than
‘_lteq_’ is less than or equals
‘_gteq_’ is greater than or equals
‘_ans_’ is answered
‘_nans_’ is not answered
"value" is a required value except if the _ans_ or _nans_ operators are
used.
The following example creates a simple question that asks for a survey respondent's height in feet and inches.
Hook Data
<Question xmlns="http://www.datstat.com/2008/MultiControl.xsd"> <Row> <Data> <Prompt value="Enter your height:" /> </Data> </Row> <Row> <Data> <TextField variableName="HEIGHT_FEET" labelAfter="feet" size="4" > <NumericValidation errorMessage="A numeric value between 3 and 8 for the height in feet is required." required="true" minValue="3" maxValue="8"/> </TextField> <TextField variableName="HEIGHT_INCHES" labelAfter="inches" size="4" > <NumericValidation errorMessage="A numeric value between 0 and 11 for the height in inches is required." required="true" minValue="0" maxValue="11"/> </TextField> </Data> </Row> </Question>
Notes about this Example
This question consists of 2 rows contained with the "row" tags.
The first row contains a prompt ("Prompt" tag) and the second row consists of 2 text fields ("TextField" tag) with labels.
The survey variables, HEIGHT_FEET and HEIGHT_INCHES, are referenced by this Multi-Control question and must be defined as Preload/Hidden questions. If they are not an error message will be displayed in place of the question when viewing or previewing the survey.
The "NumericValidation" tag is specified for both text fields and this requires the respondent to enter a numeric response within a certain range. Please note that all Multi-Control input validation requires javascript. If Multi-Control validation is used, it is highly recommended that the ‘Require survey participants to have javascript enabled’ option found on the Advanced tab of the Survey Preferences dialog is checked.
The following example is a different variation of the previous example that asks for the respondent’s height in feet and inches. Instead of text field controls, this question uses poplist controls:
Hook Data
<Question xmlns="http://www.datstat.com/2008/MultiControl.xsd" > <Row> <Data> <Prompt value="Enter your height:" /> </Data> <Data> <Poplist variableName="HEIGHT_FEET" style="text-align:left;width:180px" unansweredResponse="--Select Height in Feet--" > <RequiredValidation errorMessage="Please select a response for your height in feet."/> </Poplist> </Data> </Row> <Row> <Data> <Poplist variableName="HEIGHT_INCHES" style="text-align:left;width:180px" unansweredResponse="--Select Height in Inches--" > <RequiredValidation errorMessage="Please select a response for your height in inches."/> </Poplist> </Data> </Row> </Question>
Notes about this Example
The Poplist values must be configured in the Scale values of the Preload/Hidden Variable used in the field and the poplist will be generated automatically with values and labels you specify in the preload/hidden.
This question only consists of 1 row
The "RequiredValidation" tag is specified for both poplist controls. This requires a response. Please note that all Multi-Control input validation requires javascript. If Multi-Control validation is used, it is highly recommended that the ‘Require survey participants to have javascript enabled’ option found on the Advanced tab of the Survey Preferences dialog is checked.
The following example is a different variation of the previous example that asks for the respondent’s height in feet and inches. It uses a mix of text field control, poplist and a checkbox:
Hook Data
<question xmlns="http://www.datstat.com/2008/MultiControl.xsd"> <row> <data> <prompt value="Enter (and choose) your height:" /> </data> </row> <row > <data> <textfield size="4" variablename="HEIGHT_FEET_ALLFIELDS" labelafter="feet"> <numericvalidation required="true" errormessage="A numeric value between 1 and 7 for the height in feet is required." minvalue="1" maxvalue="7" /> </textfield> <poplist style="FONT-WEIGHT: bold; WIDTH: 150px; TEXT-ALIGN: left" variablename="HEIGHT_INCHES_ALLFIELDS" labelafter="inches" unansweredresponse="--Inches--"> <requiredvalidation errormessage="Please select a certain amount of inches for your height" /> </poplist> <checkbox variablename="HEIGHT_CHECK_OPTOUT" labelafter="I like my height"> </data> </row> </question>
The following example attempts to demonstrate all of the possible controls within a question table:
Hook Data
<QuestionTable xmlns="http://www.datstat.com/2008/MultiControl.xsd" width="1000px" numbering="({1})" promptHeader="Prompt Header"> <Instructions>Instructions</Instructions> <TextField variablePrefix="TFCOM_" heading="TextField Heading" size="5" maxLength="5" columnWidth="80px" > <TextValidation required="true" minLength="1" maxLength="2" errorMessage="Text field response must be 1 or 2 characters in length."/> </TextField> <RadioGroup variablePrefix="RGCOM_" heading="Radio Column Heading" columnWidth="80px" > <RadioOption code="0" heading="Radio 1 Heading" /> <RadioOption code="1" heading="Radio 2 Heading" /> <RadioOption code="2" heading="Radio 3 Heading" /> <RequiredValidation errorMessage="A radio button response is required." /> </RadioGroup> <Empty columnWidth="50" heading="This is a Space" headingStyle="border-bottom:none;border-top:none;" cellStyle="border-bottom:none;"/> <CheckAll variablePrefix="CBGCOM_" heading="Checkbox Group Heading" columnWidth="80px" > <CheckAllOption heading="Check 1" name="0" /> <CheckAllOption heading="Check 2" name="1" /> <CheckAllOption heading="Check 3" name="2" /> <CheckAllValidation errorMessage="You must select between 1 and 3 items in the checkbox group." minRequired="1" maxRequired="3" /> </CheckAll> <Checkbox variablePrefix="CBCOM_" heading="Checkbox Heading" columnWidth="80px"> <RequiredValidation errorMessage="You must select the single checkbox."/> </Checkbox> <Poplist variablePrefix="POPLCOM_" heading="Poplist Group Heading - Pick a Number" columnWidth="175px" unansweredResponse="Please Select a Number"> <RequiredValidation errorMessage="Please select a response for your height in feet."/> </Poplist> <Row prompt="Prompt 1"/> <Row prompt="Prompt 2"/> <RowHeader value="Row header value" style="background-color:#CCCCCC;border-bottom:none;" /> <Row prompt="Prompt 3"/> </QuestionTable>
Hook Data Explained
Must be in each XML. The Numbering= determines if you will number or letter your rows
Allows you to write instructions for your Question Table
Each Type of Control will need a Prefix to be defined and then used in the Preload/Hidden Variables that get created. This is the Text Field prefix. There are three Preload/Hidden variables that have been created with this prefix. TF_1, TF_2, TF_3
The RadioGroup needs a Heading for each option and a Preload/Hidden Variable for each.
This will add a space between sections. The Heading was added to explain the gap.
The CheckAll requires that you check the Multi-Value in the Preload/Hidden Variable creation. Scale Values will also need to be added. See The example Multi-Control Example Survey
The Checkbox requires Preload/Hidden Variables that have the Data Type as Yes/No
The Poplist code information can be coded in the XML or can be part of the Scale Values in the Preload/Hidden Variables. In this case it is part of the Preload/Hidden Variable.
This represents 3 Question Prompts with a row header between the 2nd and 3rd Prompt.
Notes about this Example
This question table contains 5 different controls: TextField, RadioGroup, CheckAll, Checkbox and PopList.
The question table contains 4 rows, of which 1 is treated like a header.
The variable prefix for the TextField control is “TF_”. This means that hidden questions named “TF_1”, “TF_2”, and “TF_3” should be defined in the survey, otherwise an error will be displayed.
The variable prefix for the CheckAll question is “CBG_”. The survey should have the following hidden questions defined in the survey: “CBG_1”, “CBG_2”, and “CBG_3”. Each of these questions should be marked as “Check all that apply” questions that contain responses with suffixes of “OPT1”, “OPT2”, and “OPT3”.
The “CheckAllValidation” tag is specified for the “CheckAll” control. This requires the survey respondent to enter between 1 and 3 checks. Please note that all Multi-Control input validation requires javascript. If Multi-Control validation is used, it is highly recommended that the ‘Require survey participants to have javascript enabled’ option found on the Advanced tab of the Survey Preferences dialog is checked.
Survey templates are reusable models upon which surveys can be built. A template may include headers, footers, images, questions, and blocks of HTML.
To create a new template, create a new survey and then designate that survey as a template the first time you check it in. See Checking in a Survey for details on templates and the check in process.
If you have already checked in an item as a survey and want to change the item to a template, clone the existing survey and check in the clone as a template.
Any new surveys you build from the template will include the template's header, footer, stylesheet, and other survey-wide preferences, as well as its questions.
Every Illume survey contains a Login Collection which cannot be deleted. Items in the Login Collection will be presented to participants before they have logged in to the survey. In fact, the purpose of the login collection is to ask participants for credentials to log in. Generally, a Login Collection might include a welcome message, and one or more questions. These will be the first things a participant sees when he or she comes to your survey.
Participant Authentication
If your survey requires participants to log in, there are two things you need to do to set up participant authentication: First, use the Illume Web Console to upload a list of eligible participants. Then create questions in the Login Collection that Illume can use to authenticate participants. When you upload a list of participants, your list can include any fields you choose. For example, you may upload a participant list containing the first and last names of all participants, along with their email addresses and employee ID numbers. Let's assume these fields in your participant list are named FIRSTNAME, LASTNAME, EMAIL, and EMPID. Let's also assume you want participants to log in using their email address and employee id number. To do this, you would create two questions in the Login Collection: one name EMAIL that asks for the participant's email address, and another named EMPID that asks for employee id. The unique ids of these two questions must match the name of the columns in your participant list. When a participant types in his or her email address and employee id, Illume looks for an entry in the participant list with the given email address and employee id. If it finds a matching entry in the list, the participant starts the survey. If there is no matching entry in the list, the participant cannot start the survey.
Which Fields Should You Use to Authenticate?
You may use any field or combination of fields in your participant list to authenticate participants. For each field you want to use, add a question to the Login Collection and make sure the question's unique id matches the desired field name in the participant list.
Unauthenticated/Anonymous Surveys
If you want participants to be able to take your survey without having to log in, do not put any questions in the Login Collection. You may still include Text/HTML items in the Login Collection to display a welcome message.
Cookie Support for Tracking Unauthenticated Surveys
This option applies only to unauthenticated surveys and prevents multiple submissions (or “stuffing the ballot box”) by the same computer and allows users to resume survey sessions for unauthenticated surveys. Multiple submissions are prevented unless cookies are deleted from the survey participant’s computer.
This option is not recommended in situations where a fairly high percentage of survey participants are expected to use computers in the same shared computing environments. This is often the case in academic environments.
To enable this option, select Edit > Preferences and then the Advanced tab. Check the box entitled: Use browser cookies to track unauthenticated survey sessions. Note that this check box will appear grey and be disabled if the survey is authenticated, i.e. there are one or more questions in the LOGIN collection.
Using System-Generated IDs
If you do not want to create unique ids for all of your participants, but you do want to ensure that only people on your participant list can take your survey, follow these steps to use Illume's internal system-generated IDs:
Create a single question in the login collection. The question must have the display type "Text", and the question's unique name must be "ID". (You will have to create a prompt for this question, even though most participants will never see the question or the prompt.)
In the Surveys section of the Web Console, be sure to assign the proper participant list(s) to your survey.
In the Email Jobs section of the Web Console, create an Email Job that uses your survey and participant list. Include the {SurveyURL} tag in the body of the email.
Illume will send out email invitations to your survey with an embedded URL that looks like this: https://www.datstat.com/SB-Collector/Survey.ashx?Name=MySurvey&LoginId=d6715527-d4b6-44a7-a827-e151310e4318 Note that the URL ends with "LoginId=" followed by a long GUID (globally unique identifier). The GUID is the participant's unique login id. If you ever need to look up a participant's GUID, you can do so through the Participant List area of the Web Console. Go to the participant list and click on the participant's name or email address (or any other piece of the participant's data). This will display the "Edit Participant" page, which always displays the participant's GUID.
Things Not to Do
Do not include duplicate entries in your participant list. For example, if you are requiring participants to provide an email address and employee id to access your survey, do not include in your participant list more than one participant with the same combination of email address and employee id, even if other data for these two participants differs. When a participant logs in, Illume looks for a unique participant in the list who matches the supplied credentials. If Illume cannot find a unique entry matching the credentials, the participant will not be allowed in. Do not include questions in the Login Collection whose unique ids are not column names in the participant list. The example above used EMAIL and EMPID as the unique names of questions in the Login Collection. These matched the EMAIL and EMPID fields in the participant list. If the EMPID question had been named EMPLOYEEID, no participants would be able to log in, because the participant list contains no EMPLOYEEID column.
Illume's translation tools belong to an add-on package designed to work with your third-party vendors or in-house translators, streamlining workflow and enabling you to launch single surveys that include multiple languages.
The translation tools require Translation Licensing, which is available in Illume version 3.1 and later. In addition, your Illume administrator must enable the translation feature for each user who will be editing, creating, or managing survey translations. (This is a simple process; see Enabling Special Features for details.)
The Translation Process
The basic process for translating an Illume survey involves three steps:
Create a translation package. This is a simple point-and-click operation that creates a "translation package," which is an XML file containing all of the text from your Illume survey.
Translate the package. Send the XML file to a third party translation service, or use Illume's translation tool to translate the package text.
Import the translated text back into the original survey.
After step 3, your survey will contain both the original language and the translation. You may repeat this process for as many languages as needed, storing all of the translations in a single survey.
When a participant begins a survey, Illume presents the most appropriate translation for that participant, and all of the text of the survey appears in the language of the selected translation. (Details on how Illume chooses the most appropriate translation are here.)
You may also choose to save each of the translations as a separate survey. The disadvantage to the separate survey approach is that when you want to compare responses across all languages, you will have to take the extra step of building a cross survey view that includes each of the individual surveys.
Translation Tools
If your Illume license includes the translation package, and you are using a translation-enabled client, you can access Illume's translation tools through the Translate menu of the Survey Console. The translation tools include:
The Translation Editor - Use this to translate the text in a translation package (step 2).
The Translation Manager - Use this to add, remove, and update translation packages (step 3).
All Illume surveys have a "default language." Participants will see the entire survey in the default language if there is no translation that exactly matches the participant's language and culture (LCID). See How Illume Decides Which Survey Language to Display below for more about this.
In addition, any untranslated text within a specific translation will be displayed in the default language to prevent the text from appearing entirely blank. For example, if English is your survey's default language, and the French translation contains no translation for the prompt of question #3, then the prompt for question #3 will appear in English on the French translation.
How Illume Decides Which Survey Language to Display
When a survey includes more than one translation, Illume must decide which translation to display to each participant. To decide, Illume looks at what translations exist and what culture the participant belongs to. (Culture is the combination of the participant's language and country. For example, en-US is US English; en-UK is UK English. Illume considers these to be different languages. See LCID for details.)
In a multi-lingual survey, participants will see the default language if any of the following are true:
The participant's language is the same as the default language.
The participant has no specified language.
There is no translation of the survey in the participant's specified language.
How Does Illume Determine a Participant's Language?
Illume uses participant lists to determine each participant's language. It does not use the LCID specified in the participant's browser.
When a participant comes to your survey, Illume looks up the language of the list to which the participant belongs and displays the survey in the best available language. (All participants belong to a participant list, and you may optionally specify a culture for each list.) The "best available language" is determined according to the following rules:
If a language is specified for the participant list, and the survey has been translated into the specified language, Illume will present the survey in that language.
If no language is specified, or if the survey has not been translated into the specified language, Illume will present the survey in the default language.
If there is no exact match between the participant list language and the available translations, Illume will not attempt to provide a "close" alternative language.
For example: You have a participant list marked as French (Switzerland) [fr-CH] and your survey includes English (US) [en-US] as a default language and French (France) [fr-FR] as a translation.
When a participant from this list comes to your survey, Illume will look for a French (Switzerland) translation and see that none exists. Illume will then present the default language version of the survey— English (US)— rather than looking for a "close-enough" French translation.
Serving Multiple Cultures With a Single Translation
If you will be fielding a survey to multiple cultures (LCIDs) that share a language, you must add a translation package for each of the target cultures. If you don't mind all of your French participants seeing the same translation, regardless of their culture, you may make a single French translation, then add it to your survey once as French (France), then again as French (Switzerland), then again as French (Canada), etc.
How to Force Illume to Display a Specific Translation
You can force Illume to present a survey in a given language (assume a translation for that language exists) by adding the following to the end of the survey URL. If your survey URL looks like this:
where LCID is a numeric or character LCID such as 1033 (for US English) or fr-CH (for Swiss French). The LCID for each translation appears in the list of translations in the Manage Translation dialog. The numeric LCID appears in the LCID column, and the character LCID appears in the Translation ID column.
Note that Microsoft's list shows both decimal and hexadecimal LCID values. When using hexadecimal LCIDs in an Illume survey URL, you must add the prefix "0x" to the LCID. For example:
&Translation=1033 (decimal LCID for US English)
&Translation=0x409 (hexadecimal LCID for US English, with 0x prefix)
&Translation=en-US (character-based LCID for US English)
Creating a Translation Package
Creating a translation package is the first of three steps for adding a translation to your survey. The translation package will contain all of the text from your survey in the form of an XML file.
To create a translation package:
In the Survey Console, click on the name of the survey for which you would like to create a translation package.
Choose the languages from which and to which the survey will be translated. If your survey currently includes only a single language, there will be only one option in the Translate from list. This is the default language, and it is marked by an asterisk.
If your survey already includes more than one translation, you may translate from any of the existing languages. (See Translating from Languages Other Than the Default below for a special note about this.)
Click Save Package. Illume will supply a default name for the package. You may change this, though the filename must end with .xml.
The resulting XML file is ready to send to a translation agency, or you may translate it using Illume's translation tool. The XML file includes instructions for translation agencies.
Excluding Items from Translation
In some cases, you may want to make sure text is NOT translated. Examples of items you may want to exclude from translation include:
Brand names or product names. These often appear untranslated in other languages.
Already translated items. If you have changed a handful of questions in your survey since it was last translated, then you will likely want only those few items translated. Excluding the previously translated items saves you time and money.
To exclude an item from being translated:
Click the item in the list of translatable strings.
Click Remove from Translation.
You'll notice that the word No appears in the Translate column to the left of this string.
If you change your mind, you can select the item again from the list of translatable strings and click Restore to Translation.
Special Translation Package Options
Exclude items with existing translations
If some items in your survey have already been translated into the target language, checking this option removes those items from the translation package. This may save you the expense of translating again text that has already been translated. You may use this option, for example, if you edit your survey after it has already been translated, and you want to translate only the latest changes.
Include text for existing translations
If some items in your survey have already been translated into the target language, checking this option causes the existing translation for each item to be included in the translation package. Whoever translates the package will be able to see the existing translations, and can verify or correct them.
When Exclude items with existing translations is checked, Include text for existing translations has no effect.
Translation Package Details
The translation package contains every unique string of text found in your survey, including the text of question prompts, response options, instructions, error messages, button labels, HTML resources, etc.
Each unique text string is included only once in the translation package, regardless of how many times it appears in your survey. For example, if 20 different questions include the response option I choose not to answer, the text string I choose not to answer appears only once in the translation package. It will be translated once, and when you import the translation package back into your survey, every instance of the text string I choose not to answer will be replaced by the same bit of translated text. This saves time and money by sparing translators from having to translate the same text multiple times.
The Translatable Strings list includes the following columns:
Translate - Displays whether the text string is marked for translation.
Appearances - Shows the number of times this text string appears in the survey.
Source - Displays the text string in the source language.
Target - Displays the text string in the target language. If the string has not been translated yet, the column will be empty.
The text count at the bottom of the Translation Package window shows the total number of non-unique text strings in the entire survey, the total number of unique strings, and the total number of strings in the translation package.
The number of strings in the package will be equal to the total number of unique strings in the survey, minus any strings you marked for exclusion.
Translating from Languages Other Than the Default
When a translation is missing items, your survey participants will see the untranslated in the default language. This is true no matter what source language your translation package uses.
For example, assume your survey's default language is English. The survey includes a Spanish translation for Spain (es-ES) and you want to create another Spanish translation for Mexico (es-MX).
You create a package with es-ES as the source language and es-MX as the target language. The translator finds that only 5 items need to be changed for Mexican Spanish, so she translates those 5 items and leaves the other 300 items untranslated.
When you import the Mexican translation back into your survey, the 5 translated items will appear in Mexican Spanish, and the remaining 300 items will appear in English, because English is the survey's default language. Illume always uses the default language to fill in missing items!
Managing survey translations includes the following actions:
Adding a new translation to a survey.
Updating an existing survey translation.
Removing a translation.
Displaying and translating "missing" (untranslated) items.
Adding a New Translation
This is the third step in adding a translation to your survey. (Step one is to create a translation package; step two is to translate it.) After you or your translation vendor has completed the translation, you will need to import it back into your survey. The final result will be a single survey with multiple translations. This ensures that all data are collected into a single dataset independent of the language in which the survey was displayed.
If you wish to maintain multiple surveys (one for each translation) see the section on Multiple Surveys below.
To import the translation back into your Illume survey, follow these steps:
Choose Translate > Manage Survey Translations... from the Survey Console Menu. (It does not matter which survey is selected in the survey list.)
Click the Add/Update button.
Choose the file containing the survey translation and click Open. The file you choose should be a survey translation package (an XML file) containing translated text.
Illume will load the translation into your survey, and the translation will appear in the translations list. The list above shows a survey with several translations.
The Translations list includes the following columns:
Translation Name - The name of the translation language and culture. The language always appears first, with the culture in parentheses. Note a single language may have many cultures, and that each culture is considered a separate translation. English (US) is not the same as English (UK). See Understanding the Default Language for information about why culture is relevant.
Translation ID - The character-based LCID of the translation.
Translation Count - The number of items translated (and untranslated) in the specified translation.
Updating a Translation
To update a translation, follow the steps for adding a new translation above. When you update a translation, Illume will overwrite any translated text in the existing survey with the translation from the new package, except when the survey includes a translation that is missing from the package.
For example, if the text string "Click here to begin" is already translated in your survey, but is not translated in the translation package you are importing, Illume will leave the existing translation in place.
If the text string is translated in both the survey and the translation package you are importing, Illume will overwrite the translation in the survey with the translation in the package.
Note that translations for different cultures are considered separate translations, even if they are in the same language. For example, Illume considers French (France) and French (Canada) to be distinct translations. If your survey already includes a translation into French (France) and you add a French (Canada) translation, you will end up with two French translations in your survey.
Removing a Translation
To remove a translation from a survey:
In the Survey Console, click on the survey from which you would like to remove a translation.
Choose Translate > Manage Survey Translations... from the Survey Console Menu.
In the list of translations, click the translation you want to remove. You may select more than one translation by holding the Control key while clicking several translations.
Click Remove.
Click Save Survey... to save the updated survey. If you have removed a translation by mistake, click Cancel to throw out the changes. Your survey will remain unchanged, and you can start over from step one.
Choose Save radio button to overwrite the existing survey, or Save As to save a copy of the new survey. (Save As preserves your existing copy.) If you choose Save As, you must provide a new name for the new version of the survey.
Click Save.
Displaying and Translating "Missing" (Untranslated) Items
In the Survey Console, click on the survey you'd like to work on.
Choose Translate > Manage Survey Translations... from the Survey Console Menu.
Choose a translation from the list and click Show/Add Missing....
This displays all of the survey's untranslated text strings in the Translation Editor. To translate these items, follow the instructions for Using the Translation Editor.
How Illume Handles Missing (Untranslated) Items
Any missing or untranslated items will be presented in the default language. For example: You have a survey whose default language is English. The survey includes 100 translatable text strings. The survey includes a French translation, in which 90 of the 100 items are translated. The remaining 10 items will appear in English, even on the French survey.
Illume's rule of thumb is to always fall back on the default language when no other suitable translation is available.
Translation Mismatches
The following scenario will cause problems:
You create a translation package and send it out to be translated. Before the translation comes back, you edit the survey, changing the question prompt and response options for question #3.
You get the translation package back, and it says all strings are translated. You import the translation back into your survey.
The translation tool tries to match each of the text strings in the translation package with text strings in the survey. Because the prompt and response options for question #3 are new in the survey, and do not exist in the translation package, those items will remain untranslated. All other items will be translated.
Multiple Surveys: Creating One Survey for Each Translation
In some cases, you may want to create one distinct survey for each translation, rather than having all translations rolled into a single survey.
To do this, follow the steps below for each of your translations. This assumes that you already have translations for each of the languages in which you will be fielding the survey.
In the Survey Console, click on the survey you want to work with.
Choose Translate > Manage Survey Translations... from the Survey Console Menu.
Click Add/Update.
Choose the file containing the survey translation and click Open.
From the Default language list, choose the newly added language as the default language.
In the list of translations, click each other translation, while holding down the Control key, then click Remove. You now have a survey that includes only one language.
Click Save Survey....
Check the Save As option, and enter a new name for the survey. Do not use the Save option, or you will wipe out your original survey!
Type a new name for the survey in the Survey name box and click the Save button.
As noted under How Illume Handles Missing (Untranslated) Items above, if any of the translations are missing items (e.g. only 90 of the survey's 100 text strings are translated), Illume will copy the default language text into the translated survey.
To translate a survey using Illume's translation tool, you must first create a translation package, as described in Creating a Translation Package. Once you have created the translation package, follow these steps to open the translation editor:
Click the survey you want to translate in the Survey Console's list of surveys.
Choose Translate > Translate Survey... from the menu.
Click the Open Package button at the bottom of the Translation Editor.
Choose the translation package you want to work on and click Open.
The translation editor displays the contents of your translation package, and provides features for translating text while maintaining attributes such as font color, bold-face and underlined text.
Using the Translation Editor
The bottom half of the translation editor displays all of the unique text strings in the source language. Translations appear to the right of the source language strings, in green type.
To translate text from the source language to the translation language:
Click the text you want to translate in the list in the bottom half of the translation editor. The source language appears in the top left text box. The translation appears in the top right Text/HTML editor. If the text has not been translated yet, the same text will appear in both text boxes.
Click in the Text/HTML editor in the top right corner and edit the text as you would in Microsoft Word or another word processor.
If you lose formatting while you edit the translation, simply highlight the text and use the buttons beneath the Text/HTML editor to re-apply formatting. Note that the original text, with formatting, is always displayed in the top left editor.
If you are comfortable editing HTML directly, you may click the Source tab and edit the HTML source.
Click Save Translation to save the text you just translated.
Choose a new string to translate using the << Previous or Next >> buttons, or by clicking on the text in the list. Then repeat steps 1-3.
To save your work, click Save Package..., then click Save in the file dialog.
Changing the Default Language
To change the default language of a multilingual survey:
Choose the survey whose default language you want to change from the Survey Console.
Choose Translate > Manage Survey Translations... from the Survey Console Menu.
Choose the language you want to set as the default from the Default Language list.
Click Save Survey....
If you want to create a copy of your survey with the new default language, choose Save As and enter a new name for the survey. This leaves you with two versions of the survey: one having the old default language and one having the new default language.
If you want to keep only the version with the new default language, click Save.
Default Language Considerations
If you choose as your new default language a translation in which some items are missing, Illume will fill in the missing items with text from the old default language. For example: Your default language is English (US), and your survey includes 100 translatable text strings. You change the default language to French (France), but 10 items in the French version are missing. Illume will copy the English text for those 10 items into the French version of the survey.
Illume will not leave untranslated items empty: it will fill in missing text from the default language, even when this means copying text from the old default language to the new default language.
You should choose a default language for which a translation exists. If you change the default language to a language for which no translation exists, Illume will copy all of the text from the old default language into the new default language.
Initial Setting of the Default Language
When you create a survey, Illume sets the survey's default language to the language (LCID) under which your computer is running. This may not always be correct. If, for example, your computer is running under US English, and you are composing a survey in Spanish, the survey's default language will be called English (en-US) even though all of the text is in Spanish.
If you create a survey by cloning an existing survey, the default language of the new survey will be the same as the default language of the original survey.
When fielding a multilingual survey, you should verify each of the following items.
Make Sure All Translations Exist
Create a translation for each language in which the survey will be fielded. To see which languages are currently included in your survey:
Click on the survey in the Survey Console.
Review the list of translations in the Manage Translations dialog. The Translations list includes the name and LCID of each translation currently included in the survey.
If any translations are missing, follow the steps for adding survey translations outlined in Managing Survey Translations.
Keep in mind that your local copy of the survey may be more up to date than the published copy. Be sure the translations exist in the published copy!
Make Sure the Default Language Is Correct
Remember: If Illume cannot find a suitable translation for members of a given participant list, it will present the survey to members of that list in the default language. Follow steps 1 and 2 above to ensure the default language is acceptable. See Changing the Default Language if you need to make changes.
Keep in mind that Illume will present either the translation that exactly matches the participant's language and culture, or the default language. It will not present a "close" translation. If your survey includes several participant lists having the same language but different cultures (e.g. French (France), French (Switzerland) and French (Canada)), and you don't want to create a separate translation for each, see Serving Multiple Cultures with a Single Translation
Make Sure Participant List Languages are Set Correctly
If you want your survey to appear in different languages for different participants, you must set up multiple participant lists, each with its own language.
For example, if you field a survey in English, French, and Spanish, your survey should have 3 participant lists: one with the language set to English, one set to French, and one set to Spanish.
All participants will see the survey in the language associated with their participant list. For instructions on how to set the language of a participant list, see Creating a Participant List. For instructions on how to associate the list with your survey, see Survey Participant Lists.
As of version 3.1, Illume's translation tools do not support right-to-left languages. Right-to-left languages include:
Remote Data Collection allows interviewer-style users to use DatStat Illume to collect survey data on mobile computers in areas where an Internet connection is not available or unreliable. Remote data collectors simply download selected surveys and participant lists for use in the field, perform interviews offline, and then upload collected survey data back into Illume once they have access to an Internet connection again.
The Remote Data Collection module is an optional add-on component in Illume that is purchased separately and requires Remote Data Collection Licensing, which is available in Illume version 4.5 and later. In addition, your Illume administrator must enable the Remote Data Collection feature for each user who will be collecting survey data remotely. (This is a simple process; see Enabling Special Features for details.)
A new tab called Remote Data Collection appears in the Illume Survey Console desktop application if this component is enabled and the user who is logged in has been assigned the appropriate privileges to use it.
The basic process for using remote data collection involves getting the survey for which you want to collect data and any needed associated participant lists while connected to the Illume server, disconnecting from the Illume server and collecting data remotely, and then reconnecting to the Illume server and synchronizing collected survey data.
To get surveys and participant lists on your local computer for use with remote data collection:
From the Remote Data Collection tab in the Survey Designer, click the Add Survey… button or right-click anywhere in the Available Surveys list and choose Add survey… from the context menu
A dialog displays a list of all of the published surveys in the system to which you have access
Select a survey and click the Next > button
The dialog displays a listing of all participant lists associated with the survey (NOTE: if the survey is authenticated, i.e. one or more questions exist in the Login collection of the survey, and no participant lists are associated with the survey, you CANNOT proceed past this step and will not be able to actually get the survey for remote data collection.)
Select the list or lists that you would like to use for Remote Data Collection. You can select multiple lists by using the Shift and Ctrl keys with the left-mouse button.
Check the box to "Download current partial submissions to complete remotely" if you would like to be able to complete any partial submissions using remote data collection. This box is only enabled if the survey is authenticated and partial submissions exist on the Illume server for that participant list.
Click the Finish button to complete the process and add the survey and any selected participant lists to your Remote Data Collection tab.
Note that "Getting a survey for remote data collection" is not like checking a survey out for editing, which locks that survey on the server and prevents any other users from checking it out. Multiple users can download a survey for remote data collection at the same time, allowing you to have multiple interviewers in the field collecting data for the same survey.
Available Surveys and Survey Status
To view the surveys that are available to you for remote data collection, click on the Remote Data Collection tab and click on the survey in the left-hand pane. The survey status pane shows you information about the survey, including the version of the survey you are using with remote data collection, the number of complete survey sessions you have collected but not synchronized with the Illume server, and the number of sessions you have in progress (sessions that have been started but not submitted).
Collecting Data
To collect data for an unauthenticated survey, or to manually login to an authenticated survey to collect data remotely:
Select the survey in the list of available surveys on the Remote Data Collection tab.
Click the Collect Data… button.
The login page for the survey will be displayed.
To collect data for an authenticated survey that you want to automatically authenticate into:
Select the survey in the list of available surveys on the Remote Data Collection tab.
Click the Participants… button.
This shows a list of all participants associated with the survey from the participant lists you downloaded from the Illume server. Test participants are displayed in a grayed-out fashion in this view to distinguish them from real participants.
Select the participant whose data you would like to collect and click the Collect Data… button.
Synchronizing remote data collection surveys keeps offline interviewers up to date by downloading any survey changes and participant list changes to the remote data collector’s computer while simultaneously uploading any data collected remotely to the Illume server.
To synchronize a survey, select the survey on the Remote Data Collection tab and click the Synchronize button.
Synchronizing performs the following actions:
Uploads any sessions you have collected to the server.
Downloads any survey design changes that have been published since the last time you synchronized.
Downloads updates to associated participant lists you are using for remote data collection with this survey.
Once you complete collecting data remotely for a survey and synchronize all of your collected data, and you do not plan to collect any more data remotely on this computer, you can click the Remove Survey button to remove that survey from your local Remote Data Collection tab. Important Note: removing a survey will delete remotely collected data that have not been synchronized and is not undoable. If you have collected data for the survey that you want to be preserved in your data set for analysis, be sure to synchronize the survey before removing it.
When you choose to remove a survey that has collected data from your Remote Data Collection cache, a message will be displayed warning you that the collected data will be permanently deleted when you remove the survey. Remove Survey can also used to remove a survey you have erroneously added to your local computer’s remote data collection cache.
To change the location where remote data is stored on your local machine from the default setting, choose Remote data cache collection… from the Survey menu on the Remote Data Collection tab.
Click the Other radio button and browse for and select a different location on your local machine in which to store your remotely collected data and the surveys and participant lists you are using with the Remote Data Collection module.
This section describes the Survey Administration tab on the Survey Console and the features it provides for managing multiple surveys in various stages of development.
Generally, survey development follows a lifecycle that includes creation, revision, approval, publication, retirement, and possibly deletion. Survey administration is the process of marshalling a survey through these steps.
Along with these stages, it is important to understand the concepts of workflow, version control, and publication.
Workflow
Illume enforces a simple workflow rule that requires all surveys to be approved before they can be published. Any Illume user who has Designer or Reviewer privileges on a survey can edit the survey. However, only the Reviewer can approve the survey for publication.
In a larger organization, several designers may collaborate on a survey, and a manager may be required to approve it before it is presented to participants. In this case, the survey collaborators would each have the role of Designer, and the manager would have the role of Reviewer.
When the designers feel the survey is ready, they submit it for review to the manager. (See Checking In a Survey for information about submitting a survey for review.) If the manager approves the survey, then either the manager or the designers can publish it. If the manager rejects the survey, he or she may attach comments specifying what revisions are required for approval.
In cases where survey designers should be allowed to publish their own surveys, and manager approval is not required, an Illume administrator can simply give the designers the Reviewer role for the survey in question, and the designers will be able to approve the survey themselves.
See Approving a Survey for more detailed information about survey approval.
Version Control
The Illume server maintains a central "master" copy of all of the surveys that have been checked in. Whenever a user checks in a survey, Illume copies the survey to the central Illume server, and deletes the user's local copy. From then on, anyone wanting to edit the survey must check it out from the server.
When a survey is checked out, Illume creates a local, editable copy of the survey on the user's computer, and marks the "master" copy as checked out.
While the survey is checked out, other Designers cannot access it. This prevents multiple users from making conflicting simultaneous edits. The Survey Console will display the name of the person to whom the survey is checked out.
It is possible for an administrator to cancel a user's checkout if another user needs access to review or edit a survey. Note, however, that breaking a checkout will cause the master copy of the survey to revert to the version the user checked out. It will not include any changes the user made, and in fact will likely result in the loss of that user's changes. See Canceling a Survey Checkout for more information on how to break check outs and how to guard against losing edits.
When the designer checks the survey back in, Illume updates the version number, and the new version will require approval before it can be published.
Each version of a survey may have check-out and check-in notes attached. These notes form a history to describe how the survey has changed from one revision to the next.
Currently, Illume does not allow you to retrieve previous versions of surveys. Only the most recent version is accessible.
Publication
Publication is the act of making a survey ready to "go live." Publication essentially puts the survey into a ready state; it does not make the survey available to participants.
To make a survey available to participants, you must approve the survey, then publish it, and then start it. See Publishing a Survey for more information.
All survey administration actions depend on the Illume server. You must have an open connection to an Illume server to check surveys in and out, to review, approve, and publish surveys.
Before you can connect to an Illume server, your Illume client must know where the server is. Follow these steps to add or edit the information you'll need to connect:
Start the Illume client application. You can do this by going to the Windows Start menu and selecting Programs > DatStat Illume > DatStat Illume 4.7 .
On the login screen that asks for your username and password, you should see a list of available Illume connections. If you don't see this list, click the "Options >>" button.
Click New...
Enter a name for the server you want to connect to. This name is for your reference. It will appear in the list of available connections when you are done.
Enter the URL of the Illume Server in the Service Location field. You may need to contact an administrator to get this information. The URL should be a normal http or https Internet address.
Click OK to add the connection to your list.
Editing an Existing Server Connection
To change the name or the URL of an Illume server that is already in your list of available connections, select the connection from the list, click Edit, and follow steps 4-6 above.
Standard Cloning
Cloning a remote survey copies a survey from an Illume server onto your local computer. You may want to clone a remote survey because:
someone else has the survey checked out and you just want to get a look at it, or
you want to create a new survey that is very similar to the remote survey
To clone a remote survey:
Choose File > Clone Remote Survey... from the Survey Console menu.
Choose the survey you want to clone from the list of available surveys. The list may display only those surveys you have worked on. To display a list of all surveys, uncheck Only display surveys that I have worked on.
Click Clone. If the survey you want to clone is currently checked out, you will not be able to clone it because someone is editing it.
Give the survey a new name and click OK.
A new survey editor window will appear displaying the contents of the survey you just cloned. You can edit and preview the survey. Note that Illume will not save the survey to your hard drive until you save or preview the survey. If you clone a remote survey and edit the clone, you will not be able to merge your edits back into the original survey. The clone becomes a new survey, and the Illume server does not associate it with the original. If you want to edit a survey, check the survey out, make your changes, and check it back in.
Cloning Previous Versions of a Survey
This operation can be helpful in determining when changes were made between different versions of a survey.
To make a clone of a specific revision of a survey, first select the survey in the System Administration tab. Then right-click > Properties... and select the Survey Action History tab. Select on any row that contains survey content and click on the Clone Survey Version button.
There are two ways to remove a survey from the My Surveys list. If the survey was obtained by checking it out from an Illume server and the user is connected or 'logged-in' to that server, selecting Cancel Check-out... will delete the copy of the survey from the user's computer and will undo your check-out. The Illume server's copy of the survey will revert back to the state the survey was in when you checked it out-- discarding all of your changes-- and the surjvey will again be available for others to check-out.
To cancel your check-out of a survey:
In the My Surveys tab of the Survey Console, click on the survey you want to cancel.
Choose Cancel Check-out... from the Edit menu.
Click OK to confirm your cancel.
If the survey was created by the user and has never been checked-in to any server, selecting Delete... will remove this survey from the user's local machine. There is NO UNDO for this operation. If a survey was checked-out from an Illume server but the user is not connected to that Illume server, it will be possible for the user to select Delete... for that survey. This will delete the survey from the user's local machine, forfeiting all changes, but will NOT notify the Illume server that the check-out has been cancelled. In this situation a DatStat Illume Administrator will have to release the user's lock on that survey.
To delete your local copy of a survey:
In the My Surveys tab of the Survey Console, click on the survey you want to delete.
Choose Delete... from the Edit menu.
Click OK to confirm your deletion.
Note that if you delete a survey that has never been checked in, you will be deleting the only copy of it!
Permanently Deleting a Survey from the Illume Server
If you have administrative privileges, you can delete a survey permanently from an Illume server. Deleting a survey from the server means:
The survey will be erased and cannot be recovered
All of the data submitted for this survey will be deleted and cannot be recovered
To delete a survey permanently, follow these steps:
Click on the survey in the Survey Administration tab of the Survey Console.
If the survey is running, you will have to suspend it before you can delete it. To suspend the survey, right click on it and choose Suspend from the context menu.
Right click on the survey and choose Delete from the context menu.
You will a warning similar to the following. Read it carefully and understand that the survey and all of the data collected from this survey will be gone forever. Click OK if you really want to do this.
If you have recently performed a survey search, and have not cleared the search criteria, you may see only the partial list of available surveys that matched your search. To display a list of all surveys on the Illume server:
Click on the Survey Administration tab of the Survey Console.
Click on the Survey Search tab.
Click Clear All Search Criteria , if the button is enabled.
Click the Search button in the lower right corner.
If a survey is checked out, the user to whom it is checked out can rename the survey under the My Surveys tab. Otherwise, the survey can be renamed under the Survey Administration tab.
To rename a survey:
In the Survey Console, right click on the name of the survey, either under the My Surveys tab or under the Survey Administration tab.
Choose Rename... from the context menu.
Type in the new name.
Click OK .
Users may attach comments to surveys when they check in, check out, approve or reject the surveys. These comments, along with the survey's initial description, constitute the survey's history. To review a survey's history:
In the Survey Console, right click on the name of the survey under the Survey Administration tab.
Choose Show History... from the context menu.
When you are finished, click Done to close the Survey History window.
Note that individual questions within a survey may also may have comments attached. These comments do not appear in the survey history. To review question comments, you must check the survey out and follow the instructions for Reviewing and Editing Comments.
The diagram below outlines the basic process of creating and publishing an Illume survey.
To check in a survey means to return a copy of the survey to the Illume server. Once a survey is checked in to the Illume server, it can be checked out by others for review and editing, it can be approved for publication, and it can be made available to participants.
When a survey is first created, it will appear in the My Surveys list with a version number of V0, and a status of "New survey." The host will be listed as localhost, meaning the survey exists only on your local computer: the Illume server does not have a copy of it.
If you are working with an existing survey that you have checked out from an Illume server, the version number will be greater than zero, and the host will match the name of the Illume server from which the survey was checked out.
To check a survey in you must be connected to the Illume server . If you are not connected, you will have to reconnect by choosing File > Reconnect from the Survey Console.
When you are connected to the Illume server, follow these steps to check a survey in:
Right click on the name of the survey in the My Surveys tab.
Select Check in... from the context menu.
(New Surveys Only) Type a description of the survey. This will be useful to help you and other survey editors distinguish this survey from others.
Choose one of the checkin options. These options appear for existing surveys only; you will not see these options if you are checking in a new survey.
Check-in only Return the survey to the Illume server. Choose this if you or someone else will be making further revisions to the survey.
Check-in and request approval Return the survey to the Illume server and request approval from a reviewer. Choose this when you think your survey is ready for publication, and requires a reviewer's approval.
Check-in and approve for publication Approve the survey, making it ready for publication. Only reviewers and administrators can do this.
Check-in, approve, and publish Check the survey in, approve it, and publish it. The only thing left to do to make the survey available to participants is to start it. See Starting and Resuming a Published Survey. Note that when you choose this option, you must select a time period for publication. See Understanding Time Periods
Check-in as template only Check this survey in as a template. A template cannot be published or made available to participants. It is used as a foundation on which to build other surveys.
Check-in as template only and request approval Check this survey in as a template and request that the template be approved for use by others.
Check-in as template only and approve Check this survey in as a template and approve it immediately so others can start building surveys on it.
(Optional) Add checkin comments. These comments apply only to the current version of the survey. Every time you check a survey in, you can add new comments. The comments are accessible through the survey's Show History option.
(New Surveys Only) Check Add as template if you want to add this survey as a template. Survey templates cannot be published, but they can be reused as the basis on which to build other surveys. See Survey Templates below for more information.
Click OK .
The survey disappears from the My Surveys tab as Illume removes the local copy from your machine. Click on the Survey Administration tab, and you will see the survey at the bottom of the list of surveys that are stored on the Illume server.
You'll notice that the version number is one higher than what it had been when the survey was on your local computer. Illume automatically increments the version number each time you check in a survey.
To make further edits to the survey, you will have to check it out from the Illume server. See Checking Out a Survey.
Survey Templates
Survey templates are special surveys that cannot be published, but can be reused. A survey template may include a login page, header and footer, as well as logos, frequently used images, and a few stock questions that your organization uses often.
When an Illume user creates a new survey, he or she is presented with a list of templates upon which to build the survey. Initially, this list includes only Illume's Default Template.
Any survey that saved as a template will be added to the list of available templates, and users will be able to create new surveys from those templates.
Templates can save survey designers the trouble of having to hunt down commonly used resources, and can help to ensure that surveys maintain a consistent look and feel.
Keep in mind that the template itself cannot be published as a survey. You must build a survey from the template, and then publish the survey.
In certain cases, you may not be able to check a survey back in to the Illume server. The most common types of check-in errors are listed below.
Check-in option is disabled
Problem: You want to check a survey in, but the Check-in option is disabled (i.e. it appears in gray text, and you cannot click on it).
Meaning: You are not connected to the Illume server.
Solution: Choose File > Reconnect... from the Survey Console menu to connect to the Illume server. Once you are connected, you will be able to check your survey in.
Object is checked out as a different user
Problem: When you try to check a survey in, you get an error that says: "Survey checkin failed: Object is checked out as a different user."
Meaning: If you have more than one Illume account, and you checked out a survey under one login name, you cannot check it back in under a different login name.
Solution: You must reconnect to the Illume server using the same login name you used to check the survey out, and then check the survey back in. Choose File > Reconnect... from the Survey Console menu to reconnect to the server under a different login name.
Object is not checked out
Problem: When you try to check a survey in, you get an error that says: "Survey checkin failed: Object is not checked out."
Meaning: This error usually means that while you had the survey checked out, an Administrator or Reviewer canceled your checkout. In some cases, it may mean that the survey was deleted from the Illume server while you had it checked out.
Solution: Before you do anything, RENAME YOUR LOCAL COPY OF THE SURVEY! When the Reviewer or Administrator canceled your checkout, the Illume server's version of the survey reverted to the state the it was in when you checked it out. The Illume server has no record of any of the changes you made!
You must rename your local copy of the survey before you check the survey back out from the Illume server because when you check it out, the Illume server overwrites your version of the survey with its version. This means all of your changes will be lost!
To rename your local copy:
In the Survey Console, right click on the name of the survey in the My Surveys list.
Choose Rename... from the context menu.
Type a new name.
Click OK .
You can now safely check the survey out from Illume without fear of overwriting your changed copy. Note, that you will have to merge your changes back in to the checked out copy by hand. One way to do this is to open both surveys side by side, and drag items from your edited version into the checked out version.
If you want to edit an existing survey, you must first check it out from the Illume server. Note that you must be connected to the Illume server to check out a survey. If you do not see the Survey Administration tab in the Survey Console, you are not connected to the server. Choose File > Reconnect... to connect to the server, and then follow the steps below.
In the Survey Administration tab, right click on the name of the survey you want to check out.
(Optional) Type comments. These comments will be available to anyone using reviewing the survey's history.
Click OK .
The editable version of the survey will be copied to your local computer.
You may not check out any survey that is currently checked out to someone else.
You may view a read-only version of the survey by double-clicking on the survey name and answering "Yes" when asked if you want to preview. This will display all of the survey questions in printable form. The view is the same as the Preview Survey Layout option available from the Survey Designer's File menu.
Note that the read-only version is the last version checked in to the Illume server. It does not include any edits that may have been made by the person who currently has the survey checked out.
Illume will display the name of the person who has the survey checked out in the Last Action column to the right of the survey name. You should ask that person to check the survey back in so that you may access it.
If the person is unreachable, a Survey Administrator or Reviewer can break the other user's checkout, but breaking a checkout can result in the loss of any changes a user has made to a survey.
In some cases, it may become necessary to cancel another user's checkout. For example, one user checks out a survey and then is away from work. Other users need to review or edit the survey, but cannot gain access to it, because it is checked out.
Administrators and Reviewers can cancel another user's check out. Before doing this be aware that canceling a checkout may result in the loss of any changes the user made while he or she had the survey checked out.
When you break a checkout, the master copy of the survey on the Illume server reverts to the version that the user had checked out. Whatever changes the user may have made to the survey remain in the user's local copy of the survey, but these changes will not make it back to the Illume server. For instructions on how to prevent these changes from being lost, see the explanation of the error "Object is not checked out" under Understanding Checkin Errors.
To cancel another user's checkout:
In the Survey Administration tab of the Survey Console, right click on the name of the survey whose checkout you want to cancel.
Select the Cancel Checkout... option from the context menu.
Click Yes when asked "Are you sure you want to cancel this user's checkout?"
Only Reviewers and Administrators can approve surveys. Once a survey has been approved, it can be published. To approve a survey:
In the Survey Console's Survey Administration tab, right click on the name of the survey you want to approve.
Choose Approve... from the context menu.
(Optional) Type comments. These appear in the Survey's history.
Click OK .
Note that if you may also approve a survey by checking the Approve option in the survey checkin dialog when you check a survey in.
Only Reviewers and Administrators can reject surveys. To reject a survey:
In the Survey Console's Survey Administration tab, right click on the name of the survey you want to reject.
Choose Reject... from the context menu.
(Optional) Type comments. When rejecting a survey, you may want to use the comment space to provide an explanation for the rejection. Your comments will appear in the Survey's history.
Click OK .
Rejected surveys cannot be published. They must be edited and resubmitted for approval before they can be published.
To Publish a survey means to make it available to Illume's collector service, which will make the survey available to participants on the Internet. Note that a survey must be approved before it can be published (see Approving a Survey). Only Administrators and Reviewers may approve a survey.
Note: If you simply want to preview a survey to see how it looks and to test its validation features, use the Survey Previewer. This enables you to take the entire survey yourself without having to make the survey available to participants.
Once the survey is published, it must be started (described below) before participants can access it. Administrators, Reviewers and Designers may publish surveys. Viewers may not.
To publish a survey, follow these steps:
Click the Survey Administration tab of the Survey Console.
If the survey does not appear in the list of surveys under Search Results , click on the Survey Search tab. Click Clear All Search Criteria , then click Search . This will display a list of all available surveys.
Right click on the name of the survey and choose Approve and publish from the context menu.
(Optional) Add comments. These comments become part of the survey history.
You may have to assign a time period for publication. A time period is usually a short code to represent the period during which a survey is given. For example, if you administer a survey every quarter, you may assign the time periods "2004_Q1," "2004_Q2," etc. If your survey will be given only once, you may want to assign a simple period code like "1." See Understanding Time Periods for more about time periods.
Click OK .
Once a survey has been published, it is ready to start. Once the survey has been started, participants may begin submitting responses.
Unpublishing a survey is a drastic action! It has three effects:
Unpublishing deletes the last published version of the survey.
Unpublishing rolls back to the last published version. For example, assume you publish version 2 of your survey, then edit the survey and check it in several times, then publish version 3 of your survey. When you unpublish, Illume deletes version 3 of the survey, and all of the unpublished changes checked in between versions 2 and 3. You are left version 2 as the latest version of the survey.
Unpublishing DELETES ALL OF THE DATA participants have submitted in response to the version of the survey you just unpublished. For example, if you unpublish version 3 of your survey, you will lose all of the data from version 3. Data from versions 1 and 2 will remain.
If you simply want to stop a running survey so that it becomes unavailable to participants, see the article on Suspending a Published Survey.
Currently, only an administrator can unpublish a survey, and only surveys that have been published can be unpublished.
To unpublish a survey:
In the Survey Administration tab of the Survey Console, right click on the name of the survey you want to destroy.
Choose Unpublish... from the context menu.
Read the warning carefully and click OK if you agree.
Read the second warning carefully and click OK if you agree.
Note: You cannot unpublish a survey if Test Publishing is turned on. Turn Test Publishing off before you unpublish a survey!
Once a survey has been approved and published, it must be started so that participants can access it. Administrators and Publishers can start a published survey by following these steps:
In the Survey Administration tab of the Survey Console, right click on the name of the published survey you want to make available.
Choose Start/Resume... from the context menu.
(Optional) Add comments. These comments become part of the survey history.
Click OK .
Note
The Start/Resume option will be enabled in the context menu only when the survey has been published and is not currently running and available to participants.
If a survey participant is resuming a survey that was started from an older version, the page history will be retained and honored if "major" changes were NOT made to the newer survey version(s). If "major" changes were made the survey participant will start over from the beginning although responses will still be retained.
The following ARE considered major changes:
Adding, deleting, or moving ANY survey object
Changing survey logic (ie Show-If statements)
Disabling any item
The following are NOT considered major changes:
Correcting text errors or content changes anywhere in the survey
Adding a new language to a survey
Major changes are allowed in End Page Content or Survey Redirects
To suspend a survey means to make a running survey unavailable to participants. Nothing about the survey changes, other than its availability to participants. You must be an Administrator or Publisher to suspend a running survey. To suspend a running survey:
In the Survey Administration tab of the Survey Console, right click on the name of the published survey you want to make available.
Choose Suspend... from the context menu.
(Optional) Add comments. These comments become part of the survey history.
Click OK .
You may resume a suspended survey at any time. See Starting and Resuming a Published Survey.
Note
The Suspend option will be enabled in the context menu only when the survey has been published and has been started (i.e. is currently running and available to participants).
Overview
On publishing a survey, you must choose the time period for which you are publishing. If you check in, approve and publish in a single step, you must supply a time period then. Time periods are used primarily for longitudinal studies in which each participant may take the survey more than once. For example, an employee satisfaction survey may be administered to all employees twice a year. The time period is stored as a variable within the survey results to distinguish which surveys were submitted during each period. This is especially helpful for tracking how participant responses change over time.
Note: You may change the timeperiod only 1) when publishing a survey for the first time or 2) when publishing a new version of a survey that is currently suspended.
If you are publishing a survey, and there is currently a version of that survey running, you will not be able to change the timeperiod. You must suspend the running survey first!
Change the Name of a Time Period
This can be accomplished in the new Survey Properties dialog window.
To rename a time period:
Select a survey in the Survey Administration tab.
Right-click Properties...
Select the Time Periods tab.
Select a specific time period.
Rename the time period name in the text field.
Click the Rename button.
Test publish
Test publishing makes a survey available for testing, generally by internal users. When a survey's test-publish option is on, others can view and test your survey using only a web browser.
To turn on test publishing for a specific survey:
Click the Survey Administration tab in the Illume Survey Console.
Right click on the name of survey you want to test-publish.
Choose Test Publish from the context menu.
If your survey includes more than one translation, choose the translation you want to publish (see Test Publishing Translations below for details).
Check On under Test-Publish status.
Click Done.
Test Publishing Translations
When you test publish a survey that includes more than one language, Illume test-publishes all of the survey's translations, no matter what translation you choose in the test-publish dialog. Choosing a translation only affects the Survey Preview URL and the Survey Test URL that appear in the test-publish dialog.
For example, in the dialog above, changing the translation from Japanese (Japan) to German (Germany) changes the end of the Test and Preview URLs from Translation=1041 to Translation=1031.
You can get the URL for any language in your multi-lingual survey by changing the language in the test-publish dialog. You can click on the URL directly to view the survey in a browser, or you can use the Copy URL button (described below) to copy the URL into an email, instant message, or other document.
Preview and Test URLs
You'll see a Survey Preview URL and a Survey Test URL. The Preview URL provides access to the latest checked-in version of the survey in preview layout: the entire survey appears on a single HTML page, with show-if logic and other normally hidden information displayed for printing and review.
The Survey Test URL links to an interactive copy of the latest checked-in version of the survey. This version implements all of the survey's built-in logic, piping, calculations, and other behaviors. Testers can complete and submit surveys from this URL, and the data will be available for querying through the Web Console.
The Test-Publish dialog includes buttons to copy and reset these URLs. Clicking Copy URL will copy the URL into the Windows clipboard. You can then paste the URL into most applications by choosing Edit > Paste from the application's menu, or by pressing Ctrl-V.
The Reset URL button generates a new preview URL or a new Test URL. Resetting the URL effectively cancels the old URL. No one using the old Test/Preview URL will be able to access the test-published survey unless you send them the new URL.
Both the Test URL and the Preview URL are also available through the Web Console's survey page.
Published and Test-Published Versions
Surveys may have simultaneous Published and Test-Published versions. The published version, which is intended for actual participants, displays the last version of the survey that was explicitly published.
The test-published version displays the last version of the survey that was checked in. It's possible, therefore, for the two versions to have different content.
Both the Survey Preview URL and the Survey Test URL end with long alphanumeric id strings. These are designed to prevent unauthorized individuals from guessing the URL and accessing the test version of a survey.
Publishing, unpublishing, and suspending a survey has no effect on the availability of the test-published version. Turning the test-publish option on and off has no effect on the published version of the survey.
Separation of Data
Data submitted to the test published version of a survey are stored separately from data submitted to the published version of a survey. Consider these three scenarios:
When you do this
This is what happens to your survey submission
Submit live survey as real participant
Data go to live survey database table.
Submit live survey as test participant
Data go to live survey database table and are marked as test data. These submissions may be deleted later from the Test Data tab of the Survey page in Web Console.
Submit test-published survey
Data go to the test-published survey database table.
If your test-published survey changes substantially, Illume may delete the data from the table containing the test-published data, then re-create the table. This means you will lose data submitted to the test-published version of the survey if you change the data type of questions from one test-published version to the next, or if you delete questions between test-published versions. These changes will NOT affect the live survey or any data collected from any version of the live survey.
Click the System Administration tab of the Survey Console.
In the left pane, click All Projects to display a list of all of the available projects in the system.
In the right pane, right click on the project within which you want to create your new project. (Illume always includes one project called System. All other projects are contained within the System project.)
Choose New Sub-Project... from the context menu.
Give the new project a name and click OK.
After you have created a new project, you may want to give users permission to access the project. Note that by default, anyone who has a role in the this project's parent project will have the same role in the new project. You can override this inherited role by assigning the user a new role. You can prevent a user from accessing the project entirely by assigning that user the Excluded role.
To move a project:
Click the System Administration tab of the Survey Console.
In the left pane, click All Projects to display a list of all of the available projects in the system.
In the right pane, right click on the project you want to move and choose Move Project... from the context menu.
Choose the name of the project into which you want to move this project.
Click OK.
To rename a project:
Click the System Administration tab of the Survey Console.
In the left pane, click All Projects to display a list of all of the available projects in the system.
In the right pane, right click on the project you want to move and choose Properties... from the context menu.
In the Edit Project dialog, type the new project name and click OK.
To delete a project:
Click the System Administration tab of the Survey Console.
In the left pane, click All Projects to display a list of all of the available projects in the system.
In the right pane, right click on the project you want to move and choose Delete from the context menu.
Click OK when asked to confirm the deletion.
Projects containing published surveys cannot be deleted. If you want to delete a project that contains published surveys, you must first either permanently delete the published surveys (which will cause you to lose the data you collected), or move the published surveys to a different project.
To move a survey into a new project:
Click the System Administration tab of the Survey Console.
In the left pane, click All Projects to display a list of all of the available projects in the system.
Click on the name of the project that contains the survey you want to move.
Click the Surveys folder within that project. A list of surveys will appear in the right pane.
In the right pane, right click on the survey you want to move and choose Move Survey(s)... from the context menu.
Choose the name of the project into which you want to move this survey.
Click OK.
To move a participant list into a new project, you must be an Administrator, Participant List Manager, or Power User.
Click the System Administration tab of the Survey Console.
In the left pane, click All Projects to display a list of all of the available projects in the system.
Click on the name of the project that contains the participant list you want to move.
Click the Participant Lists folder within that project. All of the project's participant lists will appear in the right pane.
In the right pane, right click on the survey you want to move and choose Move Participant List(s)... from the context menu.
Choose the name of the project into which you want to move this list.
Click OK.
To move an email job into a new project, you must be an Administrator, Email Manager or Power User.
Click the System Administration tab of the Survey Console.
In the left pane, click All Projects to display a list of all of the available projects in the system.
Click on the name of the project that contains the email job you want to move.
Click the Email Jobs folder within that project. A list of email jobs will appear in the right pane.
In the right pane, right click on the email job you want to move and choose Move Email Job(s)... from the context menu.
Choose the name of the project into which you want to move this email job.
Click OK.
While the section Granting a User Access to a Survey provides a detailed description of how to manager survey-level permissions, there is a quick, convenient way to assign project-level privileges. Note that project-level privileges apply to all objects within the project, including surveys, email jobs and participants, unless these privileges are overridden at the object level.
To quickly add users to a project:
Click the System Administration tab of the Survey Console.
In the left pane, click All Projects to display a list of all of the available projects in the system.
In the right pane, right click on the project you want to move and choose Properties... from the context menu.
The Edit Project dialog appears, showing the project name at the top and a list of users below.
To assign a role to a user, click on the name of the user, select a role from the Project role list, and click Add. Note that each user can have more than one role.
To remove a role, click on the name of the user, select the role you want to remove from the Project role list, and click Remove.
Click OK to finish.
Note that each user in the project begins with the roles they had in this project's parent project. Any changes you make to the inherited roles will apply to this project only.
You can prevent a user from accessing the project (and all of the surveys, email jobs and participant lists it contains) by removing all of the user's roles, or by assigning the role Excluded to the user.
For a more complete discussion of roles and privileges, see Understanding Roles and Privileges.
Illume's survey search capability depends on surveys being organized into a set of categories. If you have not yet set up a category/value system to organize your surveys, see Understanding System-wide Search Categories and Values for an overview.
Once categories and values are established, Illume's Survey Search enables you to find surveys associated with whatever categories and values you choose. To search for surveys, follow these steps:
In the Survey Console, click on the Survey Administration tab.
Click the Survey Search tab.
From the Survey Status list, choose which surveys you want to search through. This can be either "All Surveys," or only those surveys matching in a specific state, such as "Published" or "Available for checkout."
Choose a category from the category list.
Choose one or more values from the value list. You'll notice that the contents of the value list changes when the category changes.
Choose either "is" or "is not" from the list of conditions.
Click the Add button to add the conditions and values to the search criteria.
Repeat steps 4-7 to add criteria to your search.
Select "And" or "Or" to group the criteria (details below).
Click Search .
After you click Search , the Search Results tab will appear with the results of your search.
Grouping Criteria with And and Or
Grouping search criteria with "and" will almost always produce fewer results than grouping search criteria with "or."
When you group search criteria with "and," you are telling Illume that you want a list of surveys that match ALL of the criteria you specify.
When you group search criteria with "or," you are telling Illume that you want a list of surveys that match ANY of the criteria you specify.
While "or" searches generally return a broader range of results, "and" searches return a very specific set of results.
Mixing 'And' and 'Or' in a Single Search
In some cases, you may need to use both "and" and "or" conditions in a single search. You can do this, to a limited extent.
Notice that if you check more than one value from a category's value list (as described in step 5 above) and click the Add button, the values appear on a single line in the list of criteria, and they are separated by "or."
You can add several sets of values in this way. After you add all of the sets, choose "And" as the group option, and you will end up with a set of criteria like this:
Target is "Widget Customers" or "Gadget Customers" And Author is "Kevin McHale" or "Lamar Mundane"
Currently, the Survey Search tool will include only values belonging to a common category in these one-line "or" conditions.
Restoring the Survey List
After you run a search, the survey list will display only those surveys that met your criteria. To restore that the survey list so that all surveys appear, go back the Survey Search tab, click Clear All Criteria , and then click Search again.
To see a list of all surveys having a given status (such as "Published" or "Available for checkout"), follow these steps.
In the Survey Console, click on the Survey Administration tab.
Click the Survey Search tab.
From the Survey Status list, choose which surveys you want to search through. This can be either "All Surveys," or only those surveys matching in a specific state, such as "Published" or "Available for checkout."
Click Search .
Restoring the Survey List
After you run a search, the survey list will display only those surveys that met your criteria. To restore that the survey list so that all surveys appear, go back to the Survey Search tab, click Clear All Criteria , and then click Search again.
Illume enables you to define a system of categories and values under which to organize your surveys. The system works like a library's subject catalog: the catalog includes a set of custom categories, and each item in the collection is marked as belonging to one or more of those categories.
Categories are similar to high level subjects in the library catalog, like History or Biography. Values are similar to library sub categories, such as "History, US", "History, Military," "Biography, 20th Century," etc.
Illume's survey search feature relies on the category/value system to organize and find surveys.
Examples
Company X publishes internal surveys regarding Human Resources issues, and external surveys regarding customer satisfaction issues. They create two categories under which to organize their surveys: "HR" and "Products."
They add three values to the HR category: Benefits, Compensation, Satisfaction. They add three values to the Products category to represent their three products: "Widget," "Gadget," and "Gidgit."
Each of the company's existing surveys is associated with one or more values in the HR category or the Products category.
When it's time to create a new survey on Gadgets, a survey designer can search for existing surveys in the Product category that pertain to Gadgets. From the surveys that the search turns up, the designer can drag and drop existing questions for reuse in the new survey. This can save a considerable amount of time.
See the sections Editing System Search Categories and Values and Editing a Survey's Search Categories and Values for specific instructions on how to define and assign categories and values.
The first step to organizing a searchable collection of surveys is to define the categories under which the surveys will be organized. If you have not read Understanding Survey Search Categories and Values, you may want to read that article before you continue.
Adding Survey Search Categories and Values
You must be an Administrator or a Reviewer to add or edit survey search categories. To add survey search categories:
Select Administration > Add/Edit Survey Search Categories... from the Survey Console.
Type the name of a new survey category in the name field.
Click the Add button next to the name field to add the new category.
The newly-added category should be highlighted in the list of categories. While this item is highlighted, type a value into the Value field below, then click the Add button next to the Value field.
Repeat step 4 to add as many values as you need to the new category. Repeat steps 2 and 3 to add more categories.
Click Done when you are finished. This will close the Category Editor and save your changes.
To add values to a category that already exists, simply click on the category in the Categories list and follow step 4 above.
Editing Survey Search Categories and Values
Editing search categories and values essentially means changing their names. Note that when you change the name of a search category or value, the surveys filed under that category/value retain their association to the renamed category/value.
For example, if you have ten surveys filed under a category named History, and you change the name of that category to Herstory, your ten surveys will now be filed under Herstory.
To edit categories and values:
Select Administration > Add/Edit Survey Search Categories... from the Survey Console.
Click on the name of the category or value you want to edit.
To change the category name, type the new name into the Name field and click Replace.
To edit a value within the category, click on the value in the Category Values list.
To change the value name, type the new name into the Value field and click Replace .
Click Done when you are finished. This will close the Category Editor and save your changes.
Deleting Categories
To delete categories, follow these steps:
Select Administration > Add/Edit Survey Search Categories... from the Survey Console.
In the Categories list, click on the name of the category you want to delete.
Click the Delete button.
Read the confirmation message carefully and click OK if you agree.
Note that when you delete a category, you delete all of the category's values as well. The surveys associated with the category will remain, but they will no longer retain their association to the deleted category/value.
Deleting Category Values
To delete category values, follow these steps:
Select Administration > Add/Edit Survey Search Categories... from the Survey Console.
In the Categories list, click on the name of the category that contains the value you want to delete.
In the Values list, click on the name of the value you want to delete.
Click the Delete button beneath the Category Values list. This will delete the value. (If you click the Delete button that appears under the Categories list, you will delete the entire category!)
Read the confirmation message carefully and click OK if you agree.
Note that when you delete a category value, the surveys associated with that value will remain, but they will no longer retain their association to the deleted value.
In other words, if you had ten survey filed under History, US and you delete the value "US" from the "History" category, you will still have your ten surveys, but you will no longer be able to locate them by searching for surveys belonging to the History, US category.
Once you have defined a set of categories and values within which to organize your surveys, you can associate each of your surveys with one or more values. This enables Illume users to easily locate surveys using the Survey Console's search tool.
For more background on the category/value system, see Understanding Survey Search Categories and Values.
Adding Categories and Values to a Survey
Only Administrators and Reviewers can associate surveys with categories and values. To associate surveys with categories and values, follow these steps:
In the Survey Administration tab of the Survey Console, right click on the name of the survey you want to work with.
Choose Set Survey Category Values... from the context menu.
In the list of Categories, click on the name of the category to which this survey should belong. Notice that all of the values belonging to this category appear in the list to the right.
Click on a value in the list, and click the Add button to associate the value with this survey.
Repeat steps 3 and 4 for each of the values you want to associate.
Click OK to save your changes and close the editor.
Removing Categories and Values from a Survey
To remove categories and values from a survey, follow these steps:
In the Survey Administration tab of the Survey Console, right click on the name of the survey you want to work with.
Choose Set Survey Category Values... from the context menu.
In two-column category/value list at the bottom of the Categories/Values editor, click on the value you want to remove.
Click the Remove button.
Repeat steps 3 and 4 for each of the values you want to remove.
Click OK to save your changes and close the editor.
The repository stores questions, question blocks and Text/HTML items for reuse on multiple surveys. Although it is possible to copy these items directly from one survey into another (as described in Reusing Questions and Other Survey Objects), repository items have several advantages over items borrowed from other surveys.
Guaranteed Consistency
Illume maintains some restrictions on repository items to guarantee that they are consistent on all surveys in which they appear. A repository item's scale value codes, for example, cannot change. This allows for reliable cross-survey queries.
Cross-survey Queries
Because a repository item includes a common set of scale value codes in all surveys in which it appears, it is possible to query responses to that question across multiple surveys.
For example, you have a repository that asks "What is the most important factor in your decision to purchase a computer?" The options are: 1) Price, 2) Features, and 3) Ease of Use.
You use this question in a dozen different surveys spanning a period of several months or years.
Because repository restrictions guarantee that this question is structurally the same across all of the surveys in which it appears, you run a cross-survey query on this question that will examine all of the question's responses across all of the surveys in which it appeared.
Parameterization
In many cases, you may need to reuse a question with only a slight change to the question prompt. For example, you may want to ask "How satisfied are you with your purchase of such-and-such product," changing only the name of the product from one survey to the next.
You can add this question to the repository with a placeholder in the place of the product name, and then use a survey parameter to replace the placeholder on each survey in which the question appears.
The question prompt would look something like this:
How satisfied are you with the purchase of {ParamValue:ProductName}?
Because each survey enables you to define any parameters you want, this question becomes reusable on any number of product surveys.
For more information on how to use placeholders and survey parameters, see Working with Survey Parameters and Piping Data.
Universal Access
There may be cases in which an designer wants to reuse a question from an older survey, but the designer does not have permission to view the survey itself. When this happens, the designer has no way of accessing a potentially useful resource.
The repository provides a way to work around this limitation without compromising the security of the survey to which an designer is legitimately denied access. By adding the item to the repository, you make it available to all designers.
Ease of Location
While Ilume's Survey Search enables users to locate entire surveys by category, the repository's search tool enables users to locate individual questions, question blocks, and Text/HTML items. This provides more convenient access to those users who want to locate only a single item for reuse.
The repository can hold questions, question blocks, and Text/HTML items. It cannot hold collections.
To add an item to the repository, follow these steps:
In the right pane of the Survey Editor, right click on the item you want to add to the repository and choose Submit Item(s) to the Repository. This presents the Repository Submission dialog.
(Optional) Type in any comments you want to attach to this item in the repository. These comments will appear in the item's History field when users choose to view the item's details.
(Optional) Choose a category under which to file this item.
(Optional) If you have selected a category, select a value under which to file the item.
Click OK .
When asked to save your submission, click OK , or your repository submission will be aborted.
Note that you can submit more than one item at a time to the repository. Hold down the Control key on your keyboard while clicking on each of the items you want to add, then follow the steps above.
The item will appear in the repository, under the category and value that you specified. If you did not specify a category and value, the item will appear in the Uncategorized folder. Note that you may assign categories and values to the item even after you submit it.
If the item does not appear in the Repository Viewer, choose View > Refresh to update the view.
Notice that the item appears in red text. This indicates that it has not yet been approved for reuse. Until it is approved, no users will be able to drop it into their surveys.
See Approving Repository Items for information on how to approve a newly submitted item.
The repository uses a system of categories and values to organize its contents. The repository's categories and values are similar in concept and in use to survey categories and values; however, the repository maintains its own distinct category/value list that is not associated in any way with the survey category/value list.
For an overview of categories and values, see Understanding System Search Categories and Values under Survey Administration.
The first step to organizing a searchable collection of repository items is to define the categories under which the items will be organized. If you have not read Understanding Survey Search Categories and Values, you may want to read that section before you continue. (That section discusses categories and values as they apply to surveys. The repository maintains its own set of categories and values that operates on the same principles.)
Adding Repository Search Categories and Values
You must be an Administrator, Publisher, or Power User to add or edit repository categories and values. The following instructions refer to the Repository Explorer, which you can reach from the Survey Designer by choosing Repository > Explore Repository.... To add repository search categories:
Select Repository > Add/Edit Repository Search Categories... from the Repository Explorer.
Type the name of a new repository category in the name field.
Click the Add button next to the name field to add the new category.
The newly-added category should be highlighted in the list of categories. While this item is highlighted, type a value into the Value field below, then click the Add button next to the Value field.
Repeat step 4 to add as many values as you need to the new category. Repeat steps 2 and 3 to add more categories.
Click Done when you are finished. This will close the Category Editor and save your changes.
To add values to a category that already exists, simply click on the category in the Categories list and follow step 4 above.
Editing Repository Search Categories and Values
Editing repository search categories and values essentially means changing their names. Note that when you change the name of a search category or value, the repository items filed under that category/value retain their association to the category/value.
For example, if you have ten questions filed under a category named History, and you change the name of that category to Herstory, your ten questions will now be filed under Herstory.
To edit repository categories and values:
Select Repository > Add/Edit Repository Search Categories... from the Repository Explorer.
Click on the name of the category or value you want to edit.
To change the category name, type the new name into the Name field and click Replace .
To edit a value within the category, click on the value in the Category Values list.
To change the value name, type the new name into the Value field and click Replace .
Click Done when you are finished. This will close the Category Editor and save your changes.
Deleting Categories
To delete categories, follow these steps:
Select Repository > Add/Edit Repository Search Categories... from the Repository Explorer.
In the Categories list, click on the name of the category you want to delete.
Click the Delete button.
Read the confirmation message carefully and click OK if you agree.
Note that when you delete a category, you delete all of the category's values as well. The repository items associated with the category will remain, but they will no longer retain their association to the deleted category.
Deleting Category Values
To delete category values, follow these steps:
Select Repository > Add/Edit Repository Search Categories... from the Repository Explorer.
In the Categories list, click on the name of the category that contains the value you want to delete.
In the Values list, click on the name of the value you want to delete.
Click the Delete button beneath the Category Values list. This will delete the value. (If you click the Delete button that appears under the Categories list, you will delete the entire category!)
Read the confirmation message carefully and click OK if you agree.
Note that when you delete a category value, the repository items associated with that value will remain, but they will no longer retain their association to the deleted value.
In other words, if you had ten repository questions filed under History, US and you delete the value "US" from the "History" category, you will still have your ten questions, but you will no longer be able to locate them by searching for repository items belonging to the History, US category.
Once you have defined a set of categories and values within which to organize repository items, you can associate each item with one or more values. This enables Illume users to easily locate repository items using the Repository Explorer's search tool.
For more background on the category/value system, see Understanding Survey Search Categories and Values. Note that the same principles apply to repository categories and values.
Adding Categories and Values to a Repository Item
Only Administrators and Reviewers can associate repository items with categories and values. To associate repository items with categories and values, follow these steps:
Locate the item you want to work with in the right pane of either the Browse Categories or Search Results tab of the Repository Explorer.
Right click on the item and choose Add/Edit Repository Search Categories... from the context menu.
In the list of Categories , click on the name of the category to which this item should belong. Notice that all of the values belonging to this category appear in the list to the right.
Click on a value in the list, and click the Add button to associate the value with this item.
Repeat steps 3 and 4 for each of the values you want to associate.
Click OK to save your changes and close the editor.
Removing Categories and Values from a Repository Item
To remove categories and values from a survey, follow these steps:
Locate the item you want to work with in the right pane of either the Browse Categories or Search Results tab of the Repository Explorer.
Right click on the item and choose Add/Edit Repository Search Categories... from the context menu.
In two-column category/value list at the bottom of the Categories/Values editor, click on the value you want to remove.
Click the Remove button.
Repeat steps 3 and 4 for each of the values you want to remove.
Click OK to save your changes and close the editor.
The right pane of the Repository Explorer's Browse Categories tab and the right pane of the Search Results tab each display a list of items. The Repository Explorer's View menu enables you to choose whether the text describing each item in the list comes from the item's prompt or from the item's description.
Choose View > View Question Text to switch the view back and forth between text and description. Whenever the check mark appears on the menu, question prompts will be displayed. Otherwise, item descriptions will be displayed.
Note that for question blocks, the View Question Text option displays the collection's instructions. For Text/HTML objects, it displays nothing but the Text/HTML icon.
To edit an item in the repository:
Locate the item in the right pane of either the Browse Categories or Search Results tab of the Repository Explorer.
Double click on the item in the right pane of the Repository Explorer. This causes an editable version of the item to appear.
Edit the item as you please. (Descriptions on how to use the various types of editors are available in the section "Using the Survey Designer.")
Click OK .
A dialog asks if you would like to approve these changes for immediate use. Answering "yes" will save your changes and make the item immediately available to all designers. Answering "no" will save your changes and leave the item unavailable to designers until you or someone else approves it. Choose whichever answer suits your needs.
A Note on Versions
Once the item has been edited, its version number increases by one. Any surveys that include this item will continue to include the item without the changes you just made. This is by design, for the following reasons:
Assume you have a question in the repository that asks "What is your age?" The question has three response options: 1) Under 30, 2) 31-60 and 3) Over 60. The version number of the question is V1.
Three surveys include this question, and two of them are running.
A user goes into the repository and edits the question so that the options are now: 1) Under 18, 2) 18-35, 3) 36-50, 4) 51-64, 5) 65 or older.
When the user saves these changes, the version changes to V2.
The three existing surveys that include this question will continue to include version V1 of the question because changing this question in a published survey would likely result in unreliable data.
Participants who saw version V1 of the question would have been indicating an age "Over 60" when they checked option number 3, while those who saw version V2 of the question would have been indicating an age between 36 and 50 when checking option number 3.
In such a case, you will have no way of knowing what a participant intended when he or she chose option 3 in response to your question. This is why changing an item in the repository does not automatically change the item in surveys that have included the item prior to the change.
If you ever add a repository item to a survey, then update the repository item, the survey will always include the older version of the item (the item as it existed when you first added it to your survey). If you want your survey to include the updated version, you must open the survey and manually update the repository item using the Get Latest Repository Version feature.
Updating Repository Items in Your Surveys
See Getting the Latest Repository Version for information about how to update the version of the repository item included in your survey.
Items in the repository are available for reuse only when they are approved. Approved items are displayed with black text. Unapproved items are displayed with red text.
To approve a repository item:
Locate the item in the right pane of either the Browse Categories or Search Results tab of the Repository Explorer.
Right click on the item and select Approve for General Use... from the context menu.
(Optional) Add comments. These will be displayed as part of the item's history, wherever the history appears.
Click OK .
To retire a repository item means to make it unavailable for use in future surveys. If you retire an item that has previously been included in published surveys (including currently running surveys), those surveys will not be affected: they will still have access to the item.
To retire a repository item, you must be an Administrator, Publisher or Power User, and the item itself must be approved. (Unapproved repository items cannot be included in surveys anyway, so there is no point in retiring them. You may delete an unapproved repository item if you want to get rid of it entirely.)
Follow these steps to retire a repository item:
Locate the item in the right pane of either the Browse Categories or Search Results tab of the Repository Explorer.
Right click on the item and select Retire from the context menu.
Click OK in the warning dialog.
(Optional) Add any comments you think may be helpful, such as the reason for the item's retirement. This will become part of the item's history, and may be helpful in the future is you have to decide whether or not to reactivate the item.
Click OK .
Administrators can reactivate retired repository items. See Reactivating Repository Items for more information.
Illume Administrators can reactivate repository items, making them once again available to users for inclusion in new surveys. Follow these steps to reactivate a repository item:
Click on the Search tab of the Repository Explorer.
In the Search for list, choose either All or the specific type of item you want to reactivate.
In the Item status list, choose "Retired."
Click the Search button.
You'll now see the Search Results tab with a list of folders in the left pane and a list of items in the right pane. The All Results folder should be selected.
In the right pane, right click on the name of the item you want to reactivate, and select Reactivate... from the context menu.
Click OK in the warning dialog.
(Optional) Enter comments to describe why are you reactivating the item. These comments become part of the item's history.
Click OK .
To delete an item from the repository:
Locate the item in the right pane of either the Browse Categories or Search Results tab of the Repository Explorer.
Right click on the item and select Delete from the context menu.
Click OK in the warning dialog. (The warning note is explained below, under A Note On Deleting Repository Items.)
Note: The delete option will be disabled on the context menu for any item that you are not authorized to delete. You may delete a repository item only if the following conditions are true:
you yourself submitted that item to the repository, or you are an Administrator
the item is not included in any published surveys
Removing a Published Repository Item
Although repository items that appear in published surveys cannot be deleted, they can be retired. The difference is that deleted items are removed from the repository altogether, while retired items are simply made unavailable for future use.
Published surveys that already use a retired repository item can continue to use them. Once the item is retired, however, it will no longer appear in the repository, and users will not be able to add it to future surveys. See Retiring Repository Items.
A Note on Deleting Repository Items
Note that when you delete a repository item, there may be unpublished surveys that Illume doesn't yet know about that refer to this item. If so, these surveys will not be able to include a copy of the repository item, and the item will have to be manually re-created in the survey.
To view all items in the repository:
Click on the Search tab of the Repository Explorer.
Click the Clear All Search Criteria button.
Click the Search button.
All repository items will appear. (Note that retired items will not appear. To see retired items you must be an Administrator, and you must specifically search for retired items. See Reactivating Repository Items.)
There are two ways to see detailed information about repository items:
Viewing Item Details
To get more information about an item in the right pane, right click on it and choose "View Item Details..." Illume will present the following items:
Creator The name of the Illume user who added this item to the repository.
Latest Version The current version number of the item. Each time the item is revised, the version number increases by one. This number is important! See the note on versions under Editing Repository Items.
Description This is a brief text description of the item.
Search Category Values This is a list of all of the repository categories and values with which this item is associated. Note that this refers to repository categories and values, which are separate from survey search categories and values.
Survey References A list of all surveys that use this repository item. Each entry in the list follows the format Survey Name (ITEM NAME). ITEM NAME is the name under which the repository item appears in the survey.
History This is a brief description of any changes or administrative actions (such as approval) that have been applied to this item.
HTML Preview This is what the item looks like to a participant. Note that if the item uses parameters, the parameter placeholder will be replaced by an actual parameter value when the participant see the item.
Viewing the Item in an Editor
Double click on an item to see the item in an editor. Questions will appear in the usual question editor, question blocks in the Question Table Editor, and Text/HTML items in the Text/HTML editor.
To see a list of what's in the repository, select View > Explore Repository... from the Survey Console's menu.
The repository opens with the Browse Categories tab showing. In this view, all repository items are organized into folders that correspond to your organization's custom-defined categories and values. (See Understanding Survey Search Categories and Values if you are not familiar with the category/value system. Note that the repository uses its own separate set of categories and values that follows the same principles.)
Click on any folder and the folder's contents will appear in the right pane of the Repository Explorer.
To get more information about an item in the right pane, right click on it and choose View Item Details...
To reach the repository search screen follow these steps:
Select View > Explore Repository... from the Survey Console.
Click the Search tab.
Searching by Category and Value
To search by category and value:
From the Search for list, choose the type of item you wish to locate, or choose All to search through all repository items.
From the Item status list, choose the status of the item(s) you wish to find, or All to include items of any status in your search.
Choose a category from the Category list.
Choose one or more values from the Value list. You'll notice that the contents of the value list changes when the category changes.
Choose either "is" or "is not" from the list of conditions.
Click the Add button to add the conditions and values to the search criteria.
Repeat steps 3-6 to add criteria to your search.
Select "And" or "Or" to group the criteria (details below).
Click Search .
The Search Results tab will appear, displaying the results of your search.
Searching the Text of Prompts and Scale Value
To search the texts of question prompts and scale values:
Within the search tab, select the tab labeled Word Search .
From the Search Text list, choose whether to search question prompts, or scale values, or choose "All" to search both.
Select either "contains" or "does not contain."
Type a search word or phrase into the Phrase field.
Click the Add button.
Repeat steps 3-5 to add more conditions. (For example, you may want to look for questions the contain "automobile" and do not contain "Yugo.")
Select "And" or "Or" to group the criteria (details below).
Click Search .
Grouping Criteria with And and Or
Grouping search criteria with "And" will almost always produce fewer results than grouping search criteria with "Or."
When you group search criteria with "And," you are telling Illume that you want a list of items that match ALL of the criteria you specify.
When you group search criteria with "Or," you are telling Illume that you want a list of items that match ANY of the criteria you specify.
While "Or" searches generally return a broader range of results, "And" searches return a very specific set of results.
Mixing 'And' and 'Or' in a Single Search
In some cases, you may need to use both "And" and "Or" conditions in a single search. You can do this, to a limited extent, when performing a category/value search.
Notice that if you check more than one value from the value list (as described in step 6 under searching by category/value above) and click the Add button, the values appear on a single line in the list of criteria, and they are separated by "or."
You can add several sets of values in this way. After you add all of the sets, choose "And" as the group option, and you will end up with a set of criteria like this:
Target is "Widget Customers" or "Gadget Customers" And Author is "Kevin McHale" or "Lamar Mundane"
Currently, the repository Search tool will include only values belonging to a common category in these one-line "or" conditions.
Restoring the Full Repository List
After you run a search, the survey list will display only those items that met your criteria. To restore the repository list so that all items appear, go back the Search tab, click Clear All Criteria , and then click Search again.
In previous versions of Illume there could be only one choice for the From: address when creating an Email Job. This was the address that was configured within the license file.
It is now possible in 4.7 to choose a From: address from a list created in the DatStat Designer Client System Administration tab.
Requirements
To utilize this feature, you must have the new “Self-hosted” box checked on your license. This means that you have your own server and control over your own e-mail server. DatStat enables this Self Hosting license option for those users who host their own system or use DatStat dedicated hosting. Please contact DatStat support if you need your license updated.
Permissions for Multiple From Addresses
In previous versions of Illume there could be only one choice for the From: address when creating an Email Job. This was the address that was configured within the license file.
It is now possible in 4.7 to choose a From: address from a list created in the DatStat Designer Client System Administration tab.
Creating From Addresses
Login to the DatStat Designer Client as a user with the Administrator role
Click on the System Administration tab
Highlight the Email From Addresses directory in the left pane
Right-click in the right pane and select New Email From Address
Add the new Address and Name
Select the Project that the email address is connected to
Click Save
You will see the new address in the list
This address will now be available when creating Email Jobs in the Web Console for those people with Power User and Administrator roles from that Project.
NOTE: You may wish to have the same From address available in more than one project. If this is the case you may add it to a parent Project where all of the Sub-Projects will access it, or you can create a second From Address with the same name and email address, but assign it to a different Project.
Modifying a From Address
Login to the DatStat Designer Client as a user with the Administrator Role
Click on the System Administration tab
Highlight the Email From Address directory in the left pane
Double click on the From Address and modify, then click Save
NOTE: If an Email Job has been created with the pre-modified From Address, the original information will be retained for the Email Job. The modifications will not take effect until a new Email Job is created. The same applies for deleting an Email From Address.
Impacts of Changing the From Address in the Email Send Log
If a From Address is selected that is different from the System Default the Email Send Log will not show failed emails. The Email Send Log will still record the successful attempt at sending the email but will not be able to access the account that is configured to record bounced emails.
Bounced Email Processing when using Custom From Address
Failed emails that return a bounce-back email message will only be processed by our system and be able to be viewed in the Email Send Log if the email message is forwarded to the POP3 account configured in your email service. Forwarding these bounce-back email messages to the POP3 account can be accomplished by setting up the Email From address as an Email Alias or Distribution List that redirects all received emails to the POP3 email account.
Selecting a From Address in an Email Job
Follow the standard steps to begin creating a new Email Job.
You will notice that there is now a drop-down available at the From Address
Use the drop-down to select the appropriate From Address.
User administration in Illume involves creating new users, managing the privileges of existing users, and deleting users. Most of the documentation in this section covers privilege management.
The articles "Understanding Roles and Privileges" and "Granting a User Access to a Survey" contain especially useful information.
This article describes how to edit user properties and describes what those properties mean. If you want to edit a user's roles, see Granting a User Access to a Survey.
To edit the properties of a user's profile:
Click the System Administration tab on the Survey Console.
Click once on the User folder in the left pane of the User Administration tab.
In the right pane, right click on the name of the user you want to delete.
Select Properties... from the context menu.
Edit the user's properties. These are described below.
Click Update Profile .
User Type
An interactive user is a person who uses the Survey Designer or the Web Console. When creating a new Illume user for a person, you should select interactive user.
A non-interactive user is a computer program. Custom modules and extensions built with Illume's Software Development Kit (SDK) need to connect to the Illume server to access internal data. These custom modules connect using non-interactive user accounts.
A Extranet Viewer can access reports in the DatStat Extranet, but cannot use the Survey Designer or the Web Console.
Non-interactive users and Extranet Viewers do not count against the number of Illume licenses you have purchased. Only interactive users are counted against purchased licenses.
Logon Name
This is the name the user types in combination with a password to log in to Illume.
Display Name
This should be the user's full name, or a name that other Illume users will recognize as belonging to this person. This is the name Illume uses when it reports who has checked out a survey, who posted a comment on a survey, etc.
Email
This is the user's email address.
Expiration
You may set an expiration date for a user's account. This option is useful when setting up accounts for consultants, contractors, and other temporary workers. The user's account will become disabled on the expiration date, freeing the Illume license used by this account.
Password
This is the password the user must type to log in to Illume.
DatStat Illume provides a number of User roles which determine what portions of the application and collected data are available for use. Multiple roles may be assigned to a single User allowing for very explicit role definition. DatStat Illume can protect the security of the survey and the privacy of the respondents while facilitating data sharing and collaboration. This page describes the available roles and which privileges each role confers. For information on how to assign roles to users, follow that link to Granting Users Access to a Survey at the bottom of this page.
Administrator
Administrators can perform tasks essential to maintaining the Illume system, including adding and deleting users, modifying user privileges, deleting surveys and deleting data. Administrators cannot create, modify, delete, or execute queries in the Web Console. They cannot create, edit, or publish surveys.
The Administrator role can be assigned for a specific project where the individual may now view the Users specifically assigned to that Project or a Sub-Project. An Administrator with Project level administration may add users or sub-projects. An Administrator at the System level still retains the ability to work with all Projects and Users.
Publisher
Publishers can create and edit surveys through the Survey Designer, and can approve and reject their own surveys, and the surveys of others. This is important, because surveys cannot be published until they are approved.
Publishers can also create, edit, and approve items in the survey repository.
Designer
Designers can create and edit surveys, and they can query survey results through the Illume Web Console. Designers cannot approve surveys-- not even their own surveys. After an designer creates a survey, it must be approved by a Publisher, Power User, or Administrator before it can be published. Designers can also submit items such as questions and Text/HTML objects to the repository. See the table below for a full listing of Designer privileges.
Analyst
An analyst has access to the web console only. Analysts can query and download data. They can also create and share queries with other analysts and viewers.
Power Analyst
The Power Analyst has all of the same privileges as the analyst, plus the ability to create cross survey veiws.
Designer-Analyst
The Designer-Analyst has all the privileges of the designer and the analyst.
Viewer
Survey Viewers cannot create or edit surveys. They can view and execute shared queries in the Web Console. They have no other privileges. The viewer role is appropriate for an analyst who needs access only to a limited subset of data. (For example, a contractor or consultant.)
Excluded
This role has no privileges whatsoever. Generally, you assign this role within a limited realm. For example, one of your users has Publisher privileges on all of your surveys. However, this user must not be allowed to access Survey X at all. Assign this user the "Excluded" role on Survey X, and he or she will be prevented from accessing the survey in any way. On all other surveys, the user's normal role will continue to apply.
Email Manager
Email Managers may define and initiate email jobs (that is, sending out email invitations to participants). They cannot work with surveys or view survey results or participant lists.
Participant Manager
Participant Managers can edit and upload participant lists, but cannot work with surveys or view survey results.
Power User
The power user has all of the privileges of the Designer, Analyst, Email Manager and Participant Manager.
Non-interactive User
The Illume Software Development Kit (SDK) uses non-interactive user accounts to access surveys and data. If you have a survey that employs custom extensions built with the SDK, you should create a non-interactive user account that the extension can use to access the Illume Designer Service.
The advantage of the non-interactive user account is that it does not count against the number of Illume licenses you have purchased. Neither the Web Console nor the Survey Designer permit non-interactive users to log in. These accounts are for programmatic access only.
Security Types and Security Levels
When an administrator assigns a role, he or she also defines the limits to which the role extends by specifying one of the following security types in conjunction with the role:
Project The user's role applies to all objects within the specified project. When the administrator specifies this security type, he or she must also indicate the name of the project to which the user is gaining privileges. The user's role applies to all projects within the project in which privileges were granted. When you grant someone a role in the System project, you grant them the role in all projects, since all projects are within System. You can assign different roles in different projects. See Users with Multiple Roles below.
Survey The user's role applies only to a single survey. When the administrator specifies this security type, he or she must also indicate the name of the survey to which the user is gaining privileges.
Special Considerations for the Administrator
Because users are system-wide objects in Illume, the users who are able to create, modify, and delete these objects must be granted the Administrator role on the System project.
Note that you may grant someone the Administrator role for the System project, and then restrict their privileges on projects or surveys below the system level. Read Users with Multiple Roles below.
Users with Multiple Roles
It is likely that some users will have multiple roles. That is, they may have the Viewer role throughout the system, and the designer role in several projects, and the Publisher role in selected surveys within those projects.
Multiple roles will not conflict. Illume always looks for the most granular level of privileges first, and then looks at broader privileges, applying the first set it finds.
For example, Charlie is a Viewer at the System level, an Designer on Project X, and a Publisher on Survey Y.
When Charlie works with Survey Y, Illume sees he is a Publisher on that survey, so he gets Publisher privileges.
When Charlie works with Survey X1, Illume finds no privileges for him in that survey, so it looks up to the project to which Survey X belongs: Project X. Illume sees that Charlie is an Designer on Project X, so it gives him all of the Designer's privileges in Survey X1.
When Charlie works with Survey Z1, Illume finds no roles for Charlie in the survey, or in Project Z, so Illume grants him access with his system role of Viewer.
Table of Privileges
The table below spells out which roles have which privileges.
Survey Actions
Admin
Power User
Publisher
Designer
Designer-Analyst
Analyst
Power Analyst
Viewer
Excluded
Email Mgr.
Participant Mgr.
Check In
Y
Y
Y
Y
Check Out
Y
Y
Y
Y
Cancel Check Out
Y
Y
Y
Y
Cancel Other Users' Check Out
Y
Y
Y
Approve
Y
Y
Submit
Y
Y
Y
Y
Y
Publish
Y
Y
Y
Y
Test Publish
Y
Y
Y
Y
View List of Surveys
Y
Y
Y
Y
Y
Y
Y
Y
Add
Y
Y
Y
Y
Delete
Y
N1
N1
Unpublish
Y
Modify
Y
Y
Y
Y
Y
Y
Start/Stop
Y
Y
Y
Add Template
Y
Y
Y
Y
User Administration
Get Information About Other Users
Y
Add New Users
Y
Modify Existing Users
Y
Delete Users
Y
Modify Other Users' Passwords
Y
Role Administration
Get Information About Roles
Y
Assign Roles to Users
Y
Repository Actions
Add Items to Repository
Y
Y
Y
Y
Delete Items from Repository
Y
Y
Query/Search Items in Repository
Y
Y
Y
Y
Y
Check Items into Repository
Y
Y
Y
Y
Check Items out of Repository
Y
Y
Y
Y
Cancel Repository Check Out
Y
Y
Y
Y
Cancel Other Users' Repository Check Out
Y
Y
Y
Approve Repository Items
Y
Y
Submit Items to Repository
Y
Y
Y
Y
Session Actions
Delete Sessions
Y
Search Category Actions
Add New Search Categories
Y
Y
Y
Modify Existing Search Categories
Y
Y
Y
Delete Search Categories
Y
Y
Y
Query Search Categories
Y
Y
Y
Y
Y
Add Search Category Values
Y
Y
Y
Delete Search Category Values
Y
Y
Y
Modify Search Category Values
Y
Y
Y
Search Value Actions
Add Search Values
Y
Y
Y
Delete Search Values
Y
Y
Y
Illume Web Console Actions
View Data Dictionary
Y
Y
Y
Y
Y
Y
Y
Y
Modify Custom Variables
Y
Y
Y
Y
Y
Add New Query
Y
Y
Y
Y
Y
Modify Existing Query
Y
Y
Y
Y
Y
Delete Query
Y
Y
Y
Y
Y
View Query
Y
Y
Y
Y
Y
Y
Y
Execute Query/View Results
Y
Y
Y
Y
Y
Y
Y
Add Test Data
Y
Y
Y
Y
Y
Delete Test Data
Y
Y
Y
Y
Y
Create/Edit Cross Survey Views
Y
Y
Y
Y
Project Actions
Add a New Project
Y
Modify an Existing Project
Y
Delete a Project
Y
User-Role Actions
Get Info About a User's Role
Y
Add a Role to User's Profile
Y
Modify a Role in a User's Profile
Y
Delete a Role from a User's Profile
Y
Participant Actions
View Individual Participant Information
Y
Y
Y
Y
Add Individual Participant Information
Y
Y
Y
Modify Individual Participant Information
Y
Y
Y
Delete Individual Participant Information
Y
Y
Y
View Participant List
Y
Y
Y
Y
Y
Modify Participant List
Y
Y
Y
Email Actions
View Information About Email Jobs
Y
Y
Modify Email Jobs
Y
Y
Resend Emails
Y
Y
View/Edit Block List
Y2
Y2
Report Actions
View Report
Y
Y
Y
Y
Y
Retrieve Report Entries
Y
Create Report
Y
Y
Y
Y
Modify User Access List
Y
Delete Other User's Reports
Y
Notes
1 Publishers and Power Users had been able to delete surveys in versions of Illume prior to Version 4.0. Because deleting a survey deletes survey data, Illume restricts this privilege to Administrators beginning in Version 4.0.
2 The email block list is global. That is, any participant who opts out of any email job goes on the global block list, and will not receive any more email from any Illume email jobs unless they are removed from the list. Because the block list is global, the only users who can see it are those who have the "View Block List" privilege for the System project.
Non-Users and Users with no Roles
If an Illume user has no roles, he or she will not be able to do anything after logging in to the Illume server. This user may, however, create and edit a survey on their local computer by checking the Work Locally option on the Illume Login screen. People who have access to the Illume client software and who are not Illume users (Non-Users) can also create and edit surveys on their local machines.
A user must have one or more of the following privileges in order to be able to connect to an Illume system using the Survey Designer: Add, Checkin/Checkout, Approve, or Publish a survey, or Add/modify a user. Failure to have one of these privileges will return a "User is not authorized to perform this action" error.
You must be an Illume System Administrator to grant users access to surveys.
To grant a user access to a survey, the user must already exist. If you are trying to grant privileges to a user who has not yet been created, follow the process described in Creating a New Illume user first, and then follow these steps:
Click the User Administration tab on the Survey Console.
Click once on the User folder in the left pane of the User Administration tab.
Double click on the name of the user to whom you want to grant privileges.
In the Edit User window, click on the Roles tab.
Select the role you want to grant this user for the particular survey. (See "A Note on Roles" below.)
Select Survey as the Security Type , so that the role you grant to this user applies only to the survey you want to grant access to.
Select the name of the survey to which you want to grant access from the Security Level list.
Click Add Role .
A Note About Security Types
Note that if you choose System as the Security Type, you will be granting the user a role in all surveys. If you choose Project as the Security Type, you will be granting the user a role within all surveys in the current project.
You may want to make a user a publisher on one survey only, or on one project only. This would allow the user to approve or reject only the single survey, or only the surveys in the selected project. To do this, you would follow the steps listed above, but you would choose Survey or Project as the Security Type, and then select the name of the survey or project from the security level list.
A Note on Roles
Roles are explained in detail in Understanding User Roles. To save you a lot of reading, here is a rule-of-thumb description of available roles:
Administrators can do anything.
Publishers can create, edit, approve and publish surveys. They can review participant-submitted data and participant lists. The distinguishing feature of the reviewer is his/her ability to approve an Designer's survey. The Designer cannot publish a survey until a reviewer has approved it.
Reviewers also can delete participant-submitted data and modify participant lists (lists of participant logins).
Designers can create and edit surveys, and review participant-submitted data through the Illume Web Console. They can publish surveys that have been approved by reviewers or administrators . They cannot approve surveys themselves.
Designers cannot delete participant-submitted data or modify participant lists.
Viewers can access all participant-submitted data, through the Illume Web Console. They cannot create or edit surveys, nor can they access "user data," which are data from a participant list that are associated with an individual participant (such as first name, last name, email address, etc.).
Excluded This role has no privileges whatsoever. Generally, you assign this role within a limited realm. For example, one of your users has Survey Reviewer privileges on all of your surveys. However, this user must not be allowed to access Survey X at all. Assign this user the "Excluded" role on Survey X, and he or she will be prevented from accessing the survey in any way. On all other surveys, the user's normal role will continue to apply.
Email Managers may define and initiate email jobs (that is, sending out email invitations to participants). They cannot work with surveys or view survey results or participant lists.
Participant Managers can edit and upload participant lists, but cannot work with surveys or view survey results.
To revoke a user's access to a survey...
Click the User Administration tab on the Survey Console.
Click once on the User folder in the left pane of the User Administration tab.
Double click on the name of the user whose privileges you want to revoke.
In the Edit User window, click on the Roles tab.
Under Current Roles , select the role you want to revoke.
Click Remove Role .
Click Close
You must first create an Illume user before you grant that user access to surveys. To create a new Illume user:
Click the User Administration tab on the Survey Console.
Click once on the User folder in the left pane of the User Administration tab.
Right click in the right pane of the window and select New User... from the context menu.
Type in the name of the user you want to add. If this user is already part of your Windows domain, this will retrieve information about the user from the Active Directory server so that you won't have to type it in.
If the user is not listed in Active Directory, select Create New User .
Click Add User .
Enter the user's display name. This should generally be his or her full name. This is the name Illume will use when it reports who has checked out a survey, who posted a comment on a survey, etc.
Enter the user's email address.
Type in the user's password, and retype the password in the Confirm field.
If this user will be using the Survey Designer or the Web Console, be sure the user type is set to Interactive.
Non-Interactive users are meant to be used with the Illume Software Development Kit. Custom software developed with the Illume SDK uses a non-interactive account to connect to the Illume server. Non-interactive accounts do not count against the number of Illume licenses you have purchased.
Extranet Viewers can access only the DatStat Extranet to view reports. They cannot use the Survey Designer or the Web Console, and they do not count against the number of licenses you have purchased.
Choose either User never expires or check User expires on and set an expiration date. Expiration dates are useful for contractors, consultants, and others to whom you want to grant only temporary access to your Illume system.
Click Create User.
You now have a new Illume user, and you will be looking at a form that asks you to assign a role to the new user. This user will not be able to work with any Illume surveys until you grant him or her a role. See Granting a User Access to a Survey for information on how to assign the proper role(s) this new user.
Deleting an Illume user will cause the user to lose all access to Illume. There are some instances in which you may not be able to delete a user. See Users That Cannot Be Deleted below. To delete a user:
Click the User Administration tab on the Survey Console.
Click once on the User folder in the left pane of the User Administration tab.
In the right pane, right click on the name of the user you want to delete.
Select Delete from the context menu.
Click OK when asked to confirm the deletion.
Users That Cannot Be Deleted
Illume may not permit you to delete users who have contributed edits to a survey, or who created or own certain objects within a project. Illume will response with the message "User Delete failed. The operation is invalid and cannot be performed." In this case, you may simply disable the user. This allows Illume to maintain a record of the user having existed, but it denies the user all access to the system. In addition, a disabled user does not count agains the number of Illume licenses you have purchased.
To disable a user:
Right click on the name of the user in the list of users.
Choose Properties from the context menu.
Check the Account is disabled box on the bottom left of the dialog.
Click Update Profile.
Click OK on the confirmation message.
Click Done.
To see which users belong to each role:
Click the System Administration tab on the Survey Console.
Click once on the Roles folder in the left pane of the System Administration tab.
In the left pane, click once on the name of the role whose users you want to see.
Note that the users for each role are listed in the right pane. Each entry in the list includes the following:
User/Role The name of the user, followed by the name of the role.
Security Type The extent to which the role applies.
System means the user enjoys the privileges of this role in every survey throughout the entire Illume installation.
Project means the user enjoys the privileges of this role in every survey that belongs to the project named in the Security Level column.
Survey means the user enjoys the privileges of this role only in survey named in the Security Level column.
Security Level The name of the object over which the user's role extends. This will be either "System," meaning the entire Illume installation, or the name of a specific Project or Survey.
Deleting a User From a Role
You can delete a user from a role by right-clicking on the user/role and choosing Delete from the context menu.
Note that if you delete a user from a role, the user's other roles are not affected. For example, if Joe is a System Administrator and an Administrator on the "Human Resources" survey, deleting Joe's role as System Administrator still leaves him as administrator on the human resources survey.
Beware not to delete all of a user's roles. Doing so will remove all of the user's privileges. For example, if you delete Joe's role as System Administrator and as Administrator of the "Human Resources" survey, and Joe has no other roles, he won't be able to do anything the next time he logs in to Illume.
Assigning Roles
Note that you can only assign roles by editing a user's properties. See Granting a User Access to a Survey.
You can change your password from the Survey Console by choosing File > Change Password... You'll see the dialog below. Type in your old password and your new password. Then re-type your new password in the Confirmation field. Click OK to make the change.
You can also change your password from the Illume Web Console by following the Preferences link in the upper right corner of any page.
If your Illume license includes the Software Development Kit (SDK) or the translation tools, you will need to enable these features for each user who wants to use them. By default, these features disabled for all users, even if they are included in your license. (To see if your license includes these features, follow the link to Reviewing Your Illume License below.)
To enable translation tools and/or the SDK for a specific user, follow these steps (you must be logged in as an administrator):
Click on the System Administration tab of the Survey Console.
In the left pane, click on the Users folder, so that the list of all users appears in the right pane.
Double click on the name of the user you for whom you want to enable the SDK or translation tools.
The Illume Survey Designer requires a valid client license. To activate the license, you will need to log in to an Illume server.
Follow these steps:
Start Illume by choosing Start > Programs > DatStat > DatStat Illume 4.7 from the Start menu.
Enter your User Name and Password.
Click Login.
If your Illume Survey Designer is not already configured to connect to an Illume server, follow these steps, then log in again:
Click the Options button to display the list of available Illume servers.
Click New... to configure a new server connection.
Enter a name for the Illume server.
Enter the URL for the server. The URL will usually look something like this: http://www.YourOrganization.com/DesignerService
Click OK.
If you do not know the URL of your Illume server, contact your Illume administrator or IT department.
What if I run out of licenses?
When you purchase Illume, you buy a number of client licenses. The maximum number of active Illume users you may have is limited by the number of licenses you have purchased.
If you need to add a new user but have already reached your license limit, you have two options:
Disable an existing user so you can add the new user. See Deleting an Illume User for more information.
Note: Non-interactive users do not count against your license limit. The Illume SDK (Software Development Kit) uses non-interactive user accounts to log in and perform automated activities. For more information on user types, see Understanding Roles and Privileges.
Getting Additional Client Licenses
You may purchase additional client licenses through DatStat's customer care portal.
Enter your user name and password, then click Login.
Click Log a Customer Care Inquiry near the top of the page.
Choose Purchase more licenses/users from the Subject Area list.
Type a description of your request and click submit.
Upgrading your Illume license usually involves exporting your existing license and then importing an updated license. For more information on these operations, follow the links to Exporting and Importing below.
Reviewing Your Illume License
If you have administrative privileges, you can view the details of you Illume license by following these steps:
Click on the System Administration tab in the Survey Console.
Choose View Illume Sytem License from the Administration menu.
The Illume License Summary displays the following information:
System Id This is a globally unique identifier for your Illume installation.
System Name The name of your Illume system. This name appears in the status bar of the Survey Designer when a user connects.
Max User Limit This is the number of licenses you have purchased. The number of active users in your Illume installation cannot exceed this number.
Max Viewer Limit This is the number of users you are allowed to assign to solely have access to your Extranet.
Max RDC User Limit This is the number of users that are allowed to assign to solely have access to the Remote Data Collection function.
Active User Count This is the number of active users in your Illume installation. Active users include those who can log in to your Illume server using either the Survey Designer or the Web Console. Disabled user accounts and non-interactive users do not contribute to the active user count.
Active Viewer Count This is the number of users that are currently actively using the Extranet and are assigned this privelage.
Active RDC User Count This is the number of users that are currently assigned permissions to the Remote Data Collector Role.
Designer Service URL This is the URL of the Illume Designer Service. The Illume Survey Designer connects to this URL to check surveys in and out, and to publish surveys. The Web Console also connects to this URL to run queries, edit email jobs, and perform other activities.
Collector URL This is the URL participants will use to access your Illume surveys. A typical survey URL simply appends Survey.ashx?Name= to this URL.
Web Console URL This is the URL of your Illume Web Console. Use this to run queries, and set up email jobs and participant lists.
Email From Address This will appear as the from address in all email messages sent from your Illume installation. The Web Console's Email Job page includes fields for customizing the from name and reply-to address for each individual job.
SMTP Server This is the fully qualified domain name of the mail server that Illume will use to send out email invitations and reminders. Example: mail.yourorg.com
Description A description of your Illume installation.
Support contact email This email address appears to participants when the Illume Collector encounters an error. This most commonly occurs when a participant mistypes the URL of a survey.
Max variable count This is the maximum number of variables a published survey may contain. Variables include questions, calculations and pre-load variables. Each checkbox in a checkall question counts as a variable. Checkall items also include a "checkall summary" variable that stores the number of items checked. In total, the number of variables in a checkall item is equal to the number of checkboxes plus one.
Extranet URL
LDAP Bind Path The path to your Active Directory. This is optional. When you add new Illume users, you have the option of choosing users from your Active Directory. To use that option, the LDAP Bind Path must be set, so Illume knows where to find your Active Directory.
SDK A check mark in the box indicates that your license includes support for the Illume Software Development Kit, which enables you to build custom add-ons for your Illume surveys.
Suppress Powered-by-DatStat If this box is checked, your Illume surveys will not display the Powered by DatStat logo on each survey page. This option may not be enabled on all systems.
Translation Support If this box is checked, your license includes the translation tools for creating multi-lingual surveys. See Translation Overview below for details.
Remote Data Collection If this box is checked, you will see the Remote Data Collection tab in your Designer client allowing you to collect data for your surveys while not connected to the internet.
Data Import If this box is checked, you will have the ability to import data saved by you at a previous time into an active survey in the Illume Web Console.
Self Hosted Checking this box will denote the fact that you are hosting Illume on your own servers. This will also enable the Multiple From Addresses feature that is new in version 4.7.
Exporting an Illume License
The process of upgrading an Illume license generally requires that you export your existing license to an XML file and send that file to DatStat. To export your current Illume license:
Click on the System Administration tab in the Survey Console.
Choose Export Illume Sytem License from the Administration menu.
Type a name for the xml file in the Save dialog.
Click Save.
Importing an Illume License
The process of upgrading an Illume license generally requires that you import an updated license that you received from DatStat. The license will be in the form of an XML file.
To import an Illume license:
Click on the System Administration tab in the Survey Console.
Choose Import Illume Sytem License from the Administration menu.
Locate the XML file in the file dialog.
Click Open.
You should see a message saying that the new license was successfully imported.
Download participant response data in a variety of formats, including SAS, SPSS, Excel, HTML, XML, MS SQL, and tab-delimited text.
In addition, the Web Console provides useful links to the live surveys, test surveys, and survey layouts.
Navigating the Web Console
The Web Console includes three main navigation tools:
The left navigation menu displays all available items in a hierarchical structure. Simple move the mouse over the red Projects tab on the left side of the screen, and the menu slides out. Click any item in the menu— a project, survey, email job, etc.— to go directly to that item.
Tabs on each page provide access to related components. For example, the Survey page includes tabs to access the queries, data dictionary, participant lists, and other items associated with the survey.
Breadcrumbs at the top of the page provide a quick way to navigate back to a higher level item. For example, when looking at a participant list, you may use the breadcrumbs to navigate to the list's parent project.
If you do not know where to find an item but you know part of the item's name, use Quick Find.
To find Web Console items quickly, click the Quick Find link at the top of any page. The link appears in the page header, on the right.
In the text entry labeled Name Contains, type the name, or part of the name, of any item you want to find.
Click the Find button.
Illume will search through every project looking for surveys, test surveys, cross survey views, reports, participant lists, and email jobs whose name contains the text you entered. The results of the seach are organized by type under the tabs. Each tab includes a number (in parentheses) indicating how many items of that type were found.
If you type in a new search term and click Find again, Illume searches again through all projects.
To change your Illume password and/or email address:
Click the Preferences link near the top right corner of any Web Console page. This opens the Preferences dialog (see image below).
Enter your current pasword in the Old Password field.
Enter your new password in the New Password field, then enter it again in the Confirm Password field.
(Optional) Enter a new email address.
Click Update Preferences.
Note that changing your password here also changes your password in the Survey Designer. If you use the Survey Designer, you will need to use your new password beginning with your next login.
Logging out
To log out, click the Log out link in the page header, on the right hand side.
Links to view the live and test versions of the survey, as well as the layout of the test version.
Links to all available queries, and the ability to create new queries.
Links to the participant lists associated with the survey, along with options to add and remove participant lists.
The survey data dictionary, which describes all of the questions in the survey, as well as each question's display type, data type and response options.
The General tab of the Survey page includes information about your survey's response rate, including:
The number of completed surveys. These are surveys that have been submitted (i.e. the participant reached the end of the survey and clicked the Submit button).
The number of partial surveys. These have some answers, but are incomplete (the participant did not click the Submit button at the end of the survey).
The number of surveys not started. This is the number of participants invited to the survey who have not yet started the survey.
The total number of participants invited to take the survey.
The bar graph to the right of the response summary data provides a visual representation of the same information. The dark color indicates the number of completed surveys. The light color indicates the number of active surveys, and white indicates the number of inactive surveys. The total of the three is equal to the number of invited participants.
Note: it is possible to change participant lists while a survey is actively collecting responses. When this happens, the number Note Started and Total categories may change. For example, your survey begins with 100 participants, and 90 respond. The survey status shows 90 completed surveys and 10 not started, for a total of 100. Then you delete the original participant list and replace it with a new list of 500 participants. The survey status now shows 90 completed surveys, 500 not started (because no one from the new list has responded) and 590 total. If you want accurate statistics about response rates, don't delete participants from the participant list(s) associated with your survey.
Time Period
The submission data in the General tab always represents submissions for the time period displayed in the Time Period list. Time periods are generally used in longitudinal studies in which each participant is asked to fill out a survey several times.
Choose a different time period to see submission info for that period. See the Time Period article for a general discussion of time periods.
Response History
The bars below the submission summary show your survey's day by day response history. See Reponse History for details.
The General tab of the Survey page includes a daily breakdown of completed surveys. The number of days on which surveys were submitted appears in parentheses in bold red text. Below that is a list of dates, with a colored bar representing the number of surveys submitted on that date.
This bars appear in reverse chronological order, with the most recent date on top. Click on any date or bar to see the actual list of participant responses for that day.
Test data are not displayed in the Response History. Only data that were generated from actual participants are counted in the daily totals.
To view your survey, click the View Survey tab of the Survey page. This provides the following links:
View Live Survey - If the survey is currently running, the View Live Survey link will appear. Click this link to see the live survey in a separate browser window. The live survey is the most recent published version of the survey: the one that participants log into and submit.
View Test Survey - If the survey has test publishing turned on, the View Test Survey link will appear. Click this link to see the latest test-published version of the survey. The test survey is the latest check-in version of the survey, and may include edits that do not appear on the live version. Test surveys are generally meant for internal users to test.
You may safely submit a test survey without affecting data submitted by actual participants. Test survey data are stored separately from actual survey data. Because the test survey may include questions that do not exist in the live survey, test survey submissions are stored in a separate table. Illume may automatically delete data from the test-published version of a survey if the survey changes substantially from one revision to the next.
View Test Survey Layout - Click this to see the entire test survey on one long scrolling page. The test survey appears in a separate window, and shows all items in the survey that are not disabled. This view also shows the show-if logic attached to questions, collections and text/HTML items. This link appears only if the survey has been test-published.
The Data Download tab of the survey page enables you to download survey data in a variety of formats. Note, however, that downloading data from the survey page means downloading all of the data that your survey has collected. If you want to download only a subset of the data returned by a query, see Downloading Results.
Downloading Data
To download data:
Click the Download Data tab on the Survey page.
Choose the type of data to download. Summary data includes only statistics about the results, such as counts and percentages. Raw data includes all of the actual responses that participants have submitted.
Choose a file format. These are explained in more detail below.
Choose the time period. Most surveys have only one time period. Longitudinal surveys, which may be administered to a population repeatedly over time, include multiple time periods.
Click Download Data.
File Formats
A number of different file formats are available. SPSS and SAS data can be viewed in the raw data format only. Summary data are not available for SPSS and SAS. You can choose to download raw or summary data in Excel, HTML, Tab Delimited text, or XML.
Excel - This is suitable for formatted display in Microsoft Excel.
HTML - This is suitable for formatted display in most current browsers, including Internet Explorer and Mozilla Firefox.
SPSS - This is suitable for import into newer versions of SPSS.
SPSS (Short Names) - This is suitable for import into newer or older versions of SPSS.
SAS (raw data only) - This is suitable for import into SAS.
Tab Delimited - This is suitable for unformatted viewing in Microsoft Excel or in any text editor. In addition, many SQL databases will import data from tab-delimited text files.
XML - This is suitable for applications that can manipulate XML.
MS SQL - This produces a SQL script that will 1) create the necessary tables in SQL server and 2) insert data into the tables.
The SPSS (Short Names) format limits all variable names to eight characters, to comply with naming restrictions in older versions of SPSS. The other SPSS format leaves your survey variable names intact, and is compatible with newer versions of SPSS.
If you want to import data into a SQL database other than Microsoft SQL Server, you may download the MS SQL format and run the CREATE TABLE statements in the file. You can then import the data by removing or replacing the GO statements, or by downloading the tab-delimited data and import that into the newly created database tables.
Summary Data Format
The summary data format displays the aggregate values that can be calculated from the participant data (Count, Percent, Max, Min, Mean, etc). With summary data it is easy to see the breakdown of responses for a particular question. With questions that allow for free-form text responses, such as a comments, aggregate values cannot be calculated. Only the number of the responses can be calculated. If you would like to view text-items in a list instead of viewing only the number of responses to this type of question, choose the "list text items" option. This will provide an overall report that includes summary data for questions with scale values and raw data for text-entry questions. Please note, if there are a large number of responses, you may see a long list of comments in the report.
Raw Data Format
The raw data format displays questions in a large table. This is your standard spreadsheet layout where each column is a question, and each row is a participant's response. Each cell of the table is a participant's response to a particular question. If you plan to run your own reports, download the raw data and import them into your favorite statistical package.
SAS and SPSS
SAS and SPSS download formats may include only raw data. The options to List Text Items and Include Value Labels do not apply to these formats. Because these formats can only include raw data, the text items are always part of the download. In addition, the downloads include not only the data, but a data dictionary SAS and SPSS automatically import. This means that the value labels always come with the SAS and SPSS downloads and will be present when you import the data into SAS or SPSS.
List Text Items Option
Summary results include no useful information about text items. Because text questions are open-ended, permitting an almost unlimited range of responses, Illume does not calculate counts, percentages, or other statistics for these questions.
When you check the List Text Items option, your download will include raw data for each of the text questions in your survey. For example, if 100 participants typed in their first names, the download will include all 100 first names.
Include Value Labels Option
The Include Value Labels option adds value labels next to the value codes in the data you download. For example, a question called GENDER may have two response options: 1 = Male and 2 = Female. When you download the raw data, the GENDER column will be a list of 1's and 2's.
When you check Include Value Labels, each entry in the GENDER column will be either 1:Male or 2:Female.
This option makes the data more readable to humans, but it hinders applications such as Excel from processing the data in a purely numeric way.
The Include Value Labels option applies only to Raw data in formats other than SAS and SPSS.
Authenticated surveys must be associated with at least one participant list. Otherwise, Illume has no way of knowing who is allowed to take the survey. Anonymous surveys do not need participant lists, since they are open to anyone.
To see which participant lists are associated with your Survey, click on the Participants tab on the survey page. Any participant belonging to any list that appears on this page is eligible to take your survey.
If you do not see this tab, it's because you do not have permission to manipulate participant lists. Contact your Illume administrator if you feel you should be able to manipulate participant lists.
Removing Participant Lists
To remove the association between a participant and your survey, click the Uninvite link next to the name of the list you want to uninvite. Once the list has been removed, its participants will no longer have access to your survey.
Adding Participant Lists
To associate one or more new participant lists with your survey:
Click the Select Participant Lists button at the top or bottom of the list of participant lists. This will lead you to the "Invite Participants" page.
Under All Participant Lists, check the box next to each list you want to invite. Each of the selected lists appears under "Selected Participant Lists" to the right. If you check a box by accident, simply uncheck it and it will disappear from the list.
Click Select Participant Lists to add the lists to your survey.
Illume can generate random test data for your survey. This is useful for testing queries.
Adding Test Data
To add test data to your survey:
Click the Test Data tab on the Survey page.
Type the number of rows of test data you want to create in the Number of rows field.
Click Add Rows.
Illume creates the test data a few rows at a time while a progress bar displays the number of rows created.
Removing Test Data
To remove test data:
Click the Test Data tab on the Survey page.
Click Delete Rows.
When you remove test data from the survey, Illume deletes all participant responses that have the "test data" flag set to true. This includes test data that were submitted by any Testers. Please see Adding Participant List Members to learn more about creating Testers.
Populating Preload Variables with Test Data
An improvement to test data worth mentioning is the ability to generate test data for preloaded questions (i.e. hidden questions that have a user name assigned to them). Please note that test data is still not able to be generated for hidden questions whose values are not preloaded from a participant list.
Steps:
Create a participant list that contains 1 or more test participants. NOTE: This participant list should contain test participants that contain user data fields and values that are used by preloaded questions in the survey.
Associate the list to a Published or Test Published Survey
Add up to 100 rows of test data, must be no more that the list of test participants.
Query using the Test Data check box in the Queries Properties.
When you stop and restart a survey, you have the option to create a new time period. Time periods allow a convenient way to group participant responses and query the data.
The General tab of the Survey page displays the response rate and history for a single time period. By default, this is the current or most recent time period. To display the response history for another time period, simply choose the desired period from the Time Period list.
Downloading Data
When downloading data, you have the option to download all the survey data or only data belonging to a specific time period. By default, the time period is set to the current or most recent time period. You may download data for any time period by selected the period under the Data Download tab. See Downloading Data for details.
Overview
Buttons to delete or unsubmit single survey sessions now appear on the Participant Results page if the Illume user has Administrator role for this survey.
Deleting a submission to the survey will completely erase any history of this participant taking this survey. All responses will be lost and will not be recoverable.
Unsubmitting a submission will retain all survey data but will change the submission status from "Submitted" to "Partial" allowing them to modify their responses if necessary.
Steps
Login to the Web Console
Navigate to the appropriate survey
Select the date that the participant took the survey
Choose the submission id by clicking on the number under the Row ID column
The screen below will be shown allowing you to unsubmit or delete their entries.
Overview
There is a tab in the Web Console, at the survey level, that will display the Quota Groups and Quota Conditions created in a survey. Users may toggle between the Live data Quotas and test-data Quotas by clicking the "Show Test Data Quotas" button.
Example of the Quotas tab with Test Data hidden from the user
Example of the Quotas tab with Test Data shown to the user
Queries allow you to filter, sort, cross-tab and analyze survey data. The list of available queries appears under the Queries tab on the Survey page.
The list includes the name, description, and owner of each query, and shows whether or not each query is shared. Anyone who has privileges to create and run queries against this survey can view shared queries.
To run a query in the list, click on the name of the query.
The edit the query, click the Edit link. This allows you to change the variables, filters, cross-tabs, and other attributes of the query.
To change properties such as the query name and description, whether it includes test data and whether it is shared, click the Properties link.
To delete the query, click Delete. You can delete only those queries that you own.
To create a new query, click the New button that is located at the top or bottom of the Queries list.
To create a query, follow these steps:
Click the Queries tab on the Survey page.
Click the New button.
Type a name for the new query and an optional description.
(Optional) Check the Share option if you want others to be able to see and run this query.
(Optional) Check the Use Test Data option if you want your query results to include test data. Test data include any data submitted by participants who have been maked as testers, and any data created through the Add Random Test Data page.
Click Continue to create the new query.
Once the query is created, follow the instruction for Editing a Query to choose variables, filters, etc.
To edit a query, click the Queries tab of the Survey page, then click the Edit link next to the name of the query you want to edit.
After clicking the edit link, you will see the Query Edit page.
Editing a query involves selecting a list of variables, and optionally applying criteria for filtering, sorting, cross-tabulation, time periods and submit status. The Query Edit page provides access to each of these items.
Choosing Variables
To include a variable in your query results, simply click on the variable in the All Variables list. Each variable you choose appears in the Selected Variables list to the right.
Variables will appear in your query result in the same order they appear in the Selected Variables list. To re-order variables in the Selected Variables list, click on the name of the variable, then click one of the arrows to the right of the list.
Moves the selected variable to the top of the list.
Moves the selected variable up one spot in the list.
Removes the selected variable from the list.
Moves the selected variable down one spot in the list.
Moves the selected variable down to the bottom of the list.
To remove a variable from the list, either uncheck the box next to the variable name in the All Variables list, or select the variable in the Selected Variables list and click the delete button to the right of the list.
Shortcuts to Add or Remove Variables
The All Variables list is divided to into sections, each of which represents a collection. You can select all of the variables in a collection by clicking All in the blue bar to the right of the collection name. You can de-select all of the variables in a collection by clicking the Clear link in the blue bar.
Clicking All at the top of the list selects all of the variables from the entire survey.
Clicking Comments at the top of the list includes all of the Commentary type variables from the entire survey.
Clicking Data at the top of the list includes all of the survey variables that are not Commentary types.
Clicking Clear at the top of the list removes all variables from the query.
Including Test Data
In some cases, you may want to query test data instead of real participant-submitted data. Test data include any data submitted by test participants (who usually work with the survey designer during the design process), or any data generated by the Web Console's Add Random Test Data feature.
The properties section at the top of the Query Edit page tells you whether Test Data will be included in your query results.
To include test data in your query results,
Click the Properties button at the top of the query page.
Check the box Use Test Data option.
Click Continue.
Sorting
Raw query results can be sorted by any variable that appears in the results. You can define sort variables before you run your query by checking the Sort box and selecting a variable from the Sorting Variable list.
You may choose more than one sort variable. To add a secondary sort, click on the Add link and select another variable by which to sort. The top sort will be the primary sort, with subsequent sorts applied afterward.
To remove a sort, click on the Remove link.
The sort direction can be Ascending or Descending. "Ascending" is the default, and it will sort text alphabetically, a through z. Numbers will sort from lowest to highest. Dates and times will sort from early to late. If "Descending" is selected for Direction, the sort will be reversed.
Cross-Tabs
When you define a cross tab variable, Illume breaks down summary results according to scale values of the cross tab. For example, if your survey includes a question called GENDER, and you select this as your cross tab variable, then your query results will show response data for males and females side by side.
To apply a cross tab variable, check the Cross Tab checkbox below the All Variables list, then choose the cross tab variable from the Cross Tab Variable list.
Cross-Tabs and Preloaded Data
You can use pre-loaded data as a crosstab variable only if the preloaded item has a scale (a defined set of possible values). The person designing the survey decides whether the preloaded data will have a scale. See Hidden Variables and Preloaded Participant Data for details.
Submit Status
By default, your query will return results from both completed and partial surveys. A completed survey is one in which the participant clicked the final Submit button. A partial survey is one in which a participant may have answered some questions, but left before clicking the Submit button. You can limit the data your query returns to include either Partial Submissions or Completed Submissions by following these steps:
Check the Submit Status checkbox.
Under Submit Status below, check either Partial Submissions or Completed Submissions.
Note: If you check neither box, both partial and completed submissions will appear in your results. If you check both boxes, both partial and completed submissions will appear in your results. The only way to restrict results to a single submission type is to check only one of the boxes.
Filtering
A filter or condition can be added to a query to limit the results that are returned by the query. The user defines filters by selecting the variable to filter, the operator to apply to the filter, and the value to be used by the filter. The result is in the form of "Variable Operator Value".
Filtering and Yes/No Questions
When applying filters to Yes/No questions, there are some special considerations. Yes/No questions include both individual checkboxes and check all that apply questions.
These questions can have three possible values in your dataset: Yes, No, and Unanswered.
A value of Yes indicates the participant saw the question and checked the box.
A value of No indicates the participant saw the question and chose not to check the box.
A value of Unanswered indicates the participant never saw the question. This is often due to show-if logic.
If a survey with 1000 respondents includes a conditionally displayed checkbox question, the responses may break down as follows:
Yes
No
Unanswered
600
300
100
If you create a query that includes a filter on this question, the number of responses that pass through your filter will vary.
Filter
Results
Comment
QUESTION Is 1:Yes
600
Includes only those who saw the question and checked the box.
QUESTION Is 0:No
300
Includes only those who saw the question and did not check the box.
QUESTION Is Not 1:Yes
300
Includes only those who saw the question and did not check the box.
QUESTION Is answered
900
Includes all who saw the question, whether they checked the box or not.
QUESTION Is unanswered
100
Includes only those who never saw the question.
In some cases, you may be interested in seeing responses from everyone who did not answer Yes to your question. In this example, 400 participants did not say yes: there were 300 explicit Nos and 100 who never saw the question. To get results for these 400 participants, you need two filters:
QUESTION Is 0:No
QUESTION Is unanswered
These filters must be joined with an OR in the Logic section. The final filter to retrieve these 400 results looks like this:
Filtering Unanswered Questions
When you apply a filter like this to your query:
STATE Is Not FLORIDA
you would expect to see results from all participants who did not indicate Florida as their state of residence.
In fact, you will see in your results participants who said they live in some state other than Florida, but you will not see participants who never answered the question about what state they live in. For participants who did not respond to the STATE question, Illume cannot definitively determine whether or not they live in Florida, so it excludes them from the results.
If you want your query result to include everyone except those who is explicitly stated that they live in Florida, you need to apply the following two filters:
STATE Is Not Florida OR STATE Is unanswered
Note that the two statements use "OR," not "AND." This ensures that anyone meeting either criterion appears in the result set: either they explicitly stated that they do not live in Florida, or they did not answer the question.
Advanced Filtering
The real power of query filtering comes from adding multiple filters and logically organizing the filters to retrieve narrowly targeted results. For example, two filters can be applied to the same variable to ensure values fall within an expected range. When two or more filters are used, it is possible to AND the results (where all filters are true) or OR the results (where either filter is true). This causes the query to return the intersection or union of the individual filters, respectively.
If more than two filters are used, further power can be gained by logically arranging the filters in an expression. For example, it is possible to retrieve results where the first filter is true and either the second or third filter is true.
In the example above, this query will find all participants in grade 10 or above who report being sick or injured at least 3 times.
Complex Expressions
To write complex expressions:
Notice that each filter has a letter ID, beginning with A and proceeding through the alphabet. Use the letter IDs to represent filters in your expression.
Operators in an expression include AND, OR, and NOT.
AND generally limits the number of results, since conditions on both sides of the and opertator must be true for data to pass the filter.
OR generally expands the number of results, since only one of the conditions in the OR statement must be true to pass the filter.
NOT negates a condition.
AND is evaluated before OR if they are on the same level of the expression.
Use parentheses to set the logical structure of the expressions. Nested expressions are evaluated first.
Expressions must be well formed.
This notation is the same as that used in creating complex show-if conditions in the Survey Designer. For a detailed example of a complex expression that uses grouping and all three operators see Further Notes about Custom Grouping.
Notes:
A letter can be used in an expression multiple times (A and B) or (A and C) for example.
It is not necessary to refer to ALL filters in the complex expression. In the above example, it is OK to write (B or C), essentially ignoring the A condition.
Time Period
When a survey has multiple time periods, the query can filter the data by time period. The default (no time period selected) will not filter the data and data from all time periods will be returned.
Saving a New Query
When you save a query, you can run it again at any time with a single click. To save your query, simply give it a name and a description and click the Save button at the top of the Query Edit page.
The query name will appear in the left navigation bar, beneath the name of the survey to which it belongs. The description appears when you place the mouse over the query name in the left navigation bar. Clicking on the query name displays the results.
Save vs. Save As
You can save an existing query by clicking the Save button. If you rename a query and click Save, Illume will save the query under a new name. If you rename a query and click Save As, Illume creates a new query with the new name. The original query remains unchanged. You now have two queries where there used to be one.
To run a query from the Survey page, click the Queries tab, then click the name of the query you want to execute.
To run a query from the Query Edit page, click the Run Query button at the bottom of the page.
When you share a query, you make it available to others. Anyone who has privileges to view the data in the survey that underlies your query will be able to see and execute the query once you share it. In addition, they may modify your shared query and save it as their own. Other users' modifications will not affect the original queries. Users cannot change any attributes of any queries they did not create.
Sharing and Unsharing Queries
To share a query:
Go to the Query Properties dialog. There are two ways to reach this:
From the Survey page, click the Queries tab, then click the Properties link next to the query you want to share.
From the Query page, click the Query tab, then click the Properties button.
Check the box next to Share to share the query. Uncheck the box to stop sharing.
Click Continue to save the change.
When you share your query, it will appear in the Queries list of other users who are allowed to view data from the underlying survey. Your name will appear as the owner.
In addition, shared queries appear with the small arrow icon in the slide-out navigation tree on the left side of each Web Console page.
To delete a query, click the Queries tab on the Survey page, then click the Delete link next to the name of the query you want to delete.
Summary Results - The Summary Results tab includes counts and percentages showing how many times participants chose each available response option. Summary statistics are presented as tables of figures. Clicking on any of the counts in the summary filters the results. For example, if 50 participants answered YES to a question, clicking on the number 50 next to the YES answer limits the results to those 50 participants who answered YES.
For questions with numeric scales, the tables include:
Count - The total number of responses to a question.
Min - The response with the lowest value for the given question.
Max - The response with the highest value for the given question.
Sum - The sum of all responses to the question.
Mean - The average value of all responses.
Median - 50% of responses have a value greater than or equal to this value; 50% have a value less than or equal to this.
Std Dev - Standard Deviation. A measure of dispersion from the mean.
Variance - Another measure of dispersion from the mean, this is the square of the standard deviation.
Bar Graphs - The Bar Graphs tab represents summary data in graphical format. Bar graphs include response counts and percents. Clicking on a bar, or on the count to the right of the bar narrows the results, just as clicking a number in the Summary Results does.
Participants - The Participants tab shows a table of raw participant results. Each row represents a single participant. Each column represents a question. Each cell in the table contains a participant's response to a single question. Click any row number in the Participants view to see the survey results for that participant.
Participant - This view displays survey results for an individual participant. The only way to view this is to click on a row number in the Participants tab.
Download - The download tab provides several options for downloading query results into various formats.
Each view of the query results includes a header describing how the results were filtered.
Drill Down - Drill downs are filters you added by clicking on one of the counts on the Summary Results page, or by clicking on a count or a bar in the Bar Graphs page. Those clicks drill down into narrower subsets of the data returned by the original query. You can remove a drill down filter by clicking the Remove link to the right of the filter description.
Filters - These filters were defined on the Query Edit page as part of the query. To remove them, click the Query tab and click the Remove link next to the filter description on the Query Edit page.
Time Periods (not shown in this example) - If Time Periods appear in the results header, the results are limited to the associated time periods. If the results header shows no time period restrictions, then the results include all time periods. You can remove Time Period limits by editing the query on the Query Edit page.
Sort Columns (not shown in this example) - These describe the sort criteria defined in the query. Sort criteria apply only to raw results, not summary results.
In addition, the "Results Include" note on the right side of the Results Header shows which data are included in the results. Data may include any or all of the following:
Completed Surveys - These are surveys that have been completed and submitted with the submit button.
Partial Submissions - These are surveys that have not been completed. The participant has supplied some answers, but has not clicked the submit button to submit the completed survey.
Test Data - Test data include data submitted by users who have been marked as testers and data that have been automatically generated through the Web Console's Random Test Data feature. Test data were not submitted by normal (non-tester) participants. If the "Results Include" note says that Test Data are included, then all of the data in the results you are looking at are test data.
To view Summary Statistics:
From the Survey page, click the Queries tab, then click on the name of the query you want to run.
From the Query Edit page, click the Run Query button at the bottom of the page.
From the Results page, click the Summary tab.
Summary Results include counts and percentages showing how many times participants chose each available response option. Summary statistics are presented as tables of figures.
For questions with numeric scales, the tables include:
Count - The total number of responses to a question.
Min - The response with the lowest value for the given question.
Max - The response with the highest value for the given question.
Sum - The sum of all responses to the question.
Mean - The average value of all responses.
Median - 50% of responses have a value greater than or equal to this value; 50% have a value less than or equal to this.
Std Dev - Standard Deviation. A measure of dispersion from the mean.
Variance - Another measure of dispersion from the mean, this is the square of the standard deviation.
In addition, this display includes the question name and type, the display type and data type, and for items with scales, a list of all the scale values and labels.
Questions with scales also include a chart icon. Click this to see a chart displaying response data. These charts are customizable and are available in a variety of formats. See Charting Results for more information.
Drilling Down
Click on any Count value to create a Drill Down filter. The page will refresh to show only those submissions that match your filter.
For example, if your results show 800 participants whose age is 18-21, and you click on the number 800, the page will refresh to show statistics from only those 800 participants aged 18-21.
You can add more drill down filters by clicking on other counts.
The drill down filters currently in effect appear at the top of the results page. Click Remove next to any filter to remove it. Removing a filter expands the number of results.
After adding or removing filters, you can save the filters as part of your query by clicking the Save button at the top of the page. You can also save the query, with filters, as a new query by clicking Save As.
When you save the filters as part of your query, Illume will apply the filters automatically the next time you run the query.
Bar Graph results represent response counts in a visual format. To view Bar Graph results, click the Bar Graphs tab on the Results page after you run a query.
Drill Down Filters
Click on any bar or underlined response count (to the right of each bar) to create a Drill Down filter. The page will refresh to show only those submissions that match your filter.
For example, if your results show 800 participants whose age is 18-21, and you click on the number 800, the page will refresh to show statistics from only those 800 participants aged 18-21.
You can add more drill down filters by clicking on other bars or counts.
The drill down filters currently in effect appear at the top of the results page. Click Remove next to any filter to remove it. Removing a filter expands the number of results.
After adding or removing filters, you can save the filters as part of your query by clicking the Save button at the top of the page. You can also save the query, with filters, as a new query by clicking Save As.
When you save the filters as part of your query, Illume will apply the filters automatically the next time you run the query.
Illume can produce charts to display query results for any question that has a scale. These charts can be dragged and dropped into other common applications, such as Microsoft Word and PowerPoint.
To view charts:
Create and execute a query; or click on any existing query in the left navigation bar.
Click the chart icon under any question name on the summary results page to view a chart displaying the query results for that question. (The chart icon appears only for questions that have a scale. Illume does not produce charts for questions with open-ended responses because the number of potential responses is too large to display in a single chart.)
The chart appears in a new window that includes customizable chart properties and a summary of information in addition to the chart itself.
Customizing the Appearance of the Chart
To alter the appearance of the chart, set any of the properties at the top of the chart page and click Redraw.
The chart page provides the following configurable properties:
Height The height of the chart, in pixels.
Width The width of the chart, in pixels.
Type The type of chart to display.
Data This determines whether the chart displays raw counts of answers or percentages.
Theme This controls the chart's color scheme.
Include title If this is checked, the chart will include the text in the box to the right as the title of the chart. This is useful if you will be dragging the chart into another application.
Include subtitle If this is checked, the chart will include the text in the box to the right as the subtitle of the chart.
Show Scale Values - Check this option to display scale values along the X-axis of bar and line charts, or in the legend of pie charts. This setting does not apply to box and whisker charts.
Show Scale Labels - Check this option to display scale value labels along the X-axis of bar and line charts, or in the legend of pie charts. This setting does not apply to box and whisker charts.
Max Label Length - Enter a whole number to specify the maximum number of characters that should appear for scale value labels in the chart. This setting applies only if Show Scale Labels is checked. Illume truncates the scale value label at the number of characters you specify. You may want to limit scale value label length when the labels take up too much space, or are so long that they can only be rendered in a tiny font.
Use fill patterns When this is checked, the chart uses patterns rather than colors as the primary means of distinguishing segments of the data. This option applies mainly to pie charts.
Include Filters - Check this option to include a description of the query filters in the chart. You may want to do this if your are dragging the chart into another application such as PowerPoint.
Exporting Charts into Other Applications
To export a chart into another application, simply drag the chart from your browser window into an open document belonging to the other application. Most Windows applications that support Drag and Drop and PNG image files will receive the chart.
When exporting, it's often useful to include a title and subtitle within the chart itself. You can customize these properties using the Include title/subtitle fields in the Chart Properties section at top of the page.
You can also drag the tables of data below the chart into applications such as Word and PowerPoint:
Move the mouse pointer to a point just below the chart image.
Click and drag the mouse to the bottom of the page. The data tables should now have a dark background, indicating they are selected.
Drag the data tables into Microsoft Word or PowerPoint.
The tables will appear in the Word/PowerPoint document, retaining most of their formatting.
Known Issues with Dragging and Dropping
Microsoft Word may make slight alterations to the appearance of data tables.
Microsoft PowerPoint may split nested tables into several separate tables. You can poisition the separate tables independently, or you can select them all at once and move them as a group.
To select all of the tables at once within PowerPoint:
Move the mouse to a position above and to the left of all of the tables.
Click and drag the mouse to a point below and to the right of all of the tables. You'll see that all of the tables now have borders around them.
Click on any of the table borders, hold the mouse button down, and drag the table wherever you want it to go. All of the other tables will move with the table you're dragging.
The Participants tab on the Results page displays raw results. Each row in the results table contains the responses of a single participant.
Click on column headers to sort the data. The yellow column is sorted, the arrow indicates the direction of the sort. To view the complete response from one of the participants, click on the row number, which is underlined.
To navigate to a specific page in the results. Select from the "Page" drop down menu. To modify the number of results displayed on a page, change "Results per page". Options for results per page are 1, 2, 5, 10, 20, 50, 100, and 200. Clicking on the arrows at the top of the table will move the current view to the previous or next page. The double arrow buttons are useful to move to the first or last page in the results table.
Additional Information
The number of rows that were returned from the query are displayed in the bottom left corner of the screen. The number of pages is displayed in the table title bar.
To download the results of a query, click the Download tab on the results page. Note that the data you download here include only the data returned by your query. If you want to download all of your survey data, see Downloading Data.
Downloading Results
To download data:
Click the Download tab on the Results page.
Choose the type of data to download. Summary data includes only statistics about the results, such as counts and percentages. Raw data includes all of the actual responses that participants have submitted.
Choose a file format. These are explained in more detail below.
Click Download.
File Formats
A number of different file formats are available. SPSS and SAS data can be viewed in the raw data format only. Summary data are not available for SPSS and SAS. You can choose to download raw or summary data in Excel, HTML, Tab Delimited text, or XML.
Excel - This is suitable for formatted display in Microsoft Excel.
HTML - This is suitable for formatted display in most current browsers, including Internet Explorer and Mozilla Firefox.
SPSS - This is suitable for import into newer versions of SPSS.
SPSS (Short Names) - This is suitable for import into newer or older versions of SPSS.
SAS (raw data only) - This is suitable for import into SAS.
Tab Delimited - This is suitable for unformatted viewing in Microsoft Excel or in any text editor. In addition, many SQL databases will import data from tab-delimited text files.
XML - This is suitable for applications that can manipulate XML.
MS SQL - This produces a SQL script that will 1) create the necessary tables in SQL server and 2) insert data into the tables.
The SPSS (Short Names) format limits all variable names to eight characters, to comply with naming restrictions in older versions of SPSS. The other SPSS format leaves your survey variable names intact, and is compatible with newer versions of SPSS.
If you want to import data into a SQL database other than Microsoft SQL Server, you may download the MS SQL format and run the CREATE TABLE statements in the file. You can then import the data by removing or replacing the GO statements, or by downloading the tab-delimited data and import that into the newly created database tables.
Summary Data Format
The summary data format displays the aggregate values that can be calculated from the participant data (Count, Percent, Max, Min, Mean, etc). With summary data it is easy to see the breakdown of responses for a particular question. With questions that allow for free-form text responses, such as a comments, aggregate values cannot be calculated. Only the number of the responses can be calculated. If you would like to view text-items in a list instead of viewing only the number of responses to this type of question, choose the "list text items" option. This will provide an overall report that includes summary data for questions with scale values and raw data for text-entry questions. Please note, if there are a large number of responses, you may see a long list of comments in the report.
Raw Data Format
The raw data format displays questions in a large table. This is your standard spreadsheet layout where each column is a question, and each row is a participant's response. Each cell of the table is a participant's response to a particular question. If you plan to run your own reports, download the raw data and import them into your favorite statistical package.
SAS and SPSS
SAS and SPSS download formats may include only raw data. The options to List Text Items and Include Value Labels do not apply to these formats. Because these formats can only include raw data, the text items are always part of the download. In addition, the downloads include not only the data, but a data dictionary SAS and SPSS automatically import. This means that the value labels always come with the SAS and SPSS downloads and will be present when you import the data into SAS or SPSS.
List Text Items Option
Summary results include no useful information about text items. Because text questions are open-ended, permitting an almost unlimited range of responses, Illume does not calculate counts, percentages, or other statistics for these questions.
When you check the List Text Items option, your download will include raw data for each of the text questions in your survey. For example, if 100 participants typed in their first names, the download will include all 100 first names.
Include Value Labels Option
The Include Value Labels option adds value labels next to the value codes in the data you download. For example, a question called GENDER may have two response options: 1 = Male and 2 = Female. When you download the raw data, the GENDER column will be a list of 1's and 2's.
When you check Include Value Labels, each entry in the GENDER column will be either 1:Male or 2:Female.
This option makes the data more readable to humans, but it hinders applications such as Excel from processing the data in a purely numeric way.
The Include Value Labels option applies only to Raw data in formats other than SAS and SPSS.
To view results from an individual participant:
Click on the Participants tab on the Results page.
Click the underlined row number of the participant whose survey you want to see. Note that the row number appears in the first column of the table.
Participant Response Data
The individual participant response view shows all of the participant's survey responses, even if your query included only a few variables.
For each question in this participant's response, this view displays the Variable Name, the Variable Description, the Scale Value Code (if any), and the Actual Value (the Scale Value Label seen by the participant).
The layout of this screen is somewhat similar to the Data Dictionary, with questions broken down by collection and displayed in order. Click on any collection name to limit the variables displayed to that collection.
Returning to the Participants View
To return to the participants view, click the Participants tab.
The Data Dictionary tab of the survey page shows all of the variables in your survey, along with variable data types, display types, descriptions and scales.
At the top of the data dictionary is a list of collections. Click any collection to see the list of variables belonging to that collection. Click ALL to see all of the variables in the survey.
The data dictionary displays the following items:
Variable Name - The name of the question/variable as it appears in the Survey Designer, in queries and data downloads.
Data Type - The type of data collected for this question/variable.
Display Type - The type of HTML control used to display this question in the survey.
Description - A description of the question. If the person designing the survey did not supply a description for a question, then question prompt appears as the description.
Scale - If the question has a scale, the scale values and labels appear in a table below the question description.
All Illume surveys include a collection called DATSTAT.INTERNAL which contains the following variables:
DATSTAT.SUBMISSIONID - The unique id of this data submission. No other submission on this or any other survey shares this submission id.
DATSTAT.SESSIONID - The session id assigned by the web server to this participant's login session.
DATSTAT.VERSION - The version of the survey that the participant submitted. A survey gets a new version number each time it is published. This number may be important in some cases. For example, if a participant submitted version 2 of a survey, you know that the participant did not see any of the edits or new questions that appeared on version 3 of the survey.
DATSTAT.LOCALE - This is the locale setting on the participant's computer. This may not always be available. The locale setting determines, among other things, what language the computer uses, and how it formats dates and times. Microsoft provides more information about locales on its Locales & Languages page.
DATSTAT.BROWSER - This is the browser the participant used to enter data. This is actually the text of the browser's "user agent" string.
DATSTAT.STARTDATETIME - The date and time the participant began entering data.
DATSTAT.ENDDATETIME - The date and time the participant finished entering data.
DATSTAT.ELAPSEDTIME - The total number of minutes it took the participant to finish entering data. Note that this cannot always be a reliable figure. If a participant spends 10 minutes answering questions, then takes an hour break for lunch, then spends another 10 minutes completing the survey, this field will show 80 minutes, even though only 20 minutes of that time was spent answering question.
DATSTAT.SUBMISSIONSTATUS - This field contains one of three values:
1 indicates the participant completed the survey.
2 indicates the participant started the survey but did not submit a complete survey.
4 indicates that the participant did not start the survey.
DATSTAT.LOGINCOUNT - This shows the number of times the participant logged in to this particular survey.
DATSTAT.JAVASCRIPT
A value of 1 indicates that the participant's browser had JavaScript enabled.
A value of 0 indicates that JavaScript was disabled or not supported in the participant's browser.
DATSTAT.TIMEPERIOD - This shows time period during which the survey was submitted. Time periods apply primarily to longitudinal surveys (those that a participant submits more than once over time). Time period names are arbitrary (e.g. "P1" or "Spring 2008") and are set at the time of publication by the user who publishes the survey.
DATSTAT.PCTCOMPLETE - The percentage of questions that the participant completed. If the survey includes a progress bar, this is the figure that drives the progress bar. For incomplete (a.k.a. "partial") submissions, this shows how far the participant progressed.
DATSTAT.LOGINDATETIME - This shows date and time when this participant last logged in.
DATSTAT.IMPORTDATETIME - The date and time this submission was imported. This applies only to surveys that were imported into Illume from another application or data source. This value will be empty if the participant submitted his or her survey directly via a web browser.
DATSTAT.NUMPRESENTED - This shows the total number of questions presented to the participant. Conditional jumps and show-if conditions will generally cause this number to be lower than the total number of questions in the survey.
DATSTAT.NUMANSWERED - This shows the total number of questions answered by the participant.
DATSTAT.NUMUNANSWERED - The number of questions left unanswered by this participant. This number does not include items that were never presented to the participant because of jumps or show-if conditions.
DATSTAT.PCTUNANSWERED - The percentage of questions left unanswered by this participant. This number does not include items that were never presented to the participant because of jumps or show-if conditions.
Custom Variables are computed variables that allow for recoded questions to be quickly created. This functionality is found in the Data Dictionary Tab of a Published or Test Published survey.
The following points are worth noting for Custom Variables:
Once created, Custom Variables are available for use in Queries and Reports.
Only Power Analysts and Power Users have the ability to add, modify, or delete Custom Variables
Custom Variables are not permitted to reference other Custom Variables
A Custom Variable created in a Test Published survey is only available for the Test Published survey. You will have to create the same variable for the Published Survey.
Custom Variables are saved in the database and are not part of the survey. For example, a cloned survey will not contain the Custom Variables that were a part of the original survey.
Custom Variables are not objects that can be copied and pasted.
When fields referenced by a Custom Variable are modified, the Custom Variable's value will also vary
Examples of Custom Variables
An example of a Custom Variable would be the creating of a variable that provided the “top 3”, “bottom 3”, and the middle. So if you have a question, Q1, with a scale from 1 through 10, you might want to recode the question into the “bottom 3”, “top 3”, and middle 4. You could do this by defining the following criteria “Q1 <= 3”, “Q3 >= 7”, and “Q3 > 3 AND Q3 < 7” respectfully.
Another example would be where there is a question, Q1, that is an open-ended AGE question and you want to define a new question that breaks this data out into the following intervals: those < 18, between 18 and 35, between 36 and 65, > 65. A variable could be defined that would define each of these separate intervals or scale values. Each scale value would be assigned a different criteria “Q1 < 18”, “Q1 >= 18 AND Q1 <= 35”, “Q1 > 35 AND Q1 <=65”, and “Q1 > 65”.
Multi-Select Custom Variables
To a user editing and running queries in the WebConsole, Multi-Select variables look and feel like "Check All that Apply" variables.
You must be logged into the Web Console as either a Power User or Power Analyst.
Select the survey that will have the Custom Variables.
Click on the Data Dictionary tab.
Click the Add/Edit Custom Variables button
Select the Multi-select variable link
Provide a Name and Description for the Multi-Select Custom Variable NOTE: The Name for the Variables follow the same convention as the standard variables. They must start with a letter, and may contain letters, numbers, underscores (_) and hyphens (-). The name must be between 2-30 characters in length.
Click Add New Scale Item
Enter a Label for the Scale Value
Click Add Filter to select the first filter used in this Scale Item
Decide on the Logic used for the Filters
Click Done
Continue adding Scale Items if desired
You will be presented with a list of your Scale Items
Click Done
You will see your new Custom Variable listed in the Existing Variables
Click Done or Add another variable
Single-Select Custom Variables
To a user editing and running queries in the WebConsole, Single-Select Custom variables look and feel like "Select One" variables.
You must be logged into the Web Console as either a Power User or Power Analyst.
Select the survey that will have the Custom Variables.
Click on the Data Dictionary tab.
Click the Add/Edit Custom Variables button
Select the Single-select variable link
Provide a Name and Description for the Single-Select Custom Variable NOTE: The Name for the Variables follow the same convention as the standard variables. They must start with a letter, and may contain letters, numbers, underscores (_) and hyphens (-). The name must be between 2-30 characters in length.
Enter a default value if desired that will be used if the expression cannot be evaluated.
Click Add New Scale Item
Enter the Value and Label for this Scale Item
Click Add Filter to select the first filter used in this Scale Item
Continue until you have finished selecting your Filters
Decide on the Logic used for the Filters
Click Done
If Desired continue adding Scale Items NOTE: You cannot delete a scale item until you have 2 or more scale items added. Once you do, the Delete link will appear next to every scale item.
Click Done when you are finished adding Scale Items
You will see your new Custom Variable listed in the Existing Variables
Click Done or Add another variable
Calculated Custom Variables
Creating a Calculated Custom Variable is similar to creating a Calculation in the DatStat Designer Client. However a major difference is that Calculated Custom Variables are written using Transact-SQL versus JScript.NET for survey calculations.
You must be logged into the Web Console as either a Power User or Power Analyst.
Select the survey that will have the Custom Variables.
Click on the Data Dictionary tab.
Click the Add/Edit Custom Variables button
Select the Calculated variable link
Provide a Name and Description for the Calculated Custom Variable NOTE: The Name for the Variables follow the same convention as the standard variables. They must start with a letter, and may contain letters, numbers, underscores (_) and hyphens (-). The name must be between 2-30 characters in length.
Select the Data Type for the Variable
Enter the Transact-SQL Expression and/or select the Variables to insert. This expression is different from a calculation in that calculations use Jscript.NET whereas Calculated Custom Variables use Microsoft’s Transactional-SQL language. A link to this reference is provided on the calculated custom variables screen. NOTE: You may select one Variable at a time to insert into your expression. You will see the variables in Green text that match the Data Type you selected. Once you select the Variable, Click Append to expression to have it inserted into your calculation.
Click Done when you have completed your calculation.
Use the Edit or Delete links to modify any Custom Variable you have created.
Participant lists are lists of participants that are used by Surveys to determine who is allowed to take the survey, and by Email Jobs to determine who should be sent an email.
The Project page displays all of the project's participant lists under the Participant Lists tab.
Click the name of a participant list to view the list. Click the New button to create a new participant list.
Click Delete to delete a participant list. You may not be able to delete a participant list if an active email job or a running survey is using the list.
To create a participant list:
Click the Participant Lists tab on the Project page.
Click the New button at the top or bottom of the list.
Type in a name for the new list.
Choose the project to which the list should belong. This will generally be the project that contains the surveys these participants will be taking.
(Optional) Choose a culture for this participant list. If you are fielding a multi-lingual survey, the culture you set here will determine the language in which the survey appears for all of the participants on this list. (See the Translation Overview for more details.) For single-language surveys, this setting has no effect.
Click Save.
Once you've saved the list, three more tabs apprear:
Participants displays all of the participants in the list. There will be no participants if you just created the list.
Create Participant contains a form in which you can enter information for a new participant.
Upload Participants contains a form for uploading an existing list of participants.
Changing Participant List Properties
You can move the list into another project by choosing a project from the Project list and clicking Update. You may also change the list name and Language at any time. Simple make the change and click the Update button.
To add members to a participant list, click on the Create Member tab on the participant list page.
The image above shows the Create Participant page with both Standard Data fields and Custom Data fields. Custom Data fields are optional and vary from list to list. See below for details.
Finding Similar Participants
When adding new participants to a participant list, you may wish to be notified when there is a participant in the list that has the same credentials. It is possible to check to see if any existing participant matches the new participant on any of the following information.
First & Last name
Email Address
Custom ID
To select the fields on which to base the uniqueness check, check the appropriate checkboxes. If a participant is found, a list of collisions is displayed and the option to cancel or overwrite existing participant list members is offered.
Standard Data
Participants have personal data that defines the participant for surveys and email jobs. This data can be used for many purposes, including piping, authentication, and querying. Every participant has the following five fields:
First Name
Last Name
Email Address
Custom ID - You may optionally use this field for an employee id, student id, or any other piece of data that your organization uses internally to uniquely identify a participant.
Region - This field is often piped into a survey and used in show-if logic. For example, you may divide your participants into regions A, B and C, and then define specific sets of questions to be presented based on each participant's region. You may enter any value you please into the Region field; it is not related to the Culture property of the Participant List.
Each of these values are string data types; any alphanumeric character may be included in the value.
Custom Participant Data
Participants may also have custom data, where the field name and value are defined by the participant list administrator.
To create a new Custom Data Field, click on the "Add Custom Participant Data" field. Enter a value for the name of the field and for the value of the field.
You can pipe custom data into participant's surveys to pre-populate answers, to display a personalized survey, or to store in hidden fields for show-if logic and calculations. See Hidden Variables and Preloaded Participant Data for details.
Test Participants
Participants that are configured to be "testers" can take and generate data for the survey like normal users, but also have some additional properties. Testers have the ability to take the survey multiple times. This is helpful to the survey administrator; it gives the ability to test multiple paths in the survey to ensure it works as expected. The data that testers create have a value in the "TestData" column of "True". Queries can be created that ignore rows of test data. Please see "Creating a Query" for more information on querying test data.
Follow these steps to upload a participant list:
Choose the participant list to which you want to add members, or create a new list.
Click the Upload Members tab.
Click the Browse... button to choose the participant list you want to upload.
The file you upload must be a tab-delimited text file, which you can create easily using Microsoft Excel or another spreadsheet application. See the section on File Format below for more information.
Once you have chosen the file to upload, click Upload Participants.
The upload will begin right away, and progress bar displays how many participants have been uploaded.
Note that large lists may take a long time to upload, primarily because the Web Console must process and load each participant individually. Lists with thousands of participants will take several minutes.
Creating a Participant List to Upload
The easiest way to create a tab-delimited participant list is to use Microsoft Excel or a similar spreadsheet application.
Create one column for each field of participant information you want to upload.
The column name must be at the top of each column.
Once the list includes all of the data you want to upload, choose File > Save As... from Excel's menu.
In the file dialog, give the file a name and choose Text (Tab Delimited) (*.txt) as the file type.
Click Save to save the file.
File Format
The tab-delimited may include a number of fields for each participant. The following column names are reserved and, if included as columns in the upload file, must be entered exactly as shown below.
FIRSTNAME - The participant's first name.
LASTNAME - The participant's last name.
EMAIL - The participant's email address. The Web Console uses this email address for email jobs. If you want participants to receive email invitations and follow-ups, this field is required.
CUSTOMID - This field is reserved for any unique identifier your organization uses to identify participants. For example, you may use a member id, and employee id or other organization specific identifier here.
REGION - This field is often piped into a survey and used in show-if logic. For example, you may divide your participants into regions A, B and C, and then define specific sets of questions to be presented based on each participant's region. You may enter any value you please into the Region field; it is not related to the Culture property of the Participant List.
TESTDATA - If this is set to true, yes, or 1, and data submitted by this participant will be marked as test data. If this is set to false, no, or 0 (zero), this participant's data will be counted as real data. This field is optional.
Any column that is not one of the standard data fields will be considered a custom field and added to the participant data as custom data.
You may want to add custom fields to your participant list for various reasons. For example, if you are doing an internal survey of employees, you want to add the field DEPARTMENT to your participant list. Your Illume survey can optionally preload data from the participant list into the survey, automatically adding the participant's department to his or her submitted data.
Your survey may also use preloaded data from a participant list to apply show-if logic. For example, you may want all participants in a particular state to see a special set of questions. If you know the states in which participants reside ahead of time, you can add this data to your participant list. The survey can preload the data, and decide whether or not the participant should see the special questions.
Test Users
To create test users in your participant list, create a column with the header TESTDATA. In this column, enter any of the following values for each test user:
1
Yes
True
Illume will mark any data submitted by these users as test data. You can delete test data with a single click. See the related article on Test Data for more information.
Finding Similar Participants
When adding new participants to a participant list, you may wish to be notified when there is a participant in the list that has the same credentials. It is possible to check to see if any existing participant matches the new participant on any of the following information:
First & Last name
Email Address
Custom ID
To select the fields on which to base the uniqueness check, check the appropriate checkboxes. It is further possible to check against the global list. This will check all other lists to determine if there is a participant with the same information as the new participant. To check the global list, check the "Update Global Participants" checkbox.
Participant Collisions
If any of the participants you upload match existing participants, you will see the "participant collision" page, which lists each of the duplicate participants. The participant data you see is the data from existing Illume participant lists, not the data you are uploading. You have a choice here to overwrite the participants, or to cancel the upload.
If you choose to overwrite, the information you are uploading will replace existing information for the listed participants. If you click the Cancel button, the entire upload is cancelled. You may remove the duplicate participants from the list and re-upload.
Once the participant list has been created and members added, the participant list screen will display additional filtering and sorting functionality, along with a table of participants.
Filters
Filters can be added to any of the Standard Participant Data fields (First Name, Last Name, Email Address, Custom ID and Region). It is also possible to filter the list so only testers are shown.
Columns
The five Standard Participant Data fields are always displayed, but it is also possible to show the custom fields that the members of this list use. In the columns list, select the columns that are of interest and press the "Refresh" button. The participant list member table will refresh and the new columns will be added to the table.
Paging and Display Options
To navigate to a specific page in the results. Select from the "Page" drop down menu. To modify the number of results displayed on a page, change "Results per page". Options for results per page are 1, 2, 5, 10, 20, 50, 100, and 200. Clicking on the arrows at the top of the table will move the current view to the previous or next page. The double arrow buttons are useful to move to the first or last page in the results table.
Deleting the Participant List
Clicking the Delete button at the top of the page will delete the entire participant list. Participants who have submitted at least one survey will remain in the system, and will appear on the Global participant list.
Downloading Participants
Participants and all of their data can be downloaded to a tab delimited file. The download will download only those participants that are included in the current filter. All participant data will be downloaded, including custom participant data that are not displayed in the current table view.
To view and/or update information for a single participant, follow these steps:
Use the filter feature on the participant list page to locate the participant. You may filter by any of the standard participant data fields.
Click the Refresh button to display only those participants that meet your filter criteria.
Click the name or email address of the participant whose information you want to view or edit. This displays the participant update page, showing all standard and custom participant data, and a log of all emails (if any) Illume has sent to this participant.
Change the values in any fields and click Update to save the changes.
Adding Custom Data Fields
To add custom data fields, click Add Custom Participant Data. You must type a name for each custom field, and then give the field a value. The custom field name cannot duplicate the name of any existing standard or custom participant data field.
There are two ways to delete a participant list. One is to go to the Participant Lists tab of the Project page and click the Delete link to the right of the list you want to delete.
The other way to delete a participant list is to click the Delete button at the top of the Participant List page.
What Happens When You Delete A Participant List
Every participant list is a named subset of participants who belong to the Global list. When you delete a participant list, Illume deletes the named list, but it does not delete participants on the list who have submitted surveys. Those participants remain in the Global list. The delete operation may take several seconds, or longer if the list is large.
Problems Deleting Participant Lists
You will not be able to delete a participant list if a running email job is sending email to members of the list, or if the list is associated with a running survey. You will have to stop the email job or survey before you can delete the list.
When you delete participant list members, Illume removes the members from the list. If those members are on no other participant lists, and have never submitted a survey, they are removed from the system. Otherwise, they remain on the Global participant list and any other lists to which they belong.
Deleting Several Members at Once
To delete members, check the box next to the participants row number, and press Delete Selected Participants.
Note: the Delete Selected Participants button is enabled only when at least one member is checked.
Deleting a Single Member
You can delete a single participant from the participant list page, as described above, or from the Edit Participant page, as described below.
Click on the name or email address of the participant in the participant list.
Click the Remove button at the top of the Edit Participant tab.
To download the members of a participant list:
Click the Participants tab of the Participant List page.
(Optional) Define filters and click the Refresh button if you want to download only those participant who meet specific criteria.
Click the Download Participants button at the bottom of the page.
The download produces a tab-delimited text file that you can edit with a text editor, like Notepad, or a spreadsheet application, like Microsoft Excel.
The file will contain only those participants who passed the filter criteria you defined. If you defined no filters, it will include all participants.
The file also contains all custom participant data columns, regardless of whether or not they are currently displayed on the participants page.
Email Jobs send scheduled email messages to participant list members. You can use them to invite participants to surveys, to remind participants to complete unfinished surveys, and to thank participants for completing surveys.
Illume enables you to specify who will receive email from a job, when the job will run, whether messages should be sent as follow-ups to other jobs, and when a job should stop sending messages.
The Web Console includes a visual editor for composing richly formatted HTML messages, as well as a plain text editor for composing messages aimed at mail clients that do not support HTML.
Illume can personalize each email message by inserting data from participant lists, and by inserting a custom survey URL into each message that enables the recipient to begin a survey without having to log in.
Email jobs are listed on the Email tab of the Project page. Click on the name of any job to see and details about the job's status and configuration. Click the New button to create a new email job.
The Email Job Page
The email job page is divided into tabs.
The Summary tab displays information about the job's basic configuration and current status, and includes a button for starting and stopping the email job.
The General tab enables you to edit basic properties.
The Recipients tab provides options for who should receive email.
The Start/Stop tab enables you to set conditions for starting and stopping the email job.
The Message tab includes and HTML editor and a plain text editor for composing the email message.
The Email Send Log tab displays a log of who has received email from this job so far, when each message was sent, and which messages bounced.
The Resend tab provides a way of resending the email message to specified participants.
The Email Block List shows who has opted not to receive any more email from this Illume system. (Note: The Email Block List appears only if you have Block List privileges in the System project.)
Visual Cues for Validation
As you move from tab to tab, the Email Job validates all of the information you entered on previous tabs. The result of the validation appears as an icon in the right side of the tab itself.
The green check means all of the information on the tab is OK.
The yellow question mark means some information on the tab is incomplete. Click the tab for a detailed message.
The red exclamation means some information on the tab is missing or invalid. Click the tab for a detailed message.
Visual Cues for Change
If you have made changes to your email job that have not yet been saved, you'll see a red asterisk on the Summary tab, and the text of the Save button in the upper right corner of the page will appear in read instead of the usual black.
To create an email job:
Click the Email Jobs tab on the Project page.
Click the New button.
Fill in the fields on the General tab of the Email Job page.
Name - The email job needs a name to distinguish it from other email jobs.
Survey - If you want to include a link to your survey in the email using the {SurveyURL} tag, you must choose a survey.
Participant List - The members of the participant list will be the recipients of the email.
Participant List Culture - This is a property of the Participant List, and you cannot edit it here. Illume fills it in automatically.
Project - This is the parent project of the email job. You will find the email job listed under this project once it has been saved.
Send no more than ___ emails per ___: This limits the rate at which Illume sends out email. You may want to limit the send to rate to reduce the burden on your mail server and on Illume.
Time intervals include Minute, Hour, Day, and Week. Note that the mailer frequency is the maximum number of emails that Illume will send in a specified time period. This setting does not guarantee that the emails will be sent at the set frequency. It only ensures that emails will not be sent more frequently than you specify.
Your email job's actual frequency depends on network conditions and the availablility of system resources. For example, during periods when the outgoing mail server is busy, the actual rate at which Illume sends email may be well below the maximum frequency you requested.
Click the Next >> button.
On the Recipients tab, select which participants should receive email from this job. Choices may include any or all of the following:
Participants who have not started the survey
Participants who have started the survey but haven't finished
Participants who have finished the survey
Click the Next >> button.
On the Start/Stop tab, you may optionally define dates or conditions for the beginning and end of the email job. The first image below shows start and stop dates. The second image shows start and stop conditions. See Setting Start and Stop Conditions for detailed information.
Click Next >> to go to the Email Message tab.
Compose the message you want to send. See Composing Email Text for information on how to compose HTML and Plain Text messages.
Click the Save button in the upper right corner of the page to save the email job.
Click the General tab of the Email Jobs page to set the following properties:
Name - The email job needs a name to distinguish it from other email jobs.
Survey - If you want to include a link to your survey in the email using the {SurveyURL} tag, you must choose a survey.
Participant List - The members of the participant list will be the recipients of the email.
Participant List Culture - This is a property of the Participant List, and you cannot edit it here. Illume fills it in automatically.
Project - This is the parent project of the email job. You will find the email job listed under this project once it has been saved.
Send no more than ___ emails per ___: This limits the rate at which Illume sends out email. You may want to limit the send to rate to reduce the burden on your mail server and on Illume.
Time intervals include Minute, Hour, Day, and Week. Note that the mailer frequency is the maximum number of emails that Illume will send in a specified time period. This setting does not guarantee that the emails will be sent at the set frequency. It only ensures that emails will not be sent more frequently than you specify.
Your email job's actual frequency depends on network conditions and the availablility of system resources. For example, during periods when the outgoing mail server is busy, the actual rate at which Illume sends email may be well below the maximum frequency you requested.
Click the Save button in the upper right corner of the page to save your changes, or click on any other tab to change other options.
Click the Recipients tab of the Email Job page to select which participants will receive email from this job. Choices may include any or all of the following:
Participants who have not started the survey
Participants who have started the survey but haven't finished
Participants who have finished the survey
Click the Save button in the upper right corner of the page to save your changes, or click on any other tab to change other options.
You may set optional conditions describing when an email job should start and stop. If you set no start condition, the job will begin sending email as soon as the following are all true:
The survey associated with your job is running.
The participant list is associated with the survey. (If the participant list is not associated with the survey, the participants will not be able to start the survey.)
The email job itself has been started. (You start the job by clicking on the Start button under the Summary tab.)
If you do not set any stop conditions, the email job will run indefinitely. Typically, this means that it will continue to send email until it has sent a message to everyone on the participant list. If you add new members to the list, the job will send email to those new members shortly after they are added to the list.
Types of Conditions
You can schedule your email job to start on a specific date, or on a relative date. A relative date is a specified number of days after the participant received email from another email job. You can schedule your email job to end on a specific date, or when specific conditions are met.
Note that only one type of start condition and one type of stop condition apply. For example, if you click the Save button with a stop date specified, then the stop conditions will not apply. If you click Save with the relative start date showing, then the specific start date will not apply.
Illume ignores empty dates and empty conditions.
Note that email job start and stop conditions apply only to the email job. They do not apply to the survey. Your survey starts running once it has been started from the Survey Designer, and it continues to run until you or someone else suspends it. Generally, this means the survey is available before your email job starts and continues to be available after the email job ends. See Starting and Resuming and Published Survey for details.
Setting a Specific Start Date
To set a start date for your email job:
Click the Start/Stop tab of the email job page.
Check the option to Start on a specific date. The date controls will appear.
Select the Month, Day, Year, Hour and Minute to start the job. Note that the date and time you choose use the time zone of the Illume server. This may not be the same time zone you are in!
Setting a Relative Start Date
You can tell Illume to send email as a follow-up to another job, specifying the minimum number of days to wait between messages. Illume will send email only to those participants that have received email from the other job, and will wait at least the specified number of days between messages.
To specify a relative start date:
Click the Start/Stop tab of the Email Job page.
Check the option to Send as follow up to another email job.
Choose an email job from the list.
Enter a whole number for the number of days after the specified job you want to send the follow-up message.
Note: When you choose Send as follow up to another email job, your new email job must use the same participant list as the job you are following up! The follow up job will not work if it uses a different participant list, even when the participants on the two lists are the same.
Setting a Specific Stop Date
To set a specific stop date for your email job:
Click the Start/Stop tab of the email job page.
Check the option to Stop on a specific date. The date controls will appear.
Select the Month, Day, Year, Hour and Minute to start the job. Note that the date and time you choose use the time zone of the Illume server. This may not be the same time zone you are in!
Setting Stop Conditions
You may define up to four conditions upon which an email job should stop sending email:
When a defined number of participants have been emailed. This is an absolute number.
When a percentage of the participant list has been emailed. This is a relative number. Once the percentage of the list is reached, the email job pauses. If more participants are added to the list, it will send more emails.
When a defined number of participants complete the survey. This is an absolute number.
When a defined percentage of participants from the participant list finish the survey. This is a relative number and will pause the email job when the percentage is reached. More participants may take the survey after the email job has stopped, as long as the survey remains running. If more participants are added to the participant list, the job may be restarted.
The email job will stop when any of the conditions are true.
To set stop conditons:
Click the Start/Stop tab of the Email Job page.
Check the option to Stop when one of these conditions is met.
Enter a whole number in any or all of the four fields. Illume will ignore blank fields.
To compose the text for your email message, click the Message tab of the Email Job page.
You'll see the email HTML editor and the following fields:
Encoding - This is the character set used in the email. You should choose a character set that suits the language of the email message.
Latin (ISO-8859-1) - Use this for sending email in any language that uses the Roman alphabet.
Chinese Simplified (GB2312) - This is the simplified Chinese character set.
Chinese Traditional (Big5) - This is the traditional Chinese character set.
Japanese (Shift-JIS) - This is a Japanese character set.
Korean (KSC 5601-1987) - This is a Korean character set.
UTF8 - This is a Unicode character set capable of representing virtually all characters in common use in any language.
Participant List Culture - This is the culture of the participant list to which emails will be sent. You cannot edit this here. Illume displays it as a reminder, so you know what language you should be writing in!
From - This is the name that the recipient will see in the From line of the email. This does not have to be an email address.
Reply To - If a recipient replies to your email, the reply will go to the address you enter here. This must be an email address.
Subject - This is what the recipient will see in the subject line of the email.
Composing a Message
The HTML editor enables you to compose formatted HTML email using a word-processor style interface. You can apply formatting by simply highlighting text and clicking buttons or selecting options on the toolbar.
Note that there are two tabs on the editor: Edit HTML and Edit Plain Text. You can copy text from one to the other with a single click. The Import Plain Text button copies your plain text message into the HTML editor (with no formatting). The Import HTML Text copies your HTML text (without images or formatting) into the plain text editor.
Adding Images
To add an image to your email message, click the image button and specify, at minimum, the URL of the image. When you add images to an email, Illume does not attach the image as part of the message. This means you should specify the full URL of the image, which should be on a publicly available web server. (Hint: If you click the Preview button and the image does not appear in the previewer, your recipients will not be able to see it.)
Personalizing Email Messages
You can pipe data from participant lists directly into your email, so that each participant receives a personalized message. Illume looks for tags in your email message that follow the format {UserData:FieldName} That is: the word UserData, followed by a colon and the name of the field whose data you want to insert. All of this must be enclosed in curly braces. Capitalization does not matter.
The HTML editor includes a button to help you insert user data. Click this button to see the user data dialog. Choose the user data field you want to insert, then click OK. The UserData tag will appear in the email message at the cursor position.
To insert custom user data from your participant list, choose the Other option and type in the name of the field.
When Illume sees a UserData tag, it looks for the specified field name in the participant list you have specified for this email job. For each participant, Illume substitutes the value of that field for the UserData tag. In the example below, the message begins Hello {UserData:CAND_FIRSTNAME} {UserData:CAND_LASTNAME}. When this job runs, Illume substitutes each participant's first name and last in place of the UserData tags, so that each participant receives a personalized email. UserData tags will work for any fields you have defined in your participant list.
Embedding the Survey URL
Email jobs also support a {SurveyURL} tag. When you include this tag in your message, Illume will embed a custom survey URL into each email. Illume automatically figures out what information is required for the participant to log in, and it embeds that information in the URL. When a participant clicks on this link, he or she can begin taking the survey without having to log in. You can add text to the {SurveyURL} tag to display a "friendly" link, rather than a long URL.
For example, the tag {SurveyUrl:click here} would produce the words "click here" as a clickable link. Clicking the link has the same effect as clicking the long survey URL: participants can start responding to your survey questions. Keep in mind, however, that not all participants have HTML enabled mail clients. Those using text-based mail clients will not be able to "click here" to reach your survey. These participants need access to the full survey URL, so they can copy it from the email and paste it into a browser.
The HTML editor includes a button to insert the Survey URL in your email. Click this to insert the Survey into your email at the point of the cursor. Whatever you type in the Link Text field becomes the text of the clickable link.
To embed the raw URL, use {SurveyRawURL} to produce the actual URL of the survey. This is the URL in plain text form. It is not clickable, but participants can cut and paste it into the address field of their browser to go to your survey.
Embedding a URL to Launch the Survey with No Toolbar
If you want your survey to appear in a browser window that has no toolbar and no address bar, use the {LaunchPageURL} tag in your email instead of the {SurveyURL} tag.
The {LaunchPageURL} tag produces a clickable link in your email that will launch your survey in a browser window that has no address bar and no toolbar.
The {LaunchPageRawURL} tag produces a non-clickable plain text version of the URL for your survey's launch page. Participants can cut and paste this into a browser to go to your survey's launch page.
Use the Survey URL button in the HTML editor to quickly insert the LaunchPageURL. (See above, under Embedding the Survey URL.) Type the link text, choose the Bare Window option, and click OK.
The link produces a stripped-down browser window in browsers that have JavaScript enabled. (This generally includes well over 90% of participant browsers.) Those without JavaScript will see the survey in a normal browser window with the address bar and toolbar.
Embedding an Opt-Out Link
To include an opt-out link in your email, use the {OptOutURL} tag. Illume will replace this tag with a custom URL. Any participant who clicks on this URL will be added to Illume's "blocked" list.
Note When a participant clicks the opt-out link, Illume adds the participant's email address to the blocked list. Illume will never send emails to addresses that are on the block list, even if the address is associated with other participants on other lists. Refer to the related articles below to learn how to remove an email address from the block list.
Currently, you cannot customize the text of the opt-out link. {OptOutURL} always prints full URL, and has no option to print friendly text like the {SurveyURL} tag.
Plain Text vs. HTML
Email jobs send "multi-part" messages in two formats: plain text and HTML. Which version the recipient sees depends on their email program and display preferences. If you define an HTML message, and the recipient's email program is configured to display HTML, the recipient will see the HTML version. If the recipient's email program cannot display HTML, or is set to display text only, the recipient will see only the text version. To reach the widest possible audience, you should include a plain text version of your message.
Known Issues with the HTML Editor
Mozilla Firefox will not let you paste text copied from an external application into the HTML editor. This is due to a security feature in Firefox aimed at preventing executable scripts from being pasted into a page while the page is in edit mode.
You can work around this issue in one of two ways:
1. Clicking the source-mode button and paste the HTML or text directly into the HTML source. Then click the source mode button again to switch back to the formatted HTML view.
2. Paste text into the Plain Text tab of the message. From there, you can switch back to the HTML tab, click Import Plain Text, and then apply formatting.
If you need to copy extensive sections of text with formatting, Internet Explorer does not restrict content being copied into the HTML editor.
Testing Your Email Message
To test the appearance of your email message, enter your email address in the Send Test Message field and click Send. Illume will randomly pick one test participant from the list, and will send that participant's personalized email to you.
Note: The Survey URL that Illume embeds in a test email message will include TESTDATA=1 in the query string. This means that if the recipient of the test message clicks on the link and takes the survey, the submitted data will be marked as test data, and will not be counted among normal participant results when you run queries in the Web Console. Passing Data through the Survey URL has more information about the TESTDATA flag. Creating Queries has more information about how to include or exclude test data from a query.
To start your email job, click the Summary tab of the email job page, then click the Start Job button.
If the participant list to which the email is being sent is not associated with the survey, you will need to click the Associate List Now button. If the participant list is not associated with the survey, Illume will not run the email job because none of the participants will be able to log in to the survey.
Illume will not automatically associate the participant list for you. While it may seem desirable in many cases to have Illume take care of this step for you, there are some cases in which automatically associating a participant list is not desirable, since doing so may lead to the wrong participants receiving email invitations, or the wrong participants being granted access to a survey.
Stopping an Email Job
To stop an email job, click the Stop Job button on the Summary tab of the Email Job page.
Note: Starting and stopping an email job is not the same as starting and stopping a survey. Your survey may be running before your email job starts and after it ends. See the related articles below for information about starting and suspending surveys.
Illume maintains a log of all the emails it has sent. The log includes information about when each message was sent, the email address it was sent to, which email job generated the message, and whether the message bounced.
Viewing the Log for an Email Job
To view the log of messages sent from a single email job, click the Email Send Log tab on the Email Job page.
Viewing the Log for an Individual Participant
To view the log of messages sent to an individual participant:
Go to the Participant List that includes the participant you want to look up. If you do not know which list the participant belongs to, and you have access to the Global participant list, go to the Global list. Participant lists appear on the Participant Lists tab or the Project Page. The Global list appears under the System project.
Click the Participants tab.
Under Filters, choose Email Contains, then type a part of the email address you want to look up.
Click on the participant list whose email log you want to see. The email send log for this individual will list all email messages sent from all jobs. The list appears at the bottom of the individual participant information page. If no list appears, the system has sent no emai to this individual.
Understanding the Email Log
The email log displays the following information:
Project The project to which the email job belongs.
Survey The survey to which the email job belongs.
Email Job The name of the job that that sent the email.
Email Address The address to which the message was sent.
Date Sent The date and time the message was sent.
Result The result of the send operation. OK means that Illume received no indication that the message bounced. Failed means Illume did receive an indication from a mail server the the message could not be delivered.
Message For failed messages, this field contains the reason for the failure. The text in this field comes from the mail server responsible for delivering the message to the recipient. That is, it comes from a server outside of the Illume installation. Message text is not consistent from one server to the next.
You can sort the log by any of these fields by clicking on the column heading. Click again on the column heading to reverse the sort.
Bounced Messages
In some cases, messages marked as Failed may have actually succeeded. Some mail servers report "transient" delivery errors, or the temporary inability to deliver messages. These may show up as failed deliveries. Read the text in the message field to learn more.
In addition, there is no guarantee that messages maked as OK actually reached the recipient. The OK result means that no mail server reported the message as undeliverable. There is still a chance that a server-based spam filter or the recipient's own Inbox rules classified the message as spam and deleted it or moved it to the junk folder.
Exporting the Email Log
To export the entire email log to Excel, click the Export to Excel link at the top of the page. This feature is available only for the log of an email job, not for the log of emails sent to a single participant.
To resend an email, follow these steps:
Choose the email job that contains the message you want to send. You can do this by clicking on the name of the job under the Email Jobs tab on the projects page.
Click the Resend tab on the Email Job page.
Illume displays the list of participants associated with this email job. To locate a specific individual, type all or part of the individual's email address in the box next to Email Address Contains, then click the Search button.
Check the box next to the name of each participant to whom you wish to resend the email.
Click Add Recipients. The selected recipients will appear in a separate list at the bottom of the page titled "Selected Participants."
(Optional) To remove participants from the selected list, check the box next to the participant's name and click the Remove button.
When you have finished adding recipients, click Send to send the emails.
Illume will not send any messages until you click Send. Once you do click Send, it generally takes a few minutes before Illume actually sends the new email.
Navigating the Participant List
Use the arrows at the top of the list of participants to navigate through the participant list. To jump to another page in the list, enter a page number in the Page box above the list and click Refresh.
Sorting the Participant List
You can sort the list by clicking any of the column headers. Click the header a second time to reverse the sort.
Editing Participant Information
Click on the name or email address of any participant to edit the participant's information. When you finish editing, you will return to the resend page.
To view the block list, click on any email job, and then click the Email Block List tab. The Email Block List is the same, no matter which Email Job you are looking at.
Block List Details
The email block list is a list of all email addresses belonging to participants who have opted not to receive any more Illume emails by clicking on the "opt out" link in an Illume email.
The email block list has a few important characteristics:
The block list is global. That is, it applies to all email jobs on your Illume system. If a participant clicked the opt out link in any email that came from your Illume system, Illume considers the participant to have opted out of ALL future mailings, regardless of what survey the future email may pertain to.
Because the block list is global, you will see the same block list under the Email Block List tab of every email job in the Web Console.
The block list is based on email address, not on participant id. This has two important implications:
If participant X clicks the opt out link in an email, then the email address to which that message was sent goes on to the block list, and Illume will send no more email to that address. If participant X changes his email address, he will be eligible to receive Illume emails again, assuming his new address is not on the block list. He will have to opt out again if he does not want Illume email at the new address.
If two participants share an email address, as spouses sometimes do, neither will receive any more email from Illume, even if they appear as distinct participants with unique participant ids in the participant list. Again: Illume blocks the email address, not the participant.
Removing Addresses from the Block List
To remove an email address from the block list:
Click on any email job.
Click the Email Block List tab.
Type part or all of the email address into the Email Address Contains box, and click Search.
Check the box to the left of the email address.
Click the Unblock button at the bottom of the list.
Click OK when asked if you want to remove this email address from the block list.
A Cross Survey View provides a means of querying similar questions across multiple surveys. For example, your organization has fielded four surveys over the past year, covering four different topics. All of the surveys, however, asked participants for their age. Now you would like a broad overview of the ages of everyone who has responded to your surveys.
To do this, you would create a cross survey view with a question called AGE, and then "map" the AGE question on your virtual survey to the questions about age on each of the four surveys you've fielded. When you map a cross survey variable to a question on an actual survey, you are telling Illume to include results from that question whenever you query on that variable.
In the diagram below, the cross survey question AGE is mapped to four questions on four different surveys.
Once you save this cross survey view, it will appear in the list of Cross Survey Views in the Web Console, and you can query it just like any other survey.
When you do query a cross survey view, the results you get for each variable come from all of the questions to which the variable is mapped. Querying on the AGE variable in the diagram above returns 7000 results:
500 from the AGE question on Survey 1
2000 from the AGE question on Survey 2
1500 from the YEARS question on Survey 3, and
3000 from the HOW_OLD question on Survey 4
Note that when mapping cross survey variables, differences in question prompts and ids do not matter. All that matters is that the questions share the same general data type. That is, all the questions to which a variable maps must be numeric; or they must all be true/false; or they must all be text questions. Illume prevents mixing data types because it is impossible to construct meaningful and reliable queries against inconsistent data types.
Cross Survey Views in the Project Page
Like normal surveys, cross survey views belong to projects. They are listed under the Cross Survey Views tab of the project page of the project to which they belong.
The Cross Survey Views list contains all of the cross survey views in the current project.
You can edit only those cross survey views that you created. These surveys have the Edit link next to their names in the list of Cross Survey Views.
Cross Survey View Creation Process
The process of creating a cross survey view consists of these steps:
Create and name the new cross survey view.
Add a survey to the view.
Add any number of variables from the survey.
Repeat steps 2 and 3 until the cross survey view includes all of the questions from all of the surveys you want to query.
Enable the virtual survey, marking it as "shared" if you want others to be able to query it.
Differences Between Cross Survey Views and Actual Surveys
Cross survey views appear and behave just like actual surveys in the Web Console. However, they have a few qualities that distinguish them from actual surveys.
Cross survey views have an owner. Whoever creates the cross survey view owns it and, unless this person checks the shared option on the cross survey view page, no one else can query the view. The view owner is the only person who can edit it (i.e., add, remove, or change the variables).
Cross survey views exist in draft form until they are enabled. You can add, remove, and edit items on the draft copy of a view. But until you enable it, no one else can see it or query it.
A cross survey view becomes available for querying as soon as you enable it. Note that, for cross survey views, enabling simply means making the view available for querying. Enabling does not make the view available to participants or the general public.
Cross survey views cannot be manipulated with the Survey Designer. They exist only in the Web Console to provide a means for querying data across multiple surveys.
Cross survey views can be edited, re-published, and deleted. Deleting a cross survey view does not affect the underlying data belonging to the component surveys. Nothing you do on a cross survey view can alter the data belonging to the component surveys.
Getting Started
To walk through the process of creating a cross survey view, start here.
Creating a Cross Survey View
Follow these steps to create a cross survey view:
Click the Cross Survey Views tab on the project page.
Click the New button.
Type a name and optional description for the cross survey view, then click OK.
Editing a Cross Survey View
To edit a cross survey view:
Go to the project that contains the view.
Click the Cross Survey Views tab.
Click the Edit link next to the name of the view you want to edit.
You can edit only those cross survey views that you created; you cannot edit cross survey views created by others.
Adding a Survey to a Cross Survey View
To add items to your cross survey view:
Click the Add Survey icon to add a survey to your view.
From the list on the left, choose the project containing the survey you want to add.
From the list on the right, choose the survey you want to add to your veiw.
Click OK.
Follow the steps for adding a question below.
When you add a new survey to a cross survey view that already includes a set of questions, Illume will automatically match questions on the new survey to existing questions that have the same name and data type.
Adding a Question to a Cross Survey View
Once you have added a survey to your cross survey view, follow these steps to add questions:
Click the Add Question icon at the bottom of the survey column. This enables you to add questions from the survey named at the top of the column.
Choose one or more questions from the list of questions on this survey.
Click OK.
Adding a Question Mapping
Whenever possible, Illume will automatically map questions in a newly added survey to questions in the cross survey view. Illume does this by looking for survey questions whose name and data type match the name and data type of an item on the cross survey view.
If Illume is not able to automatically map a question, or if you want to change the mapping that Illume created, follow these steps:
Click the name of the question you want to edit, or the edit question icon next to the name. If the question is not yet mapped, click the [Map] link.
Choose the question you want to map. Note that the only questions listed are those whose data type matches the data type of the cross survey view question.
Click OK.
The question you selected now appears in the cross survey view.
Removing Surveys from the Cross Survey View
To remove a survey from a cross survey view, click the Delete Survey icon next the name of the survey you want to remove.
Removing Questions from a Cross Survey View
To remove a question from a cross survey view, check the box to the left of the question name in the far left column of the cross survey view grid, then click the Delete Question icon .
Removing a Question Mapping
To remove a question mapping, click the Delete Mapping icon to the right of the mapping you want to remove.
Data Type Restrictions
Like survey questions, cross survey questions have a data type. A cross survey questions's data type is the type of the first question to which you map the variable. If the first question to which you map your virtual survey variable is a Whole Number, then your cross survey question is a Whole Number.
Once the variable's data type is set, you can map only to other survey questions of the same data type.
There is a little bit of flexibility in this rule. All numeric types are considered to be simply numeric; the variable mappings do not distinguish between "Whole Numbers", "Decimal Numbers", and "Whole Numbers >= 0". Mappings also do not distinguish between Text type questions (short text) and commentary questions (long text). Both are considered to be simply text.
The following table summarizes which type mappings are legal.
Data Type
Can Map To...
Yes/No
Yes/No
Text
Text
Whole Numbers
Whole Numbers Whole Numbers >= 0 Decimal Numbers
Whole Numbers >= 0
Whole Numbers Whole Numbers >= 0 Decimal Numbers
Decimal Numbers
Whole Numbers Whole Numbers >= 0 Decimal Numbers
Date/Time
Date/Time
Date
Date
Time
Time
Currency
Currency
Checkall Summary
Checkall Summary
You can limit the data in a cross survey view by adding filters. To add filters to your cross survey view:
Click the Edit button in the Filters area.
In the Cross Survey View Filter dialog, choose the variable you want to filter, choose an operator and a value.
(Optional) Click Add Filter to add another filter, then repeat step 2.
Click OK.
The new filter(s) appear at the top of the cross survey grid.
The process for creating filters here is very similar to the process of creating query filters. For more information on building advanced filters and complex expressions, see the sections on Advanced Filtering and Complex Expressions in Creating a Query.
Cross survey views may include filters to limit the data that show up when users run queries. This makes filters an effective means of segregating data.
For example, assume you have fielded a survey called "My Survey," and you have collected 1000 responses. Data privacy rules may dictate that a restricted analyst in your organization have access only to data submitted by certain participants: such as those over 18 who have explicitly opted in to a program. Let's assume "My Survey" includes about 600 participants who meet these criteria.
You can create a cross survey view called "My Survey View" containing all of the questions from "My Survey," then add the filters AGE >= 18 and OPT_IN = Yes. "My Survey View" effectively becomes a restricted view of the original survey, including results from only those 600 participants who meet your criteria.
You can now safely share this view with the restricted analyst described above. Simple enable the view and check the "shared" option so that others may see it.
Just make sure the restricted analyst has no rights to see the original "My Survey," but does have rights to see "My Survey View." (Your Illume system administrator, who is responsible for creating Illume users, can set roles and privileges for each user in the system.)
To edit the properties of a cross survey view from the Project page:
Click the Cross Survey View tab.
Click Properties next to the name of the Cross Survey View.
To edit properties from the Cross Survey View page, click the Properties button in the upper right corner of the page.
The Properties Dialog
The properties dialog includes the following properties:
Name The name of the cross survey view.
Description A description of what the cross survey view contains.
Parent Project The project to which the view belongs. The cross survey view is listed on the project page of its parent project. If the view is shared, anyone with access to the parent project has access to the view. There may be times when you want to move a view into another project because someone who only has access to the other project wants access to the cross survey view.
Shared Cross survey views are private by default, meaning that only the person who created the view can see it and query it. By checking the Shared option, you make the view available to others for querying. Whether your view is shared or not, no one but you can edit the surveys and questions that make up the view.
Edit these as necessary and click OK to save the changes.
Before you can query a cross survey view, you must enable it. To enable a cross survey view, simply click the Enable for Querying button at the top of the cross survey view edit page.
Cross survey views are private by default. That is, only the user who created the view can see, edit, or query it.
If you want others to be able to query your cross survey, you must share it:
Click the Properties button.
Check the Shared checkbox.
Click OK.
This enables other users to query the most recently enabled version of your cross survey view. If you are still editing the view, other users will not see your edits until you enable the version with your changes.
Questions on a cross survey view have the same general properties as questions in a normal survey: a name, description, data type and scale. As with normal survey questions, these properties appear in the data dictionary and can be very useful to data analysts.
To edit the properties of a cross survey question, click the edit icon next to the question name on the cross survey page. This appears in the far left column of the cross survey view grid.
This brings up the Cross Survey Item Details dialog, in which you can edit the question's name, description and scale.
Editing a Cross Survey Question's Scale
When you create a cross survey question, its scale comes from the original question on the survey from which the question was added.
For example, your cross survey view includes three surveys: Survey_1, Survey_2, and Survey_3. It also includes a question called AGE. If AGE was originally added to the view from Survey_1, the scale for AGE comes from the AGE question on Survey_1. If AGE was originally added from Survey_3, the scale for AGE comes from Survey_3.
At times, the scales for a single question may differ across surveys. For example, two of the surveys may use this scale:
Value
Label
1
Under 18
2
18 - 35
3
36 - 49
4
50 - 65
The third survey may use this scale:
Value
Label
1
Under 18
2
18 - 35
3
36 - 49
4
50 - 65
5
Over 65
You may want your cross survey view to use the scale from the third survey, rather than the first two, since the third scale includes more options. To do this:
Click the edit icon to open the Cross Survey Item Details dialog.
Under Scale, check the option Regenerate scale using values from survey.
Choose the survey whose scale you want to use from the list.
Click OK.
In some cases, several of the questions you have mapped to a cross survey question may have different scales. When this happens, you may want to include all of the scale values from all of the scales. To do this:
Click the edit icon to open the Cross Survey Item Details dialog.
Under Scale, check the option Regenerate scale as a union of all survey scales.
Click OK.
Mismatched Scales
If the survey questions included in your cross survey view question have mismatched scales, there are two possible consequences. The first is relatively harmless and is easy to fix; the second may be harmful because it can lead to incorrect analysis of your data.
Case 1: Some Questions Include Scale Values Not Found in Other Questions
Assume Survey_1 and Survey_2 have a question called GENDER with the following scale:
Value
Label
1
Male
2
Female
Assume the GENDER question on Survey_3 has this scale:
Value
Label
1
Male
2
Female
3
I choose not to answer
By default, the scale for each question in your cross survey view comes from the first item mapped to the question. Let's assume in this case that the GENDER question was first mapped from Survey_1. The scale, then, will include only the two values for male and female.
When you query this cross survey view, your results may include response values 1, 2, and 3 (since 3 was a valid response on Survey_3). The summary results for your query will look like this:
Value
Label
1
Male
2
Female
3
??
Because 3 is not on the cross survey question's scale, the Web Console does not know what response 3 represents.
The solution to this problem is to regenerate the scale for cross survey question as a union of all survey scales. This will ensure that any value found on the scale of any of the mapped questions appears in the scale.
Note that when Illume creates a union of scales, the label for each scale item comes from the first question that includes the scale value. For example, if the lable for value 2 is Female on Survey_1 and FEMALE on Survey_2, the label that ultimately appears in the data dictionary and on the summary results page will be Female (from Survey_1).
Case 2: Questions with Conflicting Scales
If the scales of the questions on your cross survey view are in direct conflict, you have a problem that Illume cannot resolve, and the results of your cross survey queries will produce incorrect summary data.
Assume Survey_1 and Survey_2 have a question called GENDER. Survey_1 uses the following scale:
Value
Label
1
Male
2
Female
But Survey_2 uses this scale:
Value
Label
1
Female
2
Male
Your cross survey will take the scale of the first question mapped as the scale for your cross survey question. This means that all responses with a value of 1 will be reported as Male in the summary results of a query on GENDER. All responses with a value of 2 will be reported as Female.
This is obviously incorrect for anyone who submitted Survey_2.
Even if you do a union of all scales, Illume has to pick one label for each of the scale values, and it picks the label from the first question mapped. That is, 1=Male and 2=Female.
Again, Illume will report incorrect summary data for participants who submitted Survey_2.
The only solution to this problem is to be consistent when designing surveys, and to avoid creating cross survey variables from questions that have conflicting scales.
Illume's repository was designed specifically to avoid the problem of conflicting scales by ensuring that repository questions are consistent from one survey to the next.
This article contains detailed information about the restrictions that apply to mapping variables across surveys. It also points out the potential consequences of mapping variables with mismatched scales.
Data Type Restrictions
Like survey questions, virtual survey variables have a data type. A cross survey variable's data type is the type of the first question to which you map the variable. If the first question to which you map your cross survey variable is a Whole Number, then your cross survey variable is a Whole Number.
Once the variable's data type is set, you can map only to other survey questions of the same data type.
There is a little bit of flexibility in this rule. All numeric types are considered to be simply numeric; the variable mappings do not distinguish between "Whole Numbers", "Decimal Numbers", and "Whole Numbers >= 0". Mappings also do not distinguish between Text type questions (short text) and commentary questions (long text). Both are considered to be simply text.
The following table summarizes which type mappings are legal.
Data Type
Can Map To...
Yes/No
Yes/No
Text
Text
Whole Numbers
Whole Numbers Whole Numbers >= 0 Decimal Numbers
Whole Numbers >= 0
Whole Numbers Whole Numbers >= 0 Decimal Numbers
Decimal Numbers
Whole Numbers Whole Numbers >= 0 Decimal Numbers
Date/Time
Date/Time
Date
Date
Time
Time
Currency
Currency
Checkall Summary
Checkall Summary
Scale Values for Virtual Survey Variables
When you create a cross survey variable, the variable's scale is set to the scale of the first question to which you map the variable.
For example, assume you create a cross survey variable called GENDER to collect gender information from Survey_A and Survey_B.
This is how the gender question appears on Survey_A (response values appear in parentheses):
What is your gender? o Male (1) o Female (2)
This is how the question appears on Survey_B (response values in parentheses):
What is your gender? o Male (1) o Female (2) o Other (3)
If you map the cross survey variable to the gender question on Survey_A first, then the scale for the variable will have two values: Male (1) and Female (2). If you map it to the gender question on Survey_B first, the scale will have three values: Male (1), Female (2) and Other (3).
This has implications when you view query results. If you map the variable first to the item on Survey_A, so that it has only the Male/Female scale, you will see results similar to the following when you query:
Response Value
Response Label
Count
Percent
1
Male
98
49%
2
Female
100
50%
Unknown
Unknown
2
1%
The two unknown responses came from Survey_B. Because the scale from the virtual survey's GENDER question includes only Male (1) and Female (2), all responses outside of the scale are lumped together and reported simply as "unknown."
In this case, it would be wise to map GENDER to the Survey_B question first, because that one has the broader scale.
The following case represents a more problematic scenario. Assume again that we create a virtual survey variable called GENDER that maps to gender questions on Survey_C and Survey_D.
This is how the question appears on Survey_C:
What is your gender? o Male (1) o Female (2)
This is how it appears on Survey_D:
What is your gender? o Female (1) o Male (2)
These questions have mismatched scales, and mapping them to the same virtual survey variable is guaranteed to yield unreliable results.
Again, the virtual survey variable uses the scale of the first item mapped as its own scale. If you map first to the question on Survey_C, the scale will be Male(1), Female(2).
The problem here is that all of the "1" answers collected on Survey_D will be reported as Male, when in fact, anyone choosing option 1 on Survey_D was indicating "Female."
Assume, for example, that Survey_C had 50 respondents, and they were all men. Survey_D had 100 respondents, and they were all women. When you get the summary statistics for the GENDER variable on this virtual survey, you will see something like this:
Response Value
Response Label
Count
Percent
1
Male
150
100%
2
Female
0
0%
All of the "Female" responses from Survey_D are incorrectly represented as Male due to the mismatched scales.
There is currently no solution or work-around to this issue.
The best preventive measure is to ensure that question scales are consistent from survey to survey. Illume's repository was designed specifically to enforce this kind of consistency. Repository questions include version numbers and strict controls to ensure they produce meaningful results when queried across surveys.
Choosing or creating a query to provide data for the report.
Setting display styles for the report. This is the process of choosing fonts and colors for the report.
Designing the report. This is the process of defining what charts and tables should appear, where they should appear, and what data they should represent.
Setting access privileges, which define who can see the report.
Setting a schedule for automatically updating the report.
Once these steps are complete, you can publish the report for others to view.
The top of the report page includes the following buttons:
View Published - Displays the most recently published version of the report in a separate window. This button appears only after the report has been published. When you view a published report that you created, you'll see a link to Force Report Refresh. Clicking this refreshes the report data for you and for everyone viewing the report through the DatStat Extranet.
Preview - Displays the report, complete with your latest edits, in a separate window.
Save - Saves your latest changes.
Save As - Saves your report under a new name, leaving the original report intact. This is useful for cloning an existing report.
Publish - Publishes your report so others can view it. Web Console users can see the report in the Web Console or in the DatStat Extranet.
Unpublish - Removes your report from view in both the DatStat Extranet and the Web Console. You can still edit the report, but no one else can see it until you publish it again.
Delete Draft - Deletes the saved draft (your working copy) of the report, but leaves the published report intact.
Delete - This unpublishes the report and gets rid of the working draft, if it exists. A deleted report is completely gone.
Where Reports Appear
Reports appear in both the Web Console and the DatStat Extranet. In both cases, only authorized users can view reports. In the Web Console, anyone with access to the project in which the report resides can view the report; however, only the creator of the report can edit it.
In the DatStat Extranet, users can view a report if either of the following is true:
The user has access to the project in which the report resides and the user has not specifically been denied access to the report.
The user has specifically been granted access to the report.
Illume administrators are responsible for granting access to projects. Report creators control access to reports.
To create a new report:
Click the Report tab in any project.
Click the New button.
Type a name and description for the report.
From the Parent Project list, choose the project to which the report should belong.
Click Continue.
The Parent Project property may have important implications regarding who will be able to view the report. You may change the report name, description and parent project at any time by visiting the General tab on the Reports page. See Editing General Report Properties for details.
The General properties of a report include its name, description and parent project.
To edit general report properties, click the General tab on the report page. Type the name and description, and choose a parent project, then click the Save button.
Name and Description
The name and description both appear in the DatStat Extranet. Because the DatStat Extranet may include a large number of reports, it's helpful to choose a descriptive name and to provide a description with enough detail to distinguish the report from others.
Parent Project
Choosing a parent project determines where a Web Console user needs to go to find the report. For example, if you choose System as the parent project, the report will appear under the Reports tab of the System project. If you choose Project X as the parent project, the report will appear under the Reports tab of Project X.
More importantly, the parent project determines who will be able to view the report in the DatStat Extranet. By default, DatStat Extranet users are allowed to view any reports inside of the projects to which they have access, and are not allowed to view reports inside of projects to which they do not have access.
Consider this situation for example: you have two projects, one called "HR Surveys," and one called "Customer Surveys." Everyone working in Human Resources has access only to the "HR Surveys" project, while everyone in marketing has access only to the "Customer Surveys" project.
If you create a report on the results of an HR survey, and you put that report into the "Customer Surveys" project. In the DatStat Extranet, no one working in Human Resources can see the report, but everyone working in marketing can.
This is clearly not what you want! Be sure to select the right parent project for your report! In most cases, you will want the report to be in the same project as the survey whose results it displays.
Also note that you can specifically grant or deny report access to individual users. See Setting Report Access Privileges for details.
The data displayed in all of the charts and tables of your report come from an Illume query. Reports display the summary data returned by a query. Summary data include response counts and percentages, and may include statistics such as minimum, maximum, mean, and standard deviation.
You may choose an existing query as your report data source, or you may define a new query.
Creating a query is often more convenient when you have simple data requirements (e.g. you do not need complex filters, or a large list of carefully selected variables).
Cloning a query is generally more convenient when the query you want already exists, or when you need to build and test a complex query.
Creating a Query
To create the data source for your report:
Click on the Data Source tab of the Report page.
Choose the Project containing the survey or cross survey view that will supply data for the report.
Choose the survey or cross survey view from the Survey list. (Both surveys and cross survey views appear in the list.)
Follow the steps outlined in Creating a Query to create the query.
Cloning an Existing Query
To clone an existing query:
Click on the Data Source tab of the Report page.
Choose the Project containing the survey or cross survey view that will supply data for the report. The Clone Existing Query list will display all of the queries associated with the survey you selected. It may take a few seconds for this list to load.
Choose a query from the Clone Existing Query list.
After step 3, Illume will display the query you selected, complete with the list of selected variables, filters, time periods, etc.
You may edit this query for the report, and your edits will not affect the original query. Conversely, any changes you make to the query from which this was cloned will not affect this query.
Report styles enable you to control the fonts, colors and borders on report elements. To set the styles for a report:
Click the Style tab on the Report page.
Adjust any of the style attributes in the left column. The sample annotation and table on the right side of the page show your changes as you edit.
Adjust font and border attributes by selecting values from the appropriate list. Adjust color attributes by clicking on the appropriate color icon and choosing a color from the palette that appears.
Use the color icon with the letter T to set text color.
Use the color icon with the paint bucket to set background color.
Click any color within the color palette to select that color, then click OK to apply it. You may also manually enter a color in the text box at the top of the color palette. The color must be formatted as a web color, with a pound sign, followed by 6 hexadecimal digits (e.g. #FF09C3). This option may be useful for organizations whose publications must adhere to a defined stylesheet or color palette.
Font - Sets the font-family (typeface) of the text of annotations, and of the value labels, counts and percents in data tables.
Font Size - Sets the size of the text of annotations, and of the value labels, counts and percents in data tables.
Font Style - Sets the style (bold, italic, etc.) of the text of annotations, and of the value labels, counts and percents in data tables.
Font Color - Sets the color of the text in annotations, and of the text in value labels, counts and percents in the odd rows of data tables.
Bg Color - Sets the background color behind the text of annotations and behind the text of value labels, counts and percents in the odd rows of data tables.
Alt. Font Color - Sets the color of the text in annotations, and of the text in value labels, counts and percents in the even rows of data tables.
Alt. Bg Color - Sets the background color behind the text of annotations and behind the text of value labels, counts and percents in the even rows of data tables.
Chart Bg Color - Sets the background color of all charts within the report.
Chart Series Colors - Sets the colors of items within all charts in the report— e.g. bars in bar charts, slices in pie charts.
Column Header Font - Sets the font-family (typeface) of the text at the head of each column in data tables.
Column Header Size - Sets the size of the text at the head of each column in data tables.
Column Header Style - Sets the style (bold, italic, etc.) of the text at the head of each column in data tables.
Column Header Font Color - Sets the color of the text at the head of each column in data tables.
Column Header Bg Color - Sets the color background color behind the text at the head of each column in data tables.
Table Border - Determines whether data tables will display a border around their outer edges. Note: Borders for annotations are set separately under the Layout/Design tab.
Table Gridlines - Determines whether data tables will display a border between rows.
Title Font - Sets the font-family (typeface) of titles at the top of annotations and data tables.
Title Size - Sets the size of the title text at the top of annotations and data tables.
Title Style - Sets the style (bold, italic, etc.) of the title text at the top of annotations and data tables.
Title Font Color - Sets the color of the title text at the top of annotations and data tables.
Title Bg Color - Sets the background color behind the title text at the top of annotations and data tables.
Adding Report Elements
Illume Reports include the following types of elements:
Annotations may contain any custom text and images.
Charts include bar charts, pie charts, line charts and box and whisker charts to represent data in a variety of styles.
Tables display various types of summary data in textual format.
Chart/Table combinations display data in both visual and textual media.
Adding Charts
To add a chart to your report, go to the Layout/Design tab of the Report page and follow these steps:
Click on the chart icon . This will create a chart at the bottom of the list of report elements on the design page. You may also click the chart icon and drag it directly to the location in which you want it to appear.
Choose the variable or variables whose data you want to appear in the chart. In the left side of the list of variables under the Element Properties tab, click on the variable you want to include. Each variable you click will appear in the list of Selected Variables on the right.
You can move a variable in the Selected Variables list by clicking it and dragging it up or down. You can remove a variable by clicking it again in the list on the left.
Illume will display one chart in the report for each variable you choose. If you choose three variables for your chart, Illume will produce three charts, each with identical style properties.
Set the display properties for the chart, described below.
If you want to create several charts of the same type that have a consistent appearance, put one chart in your report, set its properties, and add several variables to it.
If you want to create charts with distinct style attributes, create one chart for each variable.
Setting Chart Properties
Whenever a chart is selected in the Report Designer, the Chart Properties form appears on the right side of the page. (To select a chart, simply click on it. You'll know it's selected when a thick red border appears around it.)
For each chart in your report, you can set the following properties:
Crosstab/Rollup - If the query supplying data to your report is a crosstab query, you may choose whether you want the chart to represent the cross-tabulated data or the data without the crosstab breakdown (the rollup data). Note that if you choose to represent crosstab data, the chart cannot display as a pie chart. The Crosstab/Rollup option does not appear for non-crosstab queries.
Title - The text you type here appears in bold type at the top of your chart. By default, the chart title is {DS:VariableName}. This is a placeholder that will be replaced with the name of the variable when the chart is rendered. If you choose multiple variables, Illume creates a chart for each variable, and sets the variable name as the title for each one. If you manually type in a title, and you choose several variables, Illume will produce several charts, each with the same title.
Subtitle - The subtitle appears in smaller type below the title of the chart. By default, a chart's subtitle is {DS:Description}, which is a place holder for the variable description that appears in the Data Dictionary. (This is usually the same as the question prompt.) You may replace {DS:Description} with custom text.
Type - This represents the type of chart that will appear in the report. When you change the type, the image sample in the Report Designer changes to show the type of chart you've selected.
Data - Choose whether you want the chart to represent response counts or percents for the selected variable.
Height - This sets the height of the chart, in pixels.
Width - This sets the width of the chart, in pixels.
Show Scale Labels - If this box is checked, scale labels will appear near each bar, line, or pie slice on your chart. For example, if your question includes response options 0=No and 1=Yes, checking this option would cause the words Yes and No to appear next to the corresponding bar or line or pie slice on the chart. Scale value labels can take up a considerable amount of space in the printable version of your chart, leaving little room for the chart itself.
Max Label Length - If Show Scale Labels is checked, you can set the maximum number of label characters that will appear for each label. Illume will truncate the label to the number of characters you specify here.
Show Scale Values - If this box is checked, scale values will appear near each bar, line, or pie slice on your chart. For example, if your question includes response options 0=No and 1=Yes, checking this option would cause the numbers 0 and 1 to appear next to the corresponding bar or line or pie slice on the chart.
The best way to understand what each setting does is to change the setting and click the Preview button to see how the change affects the display.
Adding Tables
To add a table to your report, follow these steps:
Click the table icon . This will create a table at the bottom of the list of report elements on the design page. You may also click the table icon and drag it directly to the location in which you want it to appear.
Choose the variable or variables whose data you want to appear in the table. (See step #2 under Adding Charts above for details.)
Set the display properties for the table, described below.
Setting Table Properties
Whenever a table is selected in the Report Designer, the Table Properties form appears on the right side of the page. (To select a table, simply click on it. You'll know it's selected when a thick red border appears around it.)
For each table in your report, you can set the following properties:
Crosstab/Rollup - If the query supplying data to your report is a crosstab query, you may choose whether you want the table to display the cross-tabulated data or the data without the crosstab breakdown (the rollup data). The Crosstab/Rollup option does not appear for non-crosstab queries.
Title - The text you type here appears in bold type at the top of your table. By default, the table title is {DS:VariableName}. This is a placeholder that will be replaced with the name of the variable when the table is rendered. If you choose multiple variables, Illume creates a table for each variable, and sets the variable name as the title for each one. If you manually type in a title, and you choose several variables, Illume will produce several table, each with the same title.
Width - This sets the width of the table. You may enter a whole number or a percentage value. For example, a value of 600 sets the width of the table to 600 pixels. A value of 90% makes the table take up 90% of the width of the browser's display area. If you choose a percentage width, the width of the table will change when the person viewing the report resizes the browser window. Pixel widths are constant, regardless of the size of the browser window.
Show Totals - Check this to display the total number of participants who chose each response option.
Show Percent - Check this to display the percent of participants who chose each response option.
Show Aggregate Totals - Check this to display summary statistics including Count, Min, Max, Sum, Mean, Median, Standard Deviation and Variance.
Adding Annotations
To add an annotation to your report, follow these steps:
Click the annotation icon . This will create an annotation at the bottom of the list of report elements on the design page. You may also click the icon and drag it directly to the location in which you want the annotation to appear.
Type a title for the annotation.
Type or copy and past text into the annotation body.
Set the width of the annotation. Use a whole number (e.g. 400) to set a fixed pixel width, or a percentage to set a relative width (e.g. 90%). A percentage width causes the width of the annotation to change when the size of the browser window changes. Fixed widths remain constant regardless of the size of the browser window.
Understanding the Annotation Editor
The annotation editor enables you to compose formatted HTML with few limits. It behaves much like a word processor, and includes the toolbar functions listed below. Most of these toolbar options apply to the selected or highlighted text. To select text, click and drag the mouse across the text you want to select.
Enlarge editor - Clicking this enlarges the size of the editor.
Reduce editor - Clicking this reduces the size of the editor.
Bold text - This applies or removes boldface to highlighted text.
Italicize text - This applies or removes italic style to highlighted text.
Underline text - This applies or removes underlining to highlighted text.
Create subscript - This causes highlighted text to display as a subscript.
Create superscript - This causes highlighted text to display as a superscript.
Align left - This aligns highlighted text to the left.
Align center - This centers highlighted text.
Align right - This aligns highlighted text to the right.
Justify text - This justifies highlighted text.
Numbered list - This inserts a numbered list.
Bullet list - This inserts a bulletted list.
Decrease indent - This decreases the indent of the highlighted text, or of the paragraph that contains the cursor.
Increase indent - This increases the indent of the highlighted text, or of the paragraph that contains the cursor.
Font color - This presents a color-picker, from which you can select a color for the highlighted text.
Highlight color - This presents a color-picker, from which you can select a color for the area behind the highlighted text.
Horizontal line - This inserts a horizontal rule.
Insert hyperlink - This creates a hyperlink from the selected text or image.
Insert table - This inserts a table.
Insert image - This inserts an image.
Source mode - This switches the editor into source mode, so you can edit the HTML source directly.
Known Issues with the HTML Editor
Mozilla Firefox will not let you paste text copied from an external application into the HTML editor. This is due to a security feature in Firefox aimed at preventing executable scripts from being pasted into a page while the page is in edit mode.
You can work around this issue by clicking the source-mode button and pasting HTML or text directly into the HTML source. Click the source mode button again to switch back to the formatted HTML view.
If you need to copy extensive sections of text with formatting, Internet Explorer does not restrict content being copied into the HTML editor.
By default, reports are visible to those Web Console users who are allowed to build reports, and to all Extranet Viewers. (Extranet Viewers are those who can log into the DatStat Extranet.)
If you want to restrict who is able to see your report, you can specifically define who can see the report and who cannot.
To grant access to your report, click the Access tab on the Report page, and select one of the following options:
All Extranet Viewers can see this report. Choose this option if you want all DatStat Extranet users with appropriate privileges to be able to view this report. This does not mean that every DatStat Extranet user will be able to see the report. It means that every DatStat Extranet user who has access to this report's parent project will be able to view the report.
E.g. If this report is in Project X, then anyone who is allowed to view data in Project X will be able to see the report. Those who are allowed to view data in other projects, but not in Project X will not be able to see the report.
Only the designated Extranet Viewers below can see this report. If you choose this option, you can select which individual users will be allowed to see the report. In some cases, it's easier to check all of the users by checking the box next to Report User Name, and then uncheck the few names you want to exclude.
You may choose to create a single report, or multiple reports. A single report may be run once upon creation, or it may be updated on a regular schedule. In either case, there is only one set of data at any given time for the report to display.
When you create multiple reports, on the other hand, the Illume updates the report data on a regularly scheduled basis, and it keeps a copy of as many of these data sets as you specify, so that at any given time, you may log into the DatStat Extranet and review the report for this week, or for last week, or for some other past period.
Creating a Single Report
To create a single report:
Click the Schedule tab on the Report page.
Choose the Create a single report option.
Choose This report will be run once, when published if you want to generate a report on data that will not change. (I.e. Your survey is no longer live, and there will be no new submissions.)
Choose This report will be automatically updated on the following schedule if your survey is still collecting submissions and you expect the data to change periodically.
If you choose to automatically update the report, you must define the schedule according to which it will be updated.
Daily means the report will be updated each day after the day of publication.
Weekly means the report will be updated each week beginning 7 days after the day of publication.
Monthly means the report will be updated once a month, beginning one month after the date of publication.
Illume will update the report at the time of day you speficy in the Time field.
The following data options are available:
Include all data includes all data from all submissions.
Include data collected in the interval since the last report was created. This includes only the data that were submitted between the last time Illume updated the report and the current update. E.g. If your report runs every Friday and midnight, this would include data submitted after 12:00 a.m. on the previous Friday and up to 12:00 a.m. on the current Friday.
Include data from the past ___ days. This will include only data that were submitted in the X days prior to the report being updated. For example, if your report runs at midnight on the first of each month, and you set this to 5, your report will include only data submitted in the last 5 days of the prior month.
Note that when you choose the second option, This report will be automatically updated on the following schedule, the latest version of the report— the one with the most recent data— always overwrites any older version. Only the most up-to-date version will ever be available for review.
Creating Multiple Reports
A "multiple" report is a report run automatically on a schedule with older versions preserved. A typical "multiple" report may run once a week, with several weeks' worth available at any given time.
To create a multiple report:
Click the Schedule tab on the Report page.
Choose the Create multiple reports based upon the following criteria option.
In addition to the options described above under Creating a Single Report, you must specify the following options:
Max # of Reports - The maximum number of reports to keep available. For example, if you want to run a weekly report and keep 12 weeks of reports available, set this to 12. When the number of available reports surpasses Max # of Reports, Illume deletes the oldest reports.
Start Date - The day on or after which Illume should begin running and updating this report.
End Date - The date on which Illume should stop updating this report.
Unpublishing
When you unpublish a "multiple" report, Illume deletes all of the copies of the report! Be careful with this!
Ad Hoc Data Refresh
If you own a report, you can refresh the report data at any time. Click the View Published button on the Report page, then click the Force Report Refresh link on the report page.
Extranet Viewers see published reports through the DatStat Extranet. Web Console users see reports listed on the Reports tab of the Project page. Web Console users can view reports, but can edit only those reports they created themselves.
You can view reports you have created in two ways:
The Preview button at the top of the report page displays a preview of the report you are currently working on. This is helpful when you are designing a report and you want to see how your changes affect the report's appearance. If you have not made any changes since the last time the report was published, the Preview button will be disabled.
The View Published button displays the published version of the report. This button will be disabled if no published version of the report exists.
When you click View Published, you will see a link at the top of the report called Force Data Refresh. Click this to update the report with the latest available survey data. When you force a data refresh, the updated data appear on the DatStat Extranet as well.
Data Import is commonly used to import legacy data from other survey systems into a DatStat Illume survey or to import data collected by different means such as scanned bar-coded surveys.
Data Import can also facilitate data recoding/modifications, and/or removal of variables or submissions. This can be accomplished by importing modified data and/or possibly a subset of data into a copy of the original survey.
Survey data for Data Import must be specified as a tab-delimited text file with the variable names as the first row of the file.
Data Import is an add-on feature which is purchased separately and must be enabled in your Illume license. In addition, your system administrator must enable Data Import for each user that will be using the feature.
The Data Import is performed using the Web Console. Below are some simple steps designed to help guide you through the Data Import process.
Log into Web Console.
Click on the desired survey you wish to import data into.
Select the Import Data tab*.
Provide the name of the tab-delimited data file.
Click the Upload button and check for any errors.
If there are errors, either correct them in the data file or chose to suppress them by selecting the Error Reporting options on the Import Data tab. Click here to learn more about the Error Reporting Options.
(Optional step) After no errors are reported, select the data file again, click the Import as Test Data option, and then click the Import button. After the data has been imported as test data, run some queries and make sure the data was imported properly. This test data can be quickly removed by selecting the Test Data tab and clicking the Delete Rows button.
After you are confident of the results of importing the data as test data performed in the previous step, you are now ready to import this data as production data. Select the data file again, click the Import as Production Data option, and then click the Import button. Please note that undoing this operation is a very time intensive process and requires a user to manually delete each submission. It is recommended that you first import the data as test data first as outlined in the previous step.
* If you do not see an Import Data tab please see your system administrator. This might be due to the fact that the Data Import feature has not been purchased, or Data Import hasn't been enabled in your Illume license, or Data Import hasn’t been enabled for the user currently logged in.
This section describes all of the possible options on the Import Data tab in Web Console (shown below):
Data Import Data File Format
The data import data file must be a tab-delimited text file where the first line of the file contains variable names delimited by tabs that correspond to the survey variable names. Subsequent lines in the data file correspond to a survey participant entry or submission.
Tab-delimited text files created by Microsoft Excel are also supported, which includes triple-quoted data values. Triple-quoted data values are created by Excel whenever a data value in a cell contains one or more double quote characters. Whenever this type of data is included in a spreadsheet and the spreadsheet is saved as a tab-delimited text file, the values are written out with a leading and trailing double quote character and each double quote character in the original value is converted to two double quote characters. For example, the phrase "Hello" will actually be written out as """Hello""".
Data Import Actions
The data import actions control how the data is imported or if it is at all.
Test file for errors only (do not import data) – This is the default data import action. This action doesn’t actually import the data but rather checks the data for any errors. This action is the recommended first step when importing data. Any errors reported will need to be investigated and corrected before the data import will actually work.
Import as test data – This action imports the data as test data and allows users to run queries against the data which can ensure that Data Import process worked as expected. The benefit of this action is that test data can be quickly removed and the data import can be re-tried again if necessary.
Import as production data – This action will import the data as production data. This option should be selected after you have ensured the results of importing the data are correct using the other two actions. Once data is imported as production data it is difficult and time-consuming to delete it.
Data Cleanse Option
This option may be desirable if the survey contains questions or collections with Show-If. When this option is enabled responses will be discarded if Show-If would have caused this question or parent collection to not be shown.
Error Reporting Options
Data Import will only import data if there are no reported errors. These options allow for users to quickly suppress errors of a certain category especially if the error conditions are determined to be intentional or benign.
Suppress unknown column errors
Selecting this option will prevent errors of type Unknown Column Error from being reported. This error condition is reported when there are column names in the first row of the data file that do not match any variable names in the survey. A data file might contain additional columns that are not in the destination survey. Checking this box will essentially ignore such columns.
Suppress missing column errors
Selecting this option will prevent errors of type Missing Column Error from being reported. This error condition is reported when there are survey variables in the destination survey that are missing from the data file. A data file might not include all variables that are listed in the destination survey. Checking this box will ignore this condition as an error condition and will allow the data import to proceed.
Suppress unknown scale value errors
Selecting this option will prevent errors of type Unknown Scale Value Error from being reported. This error condition is reported when there is a specific data value that is not defined in the scale of the corresponding survey variable. When this error is suppressed, the data is cleared and treated as unanswered for these types of conditions.
Suppress response guide validation errors
Selecting this option will prevent errors of type Response Guide Validation Error from being reported. Errors of this type are reported when the values in the data file violate the following response guides specified for the survey question: 1) Minimum/maximum length; 2) Format (meta-type); 3) Lower/upper bounds 4) Data type violation (e.g. non-numeric data specified when numeric data type expected). When this error is suppressed, the data is cleared and treated as unanswered for this question.
DatStat Internal variables set by the Data Import process
Values for the following list of DatStat Internal variables are set by both the Data Import and Remote Data Collection components.
DATSTAT.UPLOADDATETIME
Values for this variable indicate the date and time this survey session was imported. This variable is also set when data has been uploaded using Remote Data Collection.
DATSTAT.UPLOADTYPE
Possible values for this variable are "1 - Remote Data Collection" and "2 - Imported". Data Import will set this variable to a value of 2.
DATSTAT.UPLOADUSER
This variable will be set to the user name of the user that performed the data import for each survey session. This variable is also set when data has been uploaded using Remote Data Collection.
Importing data into Internal DatStat variables
It is possible to import data into the most of the internal DatStat survey variables. However, the following list of internal variables is not supported. There is no harm in including these variables in the data file, but they will be ignored without any errors being reported.
DATSTAT.SUBMISSIONID
DATSTAT.ELAPSEDTIME
DATSTAT.PCTCOMPLETE
DATSTAT.UPLOADDATETIME
DATSTAT.UPLOADUSER
DATSTAT.UPLOADTYPE
DATSTAT.QUESTIONSUNANSWERED
DATSTAT.PCTUNANSWERED
Importing data into the DATSTAT.SESSIONID variable
The final value for this variable in the imported survey session will ALWAYS be different than the value specified in the data file. The purpose of specifying this column is so the same participant can be stamped in the newly created imported survey session as the previous session identified by this value.
In general it is a good idea to include this column in the data import data file if the data being imported was downloaded from a survey in the SAME DatStat Illume system. This column is ignored and a new value will be provided if you are importing data that originated from a different DatStat Illume system or a survey system other than DatStat Illume.
This participant value isn’t exposed via the web console, but it is used to retrieve the survey session of a participant when a participant is resuming a survey or when the system needs to determine if the participant already took the survey. This information is also used when determining whether to send an email to a participant based on the criteria set in the email job.
As the article on calculations indicated, Illume can perform computations while a survey is in progress, and has the ability to store the results of these calculations with the rest of the survey data it collects. This is an especially powerful functionality allowing you to analyze the data on a more complex level. Illume's Calculation Editor is a very open tool, which allows you to define very simple to very complicated computations.
Simple calculations involving addition, subtraction, multiplication, and/or division are intuitive to create. Complex calculations involving multiple variables, assigning score values, and/or, if/then statements are written using jscript. Jscript is Microsoft's version of javascript.
Simple Calculations - Example
You have a survey that has some questions asking about anxiety
Your survey contains several questions about the survey-taker's behavior in particular situations.
The responses to these items produce various "profiles" or "risk- assessments" for the respondent depending upon the answers to these questions.
Here is how a subset of this survey may appear:
In this example, the variable names are labeled Q1, Q2, Q3, Q4, Q5 respectively, the response options have the following codes associated to them: 1 = TRUE, 2 = FALSE.
Using calculations, Illume has the capability to add the score and store this as a separate variable in the database, which will be available to you when you query.
In this particular example, I wish to add the total of these 5 items to produce a 'score' value.
To do this, click on the SURVEY menu and select add/edit Survey Calculations.
The Calculation Manager will open:
Click ADD to create a new Calculation.
This will open the Calculation Editor:
Give your calculation a Unique Name. This is the variable name for this item which will appear in the data dictionary.
Add a description; this allows you to provide details about your calculation which is useful as this information will appear when analyzing your data.
This question refers to Questions which use scale values, thus it is analyzing "whole Numbers".
Click Insert Expression - this is where you will build the formula.
The expression Calculator shows a list of the variables built in the survey to this point.
We have selected Q1, Q2, Q3, Q4, Q5 as we wish to add the sum of these 5 questions which ask about anxiety behavior. (Notice that the system automatically defaults to addition, as it inserts a "+" in-between the variables).
Click paste.
If you wish to edit your calculation you do so in this screen. [For instance, if your algorithm called for subtraction ( - ), multiplication ( * ) or division ( / ) instead of or in addition to addition ( + )]
Click ok.
Your new calculation will appear in the window as a unique object within the survey.
Complex Calculations - Example 1
If your algorithm is more complex involving more than just simple operators + - * / and/or multiple variables.
You have a survey which is a series of questions that have "correct responses".
You wish to evaluate the respondent's answers to check whether or not the answer was correct for each item in order to evaluate each item individually in analysis.
Additionally you wish an overall score in order to evaluate the sum statistics in analysis.
An example of this would be:
I have 5 questions with the respective variable labels: Q1, Q2, Q3, Q4, Q5
Each of the items has an associated scale for the response options.
Q1: A participant list must be _________ to a survey before you are able to send an e-mail job inviting participants to take your survey.
Again - give the calculation a name & a description. (Remember, this must be unique as the data dictionary does not allow duplicate names for any variable).
*Instead of inserting expression using simple operators, I have inserted a string of jscript.
(({Value:Q1} == 1)?1:0)
The first part of this translates to:
Is the value of Q1 equal to 1? - Remember that 1 refers to the scale value of the correct Response Option.
The second part of this translates to:
If the value of Q1 is equal to 1, then give the calculation a value of 1. The colon communicates that if the value is NOT equal to 1, then give the calculation a value of 0.
The "value" we give this is arbitrary, however you as the designer will have to choose a value which is meaningful for the calculation you are trying to make.
This allows us to check Q1's "answer" in addition to giving it a value. The value is important since we may eventually want to know how many people got that question "right", and we also want to be able to calculate a total score based on summing all of the responses.
Click ok after inserting this process.
Repeat this process for each variable (the number after the equals sign is different in Q4 and Q5 because the right answer is different for those questions).
Now we can easily create a simple calculation to arrive at a sum.
The sum calculation is just a sum of the other calculations you just made. The lowest score someone could get across these five items is 0 (if they get every answer wrong), or 5 (if they get every answer right).
If we wanted to go a step further and evaluate a percentage score, an additional calculation would look like this:
Here you're taking the value of the sum total, dividing it by the number of items (using the "/"), and then multiplying by 100 (using the "*") to get a percentage.
The view of all your calculations would look similar to the following:
Complex Calculation - Example 2
As you are familiar with how to use the calculation editor within Illume, this example explores the use of jscript and how to write the proper calculations for this scenario.
You have a study in which a few questions ask about depression.
You want a complex algorithm which allows you to score the depression index.
An example of this would be:
In this question block there are 15 survey items, Q1 - Q15. Scale Values are Yes = 1; No = 2.
With these questions we only want to give a score of 1 in the following circumstances:
   A. If yes on Q1
   B. If yes on Q2
   C. If yes on Q3 or Q4 or Q5
   D. If yes on Q8 or Q9
   E. If yes or Q6 or Q7
   F. If yes on Q10
   G. If yes on Q11
   H. If yes on Q12 or Q13
   I. If yes on Q14
The following calculations would be created as follow:
I am giving each of the calculations a variable name of D + number
D1    (({Value:Q1} == 1)?1:0)
D2    (({Value:Q2} == 1)?1:0)
D3    (({Value:Q3} == 1) || ({Value:Q4} == 1) || ({Value:Q5} == 1)?1:0)
      [Note:  || is jscript term for "or"  so that this statement reads:  If
      the value of Q3 or the value of Q4 or the value of Q5 is equal to 1,
      then assign a value of 1 to this calculation; if not, assign a value
      of 0)
D4    (({Value:Q8} == 1) || ({Value:Q9} == 1)?1:0)
D5    (({Value:Q6} == 1) || ({Value:Q7} == 1)?1:0)
D6    (({Value:Q10} == 1)?1:0)
D7    (({Value:Q11} == 1)?1:0)
D8    (({Value:Q12} == 1) || ({Value:Q13} == 1)?1:0)
D9    (({Value:Q14} == 1)?1:0)
Here's an additional requirement:
If calculation D1 is equal to 1 or calculation D2 is equal to one AND the sum of calculations D1-D9 is greater than or equal to D5, give the calculation a value of "1".
Creating sum scores when at least one variable may not appear due to show- if logic:
Keep in mind any implication which may arise do to questions not being required by the system. If a question is not required, then the respondent may skip the question and this should factor into how you wish to evaluate and thus write your equations. When creating a sum score of multiple items, if a variable is not shown the {value:variablename} will produce a null value in the calculation. This null value will then in turn give the calculation a null value. If, however, you want all not-shown variables to have a value of 0 in the calculation, use the {score:variablename} tag for those variables.
For example, let's say you want to sum 6 variables, Q1-Q6. Variables Q3 and Q4 are only shown if the respondent is male. To create a summary score of the six variables, create the following calculation:
For variables Q3 and Q4, if they are not shown they will be given a value of 0. If they are shown, they will be given their actual value.
Go-live Checklist
I've completed the survey, I've added the logic, and I think I'm ready to publish the survey. What are the next steps?"
First, there is a very important point to know about DatStat Illume. Publishing a survey in DatStat Illume has significance in "locking down" portions of the survey and precluding any further changes to questions and response options. Do not publish a survey until it has been reviewed and tested and you are certain that you are ready to begin data collection. If you do collect data and need to revise questions and response options you may "clone" the survey, however you will lose historical information associated with version control.
This brief guide walks you through the steps of "what next?"
Authentication - Survey Log-in
An important consideration is how your respondents will login to take the survey. The type of login will determine what goes into the Login Collection at the beginning of the survey. There are three types of logins with important differences.
These surveys are the most common. They provide a unique ID for each participant in a participant list. There are two primary types of Authenticated Surveys.
The ID is embedded into the URL of the survey and contained in the email invitation so the respondent does not have to enter the ID to begin the survey (they simply click on the link and automatically gain access to the survey).
There is a question which prompts the participant to manually enter a specific ID (e.g., pre-assigned 5-digit code) in order to be able to access the survey. To utilize this method, the participant must have this information ahead of time, or the information used is something known such as a student identification number.
Using an authenticated survey allows reminder emails to be sent to those participants that have not completed the survey. Additionally, authenticated surveys enable participants to stop and start a survey, while saving previous responses, and guarantee that each participant only submits one survey. Authenticated surveys are needed when pre-populated data are included in the participant list. Lastly, authenticated surveys can include test participants that can receive the email and complete the survey for test purposes while having their responses excluded from the actual survey results.
Non-Authenticated
These surveys refer to a participant list but do not contain an ID. This allows initial survey email invitations to be sent but will preclude any additional follow-up emails (e.g., reminder emails). Additionally, there is no mechanism to prevent participants from completing more than one survey.
Anonymous
These surveys do not require a predefined participant list. These surveys are the most flexible but can also be abused as there is little control over who and how often someone completes the survey.
Pre-populated Responses
Is there any participant data that you want included for analysis that you already know about the participant (e.g., gender, state, GPA, job position, salary, diagnosis, etc.)?
These values can be loaded with the participant list and saved with the results and used in the analysis. Likewise, these values can be piped into the survey itself (e.g., the address we have on file for you is xyz, please confirm) and/or used for building logic within the survey. The participant does not have to be presented with these questions as the responses are already known.
This requires that "placeholder" questions be created in the survey in order to "pass through" the values to the database for inclusion in the final dataset.
Ensure that these questions have been included using the Pre-load Editor, located under the Survey heading.
Check-in the Survey. This uploads the survey to the server (you have to be "connected" to the internet in order to do this). This allows other members your team who are licensed Users of the DatStat Illume application to view and edit the survey. Remember, the survey is not "live" until you publish it.
* Ensure that your System Administrator set-up a new project if you wish to have the survey, email, and participant lists segregated by project.
Preview and Print Survey. Other DatStat Illume Users in your organization can check-out the survey, preview, add comments and edits, etc. Or for those who do not have the Illume software, print as PDF or HTML and send out via email.
Test all logic and branching options.
Test all imbedded images and multimedia.
Make necessary revisions.
Approving and Publishing the Survey
Ensure the survey is checked-in.
Approve and publish the survey so that you can test login and email jobs with test participants.
The survey is now published, however is still not live for your intended audience. In order to go live with your survey remember, you must send out e-mails or publish the survey URL to a specified web site.
Create the participant list which will contain the relevant information. Participant lists must be associated with a survey for authentication to occur.
Populate contact fields as desired (e.g., name, email, etc)
Custom ID field for authenticated surveys
"Auto-authenticate" with the URL embedding the ID, or,
Ask for the ID upon signing on to the survey
Pre-populated variables that will be included with the survey results.
Important Reminder!
You are not required to use any of the following fields, however if you do they must be entered exactly as listed below.
FIRSTNAME
LASTNAME
EMAIL (no hyphen, all one word)
CUSTOMID
TESTDATA - this allows you to identify testers and associated test data for testing purposes (enter a 1 in the column for those who are testers, leave non-testers blank or enter a 0)
* Never give any field the title "ID"! This is reserved since Illume interprets it to mean something very specific.
Mark additional participants as test participants for further validation and testing of the survey. Test participant data can be excluded from the survey results. Responses not identified as test participants cannot be removed from the results (however, they can be filtered out with a query).
EMAIL JOBS
Create the email templates and schedule the email jobs.
Create the email templates that will be used for up to 3 different types of email to the participants. Email jobs must be associated with a survey and with a participant list. Enabling an email with a current start date will instantly begin sending the email job. Email jobs may pipe fields from the participant list to personalize the email. Email jobs can have hyperlinks to a survey so the participant doesn't have to see a long cryptic URL.
Do not enable the email job until a test email has been sent to confirm content, presentation, and correct URL with ID if appropriate!
1. INVITATION
Email text of an invitation can include wording on the objective of the survey, privacy expectations, use of the results and a schedule or deadline for completing the survey. An email job marked as an invitation will be sent to all participants.
2. REMINDER
Email text of a reminder normally reminds the participant of the intent of the survey, stresses the importance of their participation and sets a deadline for completion. An email job marked as a reminder will be sent to all the participants who have not yet submitted a survey response. This includes those that have started but not yet submitted as well as those that have not yet started the survey. Reminder emails can only be sent with an authenticated survey. Reminder email jobs are normally scheduled to run on a specific date based on the invitation date and the date the survey will close.
3. THANK-YOU
Email text of a thank you is normally just a short acknowledgement of their participation in your important project. An email job marked as a thank you will be sent to all participants that have completed and submitted the survey. Thank you email can only be sent with an authenticated survey. Thank you email jobs are normally scheduled to run from the date the invitation was sent until the survey is closed so the system can send the thank you email as soon as the participant has submitted the survey. You may instead prefer to send a thank you at the close of the survey.
What is the difference between Plain Text and HTML?
The Plain Text allows you to get your information across; the HTML allows the information with the addition of style, pictures, animations, and color. Not all e-mail applications will display HTML. Thus you should be aware of your audience and be sure to always fill in the plain text field; the HTML field is however, optional.
Illume has very user-friendly built in tags for allowing you to "pipe in" the SurveyURL and any additional information to personalize or customize your e-mail job. Be sure to access the online help and consult e-mail jobs and Piping for further how-to's!
Send test emails
Sending a test email to a test participant from the list will allow the completion of the survey with the results marked as test data.
Open the email job you wish to send, click enable, and save. Emails will commence being sent based on the start date/time. If the date/time has passed the email jobs will begin immediately.
Enter a Customer Care Inquiry in the DatStat Customer Portal with a "Training/How Do I" subject area and the request will be routed to your DatStat contact or support staff.
Before a survey can be published, it must be approved. This prevents incomplete or unsuitable surveys from accidentally being exposed to participants. Approval simply indicates that someone has reviewed the survey and decided it was suitable for participants to see.
Illume can be configured so that any user can approve his or her own surveys, or so that surveys can be approved only by selected individuals.
Bounds are the highest and lowest limits in the range of acceptable answers. For example, if you ask a question that requires a percent value for an answer, the lower bound for a valid answer would be 0, and the upper bound would be 100.
Bounds apply only to questions that require numeric answers. They are defined as part of a question's response guides.
To check a survey in means to return it to the Illume server. Once a survey is checked in, others can check it out to review, edit, approve and publish it.
To check a survey out means to retrieve a copy of the survey from the Illume server. The survey is then stored on your computer. You must check a survey out to view or edit it. While you have the survey checked out, others will not be able to view or edit it.
The context menu is the menu of actions that appears when you right click on certain items. It is called a context menu because the actions available in the menu change, depending on the context in which you right click.
The data set is the data collected from participant responses to your survey. Data are stored in a SQL database, and can be exported to various formats.
The data type is the type of data you expect to collect in response to a question. For example, if you ask someone's age, you would expect a whole number in response. If you ask what city someone lives in, you would expect the response to be text.
Illume requires you to choose a data type for each question you create, and validates that all responses it collects are of the correct type.
Illume recognizes the following data types:
Whole Numbers Numbers without a decimal component. E.g., 21, 55000, -211
Whole Numbers > 0 Positive whole numbers.
Currency A decimal number representing a currency amount. The number of digits after the decimal point may vary by locale.
Decimal Numbers Numbers with both whole and fractional component. E.g., 3.14, -299.173
Date A valid calendar date, including day, month, and year. E.g. 12/11/2005. Dates that don't exist, like 02/30/2004, are not valid.
Time A valid time, including hour, minute and second. E.g. 12:51:17 pm.
Date/Time A valid date and time, including year, month, day, hour, minute, and second. E.g. 12/11/2005 12:51;17 pm.
Yes/No A simple 0 or 1 value. 0 traditionally represents No or False, while 1 represents Yes or True. Illume allows you to reverse the traditional meanings if you wish. All checkbox items are of this data type, since a checkbox can have only two states (checked or not checked).
Date and time formats vary by locale. For example, on a computer in the US, 12/11/2005 means December 11, 2005. On a computer in the UK, 12/11/2005 means November 12, 2005. For more information on date and time times, see Date and Time Types.
In a multi-lingual survey, the default language is the language that Illume falls back on when it cannot find any other suitable translation to present. Participants will see your survey in the default language if any of the following are true:
The participant's specified language matches the default language.
The participant has no specified language.
There is no translation of the survey in the participant's specified language.
Illume considers "language" to be the combination of language and culture. Thus, Illume does not consider US English (en-US) to be the same language as UK English (en-UK).
Each participant's language is specified in the participant list to which the participant belongs.(See Creating a Participant List for details on how to specify a language for a list of participants.)
When a participant comes to your survey, Illume looks up the language of the list to which the participant belongs.
If a language is specified, and the survey has been translated into the specified language, Illume will present the survey in that language.
If no language is specified, or if the survey has not been translated into the specified language, Illume will present the survey in the default language.
Illume automatically generates unique names for the questions within a collection. If you define a default name prefix for a collection of questions, Illume will automatically apply that prefix to the unique names it generates for all of the questions within the collection.
This option can be useful when you are analyzing data, since it enables you to quickly identify related variables in your data set by their similar names.
For example, if you create a collection of questions about what type of car a person drives, you may choose to call the collection "Automobile", and set the default name prefix to "CAR."
If the collection has five questions, participant responses will appear in the data set under the variable names CAR1, CAR2, CAR3, CAR4, and CAR5.
Illume does not apply default name prefixes unless you tell it to. You can override Illume's automatic question naming with names of your choice. See Creating a Question for more information.
A question's display type refers to the type of HTML control used to represent the question. Illume provides the following display types:
Select One Use this display type when you want a participant to select only one item from a list of available responses. The Select One display type can be either a poplist (sometimes called a pop-up menu) or a group of radio buttons. Radio buttons allow participants to see all of the available responses at once. Poplists can present long lists of response options in a minimum of space.
Check all that apply Use this display type when you want participants to be able to select more than one item from a list of options. The options appear as a series of checkboxes.
Text Field Use this item when you want participants to type short responses. Text field responses can be up to 255 characters in length. Use the Commentary display type if your question requires longer answers.
Yes/No Use this display type if your question requires a simple yes/no or true/false response. Yes/No questions are displayed as a single checkbox.
Commentary Use this item when you want participants to type responses that may be longer than 255 characters. Commentary responses can be several million characters in length.
A label is a bit of text that appears next to a text field to indicate what type of response is expected. For example, if your question requires participants to type in a dollar amount, you may add a dollar sign label before the text field. Labels can be printed before or after the field.
LCID stands for "locale identifier." This generally appears as a number or a five character text string idenfying a language and culture. For example, the numeric LCID for US English is 1033; the character LCID is en-US.
In a character LCID, such as en-US, the first two letters identify the language (en = English). The last two letters identify the culture (US = United States).
Web browsers, such as Internet Explorer and Mozilla Firefox generally send the user's preferred LCID to the web server each time the user requests a page. The server uses the LCID to determine which language to use when presenting the page.
Illume, however, does not use the LCID supplied by the browser to determine which language to use when presenting a survey. Instead, Illume uses the LCID attached to the participant list to which a participant belongs. If the survey has been translated into the language/culture specified in the LCID for that participant list, Illume presents that translation. Otherwise, Illume presents the survey in the default language.
If an exact translation does not exist, Illume does not try to find a close translation. For example, if a survey's default language is English and it includes only a translation into French (France) (LCID: fr-FR), participants from a Swiss Frech participant list (fr-CH) will not see the survey in French. They will see it in the default language of English.
How to Force Illume to Present a Specific Translation
You can force Illume to present a survey in a given language (assume a translation for that language exists) by adding the following to the end of the survey URL. If your survey URL looks like this:
where LCID is a numeric or character LCID such as 1033 (for US English) or fr-CH (for Swiss French). The LCID for each translation appears in the list of translations in the Manage Translation dialog. The numeric LCID appears in the LCID column, and the character LCID appears in the Translation ID column.
Note that Microsoft's list shows both decimal and hexadecimal LCID values. When using hexadecimal LCIDs in an Illume survey URL, you must add the prefix "0x" to the LCID. For example:
&Translation=1033 (decimal LCID for US English)
&Translation=0x409 (hexadecimal LCID for US English, with 0x prefix)
&Translation=en-US (character-based LCID for US English)
A meta-type is a type of data that can be validated against a pattern. An email address, for example, is a meta-type that should follow a pattern like name@domain.com . Other meta-types include phone numbers and zip codes.
Illume can validate responses to ensure that they match common meta-types such as email addresses. You may also define your own meta-type patterns, though this requires a knowledge of regular expressions.
A non-interactive user is an Illume user account intended to be used by software interacting with the Illume system. Typically, this is custom software developed with the Illume SDK.
Non-interactive users cannot log in through the Survey Designer or the Web Console.
The advantage of the non-interactive user is that it does not count against the number of Illume licenses you have purchased.
The page footer is the text and/or images that appear at the bottom of each page of an Illume survey. You can customize the page footer for each Illume survey from the survey's preferences editor.
The page header is the text and/or images that appear at the top of each page of an Illume survey. You can customize the page header for each Illume survey by setting the survey's page text preferences.
Survey parameters are custom variables consisting of a name and a value. Generally, you use them to display data that may appear in several places throughout the survey and/or data that may have to change frequently.
Illume enables you to put parameter placeholders into question prompts and Text/HTML items. The placeholders will be replaced by actual parameter values when the survey is running.
For example, if your company runs a product satisfaction survey for every new product it produces, and each survey includes the same set of questions, you can create a parameter called PRODUCT and pipe that parameter into each question prompt. Then, each time you want to publish a survey for a new product, you simply change the value of the PRODUCT parameter, and all of your questions change to refer to the new product name.
Throughout this documentation, the term refers to someone who responds to a survey. A participant does not create Illume surveys or analyze the data Illume collects. He or she simply answers survey questions.
Piping usually refers to the practice of inserting the response from one question into the prompt of another question. For example, if a participant indicates in question #3 that he drives a Toyota, that information can be piped in to the prompt for question #10, which may ask "How satisfied are you with your Toyota?"
Illume surveys support this type of response piping, along with several more sophisticated types of piping. See Piping Data for details.
A poplist is an HTML control that shows a drop-down list of options when you click on it. Illume poplists permit only a single item to be selected at any time.
The prompt is the text to which a participant responds when he or she answers a question. For example, if you have a question called AGE that asks "How old are you?" the prompt for the question is "How old are you?"
To publish an Illume survey is to make it ready for participants' to enter their responses. After you publish a survey, you must tell the Illume server to start the survey in order to allow participants to log in. You can also suspend a published survey for any length of time if you want to prevent participants from logging in.
The question editor provides features to create and edit a single question.
A question table is a group of questions that shares a common set of response options. For example, a question table may instruct participants to indicate whether they agree or disagree with a series of statements. The question may present a dozen statements, each of which is accompanied by the response options "Disagree" and "Agree."
Because each of the questions in this type of group has a common structure and a common set of response options, the questions can be presented within a simple template. This makes the questions easier to read and answer for participants. Each row in the table is a separate question with its own column in the database.
Question Tables are sometimes referred to as "question blocks."
A radio button is a type of HTML control that allows participants to choose only one option from a group of options. (The group of options is called a radio group.)
The radio button control was named after the station preset buttons on old car stereos: push one in, and whichever one had previously been pushed in would pop out.
See Radio Button.
Raw data are composed of actual participant responses to survey questions. If 1000 participants provided a first name and a last name in response to your survey, then your raw data will include 1000 first names and 1000 last names.
The repository stores questions, question blocks, and Text/HTML items so that they may easily be reused in multiple surveys.
See the Repository Overview for a detailed description of the repository.
The Save Email is an email sent by Illume to a participant containing a URL the participant can use to resume a saved (partially completed) survey.
The Save Page is the page a participant sees when they click the Save button. For unauthenticated surveys, this page may include a URL the participant can use to resume his or her survey later. The page may also include a button to email the URL to the participant.
Details on setting up Save and Restore for unauthenticated surveys are here.
Scale values are the response options to a question. When a question asks a participant to choose one, or check all, from a list of options, the scale values make up the list of items from which the participant selects.
SDK stands for Software Development Kit.
Illume's SDK provides a means of adding custom functionality to Illume surveys, such as generating custom feedback, connecting to external databases, triggering email notifications, etc.
The SDK supports code written in any language that Microsoft's .NET supports.
The Illume SDK is an optional feature that is not included in all installations. For more information about licensing the SDK, contact DatStat through the Customer Care Portal, or by email at sales@datstat.com.
Your Illume administrator can tell you whether your Illume installation includes the SDK by reviewing Illume your system license.
Show-if conditions are the criteria that must be met for an item to be displayed in an Illume survey. For example, if you want a certain question to be presented only to those participants who indicated they are over 21 years of age, you can define this show-if condition for the question, and the question will appear only to those 21 and over.
You can apply one or more show-if conditions to any item in your survey, except page breaks.
A stylesheet describes what fonts, colors and other attributes should apply when displaying the elements of an HTML page. Illume surveys use a customizable Cascading Style Sheet (CSS) to control the appearance of survey pages.
See Customizing Survey Display Styles for more information on customizing your survey's stylesheet.
Summary data provide a statistical overview of the raw data that a survey has collected. Summary data include the total number of responses collected, the frequency of occurrence of each response option, and other high-level statistical information.
The survey console displays a list of surveys available on your local computer under the My Surveys tab, and a list of surveys available on the Illume server under the Survey Administration tab.
Administrators also see a User Administration tab, under which is a list of all Illume users.
The Survey Console appears immediately after you click OK on the Illume login dialog.
The Survey Designer displays a list of available surveys, and provides access to survey administration functions, such as check in, check out, publication, and survey creation.
Survey templates are reusable models upon which surveys can be built. A template may include headers, footers, images, questions, and blocks of HTML.
A survey template can help to ensure that the surveys your organization produces will have a common look and feel.
Test data are data submitted by test participants, or data randomly generated by the Web Console's Random Test Data feature. Test data are reported separately from participant-submitted data. Normal queries in the Web Console do not include any test data. When the "Results Include" note in the query result header says that the results include test data, then the results consist entirely of test data, and include no "real" (participant-submitted) data.
To test publish means to enable web access to the latest checked-in version of a survey.
Test publishing enables others to view, interact with, and submit the latest version of a survey, whether or not that survey has been published.
The test-published version of the survey uses a different URL than the publicly available version for participants. Generally, the test-published version is for internal review and testing.
Data submitted through a test-published survey are marked as test data, and are not included in query results unless the query specifies test data only.
You can find the URL for the test-published version of a survey by enabling test publishing, or by viewing the survey page in the Web Console.
Surveys may have both a live and a test version running simultaneously.
A Text/HTML object is a section of a survey page that may include text, images, Flash files, or other objects that are not questions. For example, a set of instructions at the top of a survey page is a Text/HTML object.
The Text/HTML Editor enables you to create and edit HTML content without requiring any knowledge of HTML. The editor formats text, links, images, and tables.
A text string is simply a series of readable characters. It may be a word, a phrase, a sentence or a paragraph: in short, any bit of language that can be read or translated.
When you create a translation package, Illume copies all of the unique text strings in your survey into an XML file to be translated. Each unique string is then translated once.
When you import the translation back into your survey, Illume replaces each instance of each unique string with the translated string from the translation package.
A translation package is an XML file that containing all of the text from a survey.
Generally, translating an Illume survey follows these steps:
Create a translation package.
Submit the package to a translation agency, and the agency returns the translation package with all of the text translated. -OR- Translate the package yourself using Illume's translation tool.
Import the translation package back into the original survey.
The survey is then available in more than one language.
Illume includes simple tools for creating and importing translation packages, as well as a tool for translating the packages themselves. See Translating Surveys for more information.
All questions, collections, question blocks, Text/HTML items and page breaks in an Illume survey must have a unique name. The unique name enables you to refer to a single item without ambiguity.
For example, show-if conditions must refer unambiguously to other questions. The only way to do this is by using unique names.
Unique names must begin with a letter, followed by any combination of up to 19 other letters, numbers, underscores (_) and hyphens (-). Twenty characters is the maximum length for unique names.
Throughout this documentation, the term User refers to an Illume user. That is, to someone who can log in to Illume and create surveys and/or examine survey data.
A participant, unlike a user, only answers survey questions.
User data include information about survey participants from a participant list. When you upload a participant list to Illume, the list may include information such as participant names, email addresses, or any other data you choose to include.
This data can be piped into a participant's survey.
W hat Y ou S ee is W hat Y ou G et.
This is an acronym used to describe a editor that displays a document's actual layout and formatting while you edit. Illume includes a WYSIWYG HTML editor, enabling you to create HTML without requiring any knowledge of the HTML markup language.
After you publish a survey, you view it by right clicking on the name of the survey in the Survey Manager and selecting View Published Survey from the context menu.
Survey URLs
Illume assigns survey URLs according to the following scheme:
http://www.yourdomain.com/server/Collector/Collector.ashx?Name=SurveyName
Replace www.yourdomain.com with the name of the domain on which you published your survey, and replace SurveyName with your survey name.
Note that spaces in survey names will be replaced by %20 because Internet standards forbid spaces in URLs. So if your server is www.researcher.org and your survey is named Test Survey, the URL will be http://www.researcher.org/server/Collector/Collector.ashx?Name=Test%20Survey.
You may want participants to be able to access your survey through a convenient URL like http://www.mycompany.com/survey.html, but Illume has created a URL like http://server4.mycompany.com/server/Collector/Collector.ashx?Name=Customer%20Satisfaction. You can do this by redirecting a user's browser.
Using a Meta Refresh Tag
If you want the participants to be able to get to your survey through a URL like http://www.mycompany.com/survey.html, you can create a page named survey.html on your web server and include the following tag in the within the section:
The red number that appears before the semicolon represents the number of seconds to wait before the browser automatically goes to the new URL, which is specified after the semicolon. Some browsers (very few these days) will not respect the meta refresh tag. That is, the browser will load your survey.html page and will not then go to http://server4.mycompany.com/server/Collector/Collector.ashx?Name=Customer%20Satisfaction. For this reason, you should always make sure that the page which includes the meta refresh tag:
has a professional appearance, since a handful of participants may actually wind up looking at it, and
includes a link the to actual survey, so that those few people who see the page can get to the survey in a single click
Configuring a Web Server to Redirect
If you have access to your the administrator of your web server, you can request that he or she have the web server redirect requests for http://www.mycompany.com/survey to http://server4.mycompany.com/server/Collector/Collector.ashx?Name=Customer%20Satisfaction. The advantages of having the web server redirect traffic to your survey include:
All browsers respect redirects issued by a web server
You won't have to make a custom HTML page.
You will not be able to access a survey if you do not have sufficient privileges. Your Illume system administrator can change your privileges.
You will not be able to edit a survey if the survey is checked out to another user. When a survey is checked out, the Survey Console displays the name of the person to whom the survey is checked out in the Last Action column to the right of the survey name.
Survey check-in errors are explained in the section titled "Understanding Survey Check-in Errors."
Use the Survey Previewer to preview and test your survey. You can test a fully-functional survey on your own computer, without using the Illume Server, and without exposing the survey to others.
See "Printing an Entire Survey."
Illume surveys use standard HTML, and will work with all standards-compliant browsers. The HTML produced by the Illume server is compatible with all versions of Netscape and Internet Explorer from 3.0 on.
Illume surveys use both client-side and server-side validation to enforce response requirements. This means that all response requirements will be enforced regardless of whether a participant's browser is JavaScript-enabled.
To configure the information participants must supply to log in to your survey, see Configuring the Login Collection.
If you want anyone to be able to take your survey without having to log in, remove all questions from the survey's Login Collection.
Note that there is no way to prevent people from submitting un-authenticated surveys more than once.
Some questions in the right pane of the Survey Designer may appear to be grayed out. This means that the question is only partially editable. There are two reasons for this:
You are editing a published survey that has already collected data.
The question came from the repository.
Editing Questions on a Published Survey
Certain parts of questions belonging to published questions cannot be edited without potentially corrupting the survey data. For example, imagine you publish a survey that asks "What do you like MOST about our product." You publish the survey and 100 people respond "the price." You check out the survey and change the question prompt to "What do you like LEAST about our product." You re-publish the survey and more people respond. When the data analysts looks at the survey data, they will see that the first 100 respondents all said that the price was what they LEAST liked about the product, when in fact, price was what they MOST liked. This is a simple and contrived example, but it illustrates the point about the danger of corrupting data and creating misleading results. To avoid this problem, Illume does not allow you to edit certain elements of questions on a published survey.
Work-Around for Published Surveys
To work around this restriction, you must clone your published survey, edit the clone, then publish the clone under a different name. See the links below for information on cloning and renaming surveys.
Editing a Repository Item
Repository items have the same editing restrictions as published survey items. Repository items are intended to be the same across all of the surveys in which they appear. This allows data analysts to query a consistent set of data across multiple surveys. Changing the prompt or scale values of a repository item would violate this guarantee, introducing inconsistencies to the data. If you must edit the question's prompt or scale values, you can
break the item's link to the repository
edit the item directly in the repository
Both of these options have consequences. Breaking the question's link to the repository makes the question unavailable for cross-survey queries. This affects only the survey you are working on. Editing the question in the repository changes how the question will appear in all future surveys that use it. Follow the links to Repository Overview, Editing Repository Items, and Breaking a Link to the Repository below.
See Changing Your Password.
You can copy and paste text directly from Microsoft Word into the HTML editor, and your formatting will be preserved. You can also highlight a section of a Word document and drag this highlighted text into the HTML editor. This has the same effect as copying and pasting, bringing both the text and formatting from Word.
Click on the Text/HTML icon in the Survey Designer toolbar.
Highlight the text in the Word document that you want to copy.
Press Control-C to copy the text from Word.
Click in the HTML editor and press Control-V to paste the copied text.
Click OK to save the HTML.
Note: When you paste text from a Word document into the HTML tab of the HTML editor, the text you paste will retain the formatting from the Word document. When you paste the text into the Source tab of the HTML editor, the text will lose all of its Word formatting. This second option is preferable in cases where you want the new text to conform to the survey styles you have already set up.
Whenever a participant clicks the Next button to proceed to the next page of your survey, or the submit button to submit a survey, a client-side JavaScript validates the participant's responses. The script then looks for a function called CustomSubmitFunction, and if it exists, it is called. If CustomSubmitFunction returns true, the participant can go on to the next page. If it returns false, the participant cannot proceed without making corrections.
Where should I put the Custom Submit Function?
Because you have no way of knowing on which page your questions will appear, you should put your custom submit function in either the header or footer of your survey, so that it exists on all pages.
In the survey designer, go to Survey > Edit Survey Preferences
Click the Page Text tab
Choose Set text for:Cascading Style Sheet(CSS)/JavaScript
Place your JavaScript, wrapped in <script> tags directly in the HTML source.
Click OK to save your work
Example
The default survey template that is shipped with the Survey Designer contains Ranking/Sum Check validation JavaScript code that is called from the CustomSubmitFunction. The example below demonstrates how this is done. If necessary, additional validation code could be added within this function.
Use the {SurveyURL} tag in an email job to embed your survey URL into an email. The {SurveyURL} tag produces a personalized URL that will take each participant to your survey and automatically log them in.
For detailed information on how to use this tag, follow the "Email Text" link below.
Illume always generates a unique id for each participant in each participant list. You can use this system-generated id rather creating your own unique ids. This is described in under the heading Using System-Generated IDs in the article Configuring the Login Collection.
To launch the Web Console from the Survey Console, choose View > Launch Illume Web Console.... The Web Console provides tools to query and analyze data, and to manage participants and email jobs.
Some versions of Mozilla-based browsers (Mozilla, Netscape, Firefox, Galeon and others) implement a security policy that forbids JavaScipt from closing a window that was not opened by JavaScript. This prevents the close button that appears on the "end" page of some surveys from closing the browser window. This has no effect on the data your survey collects.
Set the "Column Width" property on the Display Properties tab of the Question Table editor. Follow the link below and read the text under "Column Width" for more explicit instructions.
The Previous button appears on the bottom of every survey page. You can remove the Previous button from your survey by following these steps:
Choose Edit> Preferences... from the Survey Designer menu.
Click the Button Text tab.
Delete the text for the Back button.
Click OK
If there is no text to display on the back button, Illume will suppress the back button entirely.
An Illume survey can store up to 4000 variables. The survey can include additional variables explicitly marked as "runtime only". These data are typically used in calculations and show-if conditions, but not saved when a participant submits a survey. When calculating the number of variables in your survey, keep in mind the following rules:
Questions that have display types of Select One, Text Field, Yes/No, and Commentary each use one variable to store their responses.
Each Preload/Hidden question uses one variable.
Questions of display type Check all that apply use one variable to store the total check count and one variable for each check box or response.
Attached text fields to responses for questions of type Select One or Check all that apply each use one additional variable.
Determining the number of variables used by a survey
This can be done by viewing the data dictionary. In the Survey Designer select Tools > Review Data Dictionary... The variable count is located at the top of the page. In the Web Console, first select the survey and then select the Data Dictionary tab. Again the variable count is located at the top of the page.
The problem: You want to know how long it takes participants to complete a specific section of your survey. The solution: Use calculated variables to create timestamps at selected points in the survey. This solution is fairly detailed, and a knowledge of JavaScript or JScript is helpful.
Note: Illume automatically records the elapsed time for all surveys. This values are stored in the variable DATSTAT.ELAPSEDTIME and appears in the data dictionary for all surveys in a collection called DATSTAT.INTERNAL. The variable does not show up in the Survey Designer, but it does show up in the Web Console, where you can easily run queries on it. Note, however, that DATSTAT.ELAPSEDTIME shows the elapsed time for the entire survey, not for individual components of the survey. You should also keep in mind that the elapsed time cannot always be accurate, because participants may stop work on a survey for 10 or 20 minutes at a time. They may even start a survey one day and then log back in three days later to complete it. In this case, the elapsed time will be three days!
Overview
Assume your survey contains three collections of questions called SECTION_ONE, SECTION_TWO and SECTION_THREE. You want to know how long it takes participants to complete SECTION_TWO. You can measure the time interval by creating three calculated variables. The first records the time at which Illume received a response to the last question in SECTION_ONE. The second records the time at which Illume received a response to the last question in SECTION_TWO. The third calculates the difference between the first two variables. In order for this work, the last questions in sections one and two must be required, and there must be at least one page break between the two questions to ensure that Illume does not receive both responses at the same time.
Creating a Timestamp
To create a timestamp that records when a question was answered, follow these steps:
Choose Survey > Add/Edit Survey Calculations... from the Survey Designer menu.
Click the Add... button to add a new calculated variable.
Type a descriptive name into the Unique Name field. In this example, the variable is called SECTION_ONE_END.
Click OK to save the calculated variable.
In the survey calculations editor, double-click on the name of the variable you just created. This re-opens the calculations editor. (Note: Saving and re-opening the variable may seem redundant, but is it necessary because this calculation will refer to itself.)
Enter the formula that appears in the image below, substituting the name of the variable you want to timestamp for the variable GENDER and the name of your calculated variable for SECTION_ONE_END. Be sure the datatype for this variable is Decimal Numbers and default value is 0 (zero).
The formula here (for cutting and pasting) is: ({Value:GENDER} != null && {Value:SECTION_ONE_END} == 0) ? new Date().getTime() : {Value:SECTION_ONE_END};
Click OK to save the calculation.
Repeat steps 2-7 to create a second calculated variable to record the timestamp at the next milestone question.
Calculating the Difference Between Timestamps
You now have two timestamps: one showing when Illume received the answer to the last question in SECTION_ONE and another showing when Illume received the answer to the last question in SECTION_TWO. Follow these steps to create a third variable that calculates the difference between the two.
Choose Survey > Add/Edit Survey Calculations... from the Survey Designer menu.
Click the Add... button to add a new calculated variable.
Type a descriptive name into the Unique Name field. In this example, the variable is called SECTION_TWO_TIME.
Set the data type to Decimal Numbers.
Use the calculation shown in the image below, substituting the name of your later timestamp variable for SECTION_TWO_END and your earlier timestamp variable for SECTION_ONE_END
The formula used to generate the timestamps above does the following:
The code that precedes the question mark tests to see whether the question GENDER was answered, and whether a value has been set for the calculated variable SECTION_ONE_END ({Value:GENDER} != null && {Value:SECTION_ONE_END} == 0)
If GENDER was answered, and SECTION_ONE_END is still equal to zero, then it's time to set a real value for SECTION_ONE_END. Because the expression to the left of the question mark is true, the value of SECTION_ONE_END will be set to the expression between the question mark and the colon. new Date().getTime() Here, that value is new Date().getTime(), which returns the number of milliseconds between January 1, 1970 and now. Because Illume's calculations provide full access to built-in JScript objects, you can create Date objects and call any of their methods. For information about what objects are available in JScript, see Microsoft's JScript Language Reference. For information about the Date object in particular, see Microsoft's documenation on the JScript Date Object.
If the expression before the question mark is false, which it will be before GENDER has been answered and after SECTION_ONE_TIME has been set, then SECTION_ONE_TIME is set to the value after the colon: {Value:SECTION_ONE_END} That is, it is re-set to it's current value. This is important because calculated variables are re-calculated every time a participant moves from page to page. We do not want the timestamp to change once it has been set.
The formula used to calculate the difference between the two timestamps simply subtracts the earlier time from the later time and divides by 60000. Because the times are measured in milliseconds, the difference between the two times will be in milliseconds. To get the number of minutes, divide the number of milliseconds by 60000.
The default session timeout for Illume surveys is generally set to 30 minutes. This setting is more a matter of custom than a rule, and it may change in the future.
If you are running your own Illume server, you can change the session timeout by setting the SessionCacheTimeout variable in the Web.Config file for the Illume Survey Collector application. This variable is set to an integer value representing the number of minutes of inactivity before a participant's session should time out.
For customer service, please contact DatStat through the Customer Care Portal:
To get a URL that goes directly to a specific translation of your survey, follow these steps:
Click the Survey Administration tab in the Survey Console.
Right-click on the survey you want to see.
Choose View Published Survey. If the survey includes more than one translation, a list of available translations will appear.
Choose the translation you want to view.
Illume Surveys
Illume surveys rely on two features for security: authentication and encryption.
Authentication
Authenticated surveys require survey participants to provide some kind of credentials to access their survey. The individual designing the survey determines what the credentials will be. They may be a name/password combination or a simple user id. Illume validates each visitor's credentials against a pre-selected participant list before admiting them to the survey.
Illume handles both auto-authentication and manual authentication. Participants access auto-authenticated through a unique survey URL emailed to the participant. Participants simply click on the link and it takes them directly into the survey. Manual authentication forces the participant to enter their unique code on the login page.
Authentication is optional. Illume also supports unauthenticated surveys, which have no participant lists and are open to anyone.
Encryption
DatStat-hosted Illume surveys use secure https connections with 128-bit encryption and signed SSL certificates. These settings are also the supported configuration requirements for customers hosting their own Illume servers.
The signed SSL certificate enables the participant's browser to verify the identity of the Illume server.
The encrypted connection protects information exchanged between the participant's browser and the Illume survey by making data unintelligible to any third party attempting to intercept the communication.
Every page the participant submits to the Illume server is encrypted, and every page the server sends to the participant's browser is encrypted. Illume's 128-bit encryption uses the same employed by online banking and other commercial web applications requiring the highest levels of security.
Survey Data
The only way to access submitted survey data on a system hosted by DatStat is through the Illume Server, which uses SSL and user/password authentication. The Illume Server enforces user access restrictions defined by the system administrator, preventing users from unauthorized access to data.
All access to Illume data takes place over secure https connections using the same 128-bit encryption used in Illume surveys.
DatStat hosted systems are backed up nightly. DatStat recommends customers hosting their own systems to schedule regular backups. In addition, customers hosting their own Illume Server are responsible for securing any paths to their SQL database outside of the Illume Server.
Survey Designer
The Survey Designer uses a secure https connection to communicate with the Illume server for checking surveys in and out, publishing surveys, browsing the repository, etc. The designer will not connect to an Illume server with an invalid SSL certificate. Once the connection is established, all communications are encrypted.
Web Services
The Illume SDK (Software Development Kit) communicates with the Illume server through Web Services. The connection between custom-built SDK components and the Illume server uses the secure https protocol, 128-bit encryption, and the Illume server's signed SSL certificate.
The Illume system administrator can set up special "non-interactive" user accounts for SDK software to use when connecting to Illume Web Services. Components created with the SDK must provide a valid user name to access Illume Web Services.
The Illume system administrator can restrict the data to which an SDK application has access by narrowly defining the roles and object-privileges of each non-interactive user.
Web Console
The Web Console also uses https, 128-bit encryption and a signed SSL certificate. In addition, the Web Console allows access only to Illume users. Users must supply a valid login name and password. Valid users are further secured by role-based access and can see only those objects (e.g., surveys, email jobs, participant lists, etc.) to which the Illume Administrator has granted them access.
Users can perform only those tasks (e.g., creating, modifying and deleting objects) that their roles allow. The Illume System Administrator manages users, roles, and project-level access. For example, one user may be able to query survey results while another manages participant lists. Such a separation of roles is common for authenticated surveys in which participants must remain anonymous: the data analyst cannot connect data to participants, and the participant manager cannot connect participants to data.
The Illume system administrator can deactivate users at any time, or schedule their access privileges to expire on a specified date.
HIPAA and Internal Revew Board Regulations
For academic, medical, and scientific research projects, HIPAA regulations or the study's Internal Review Board may mandate the separation of user-submitted data from data that can identify a user. The separation of the analyst and participant manager roles can help to ensure that members of the research team cannot connect individual responses to individual participants.
DatStat Extranet
Like the Web Console, the DatStat Extranet uses https, SSL and signed certificates. The Extranet also requires a valid username and password. Because the extranet displays reports, you have complete control over what is published and what data are available to Extranet Viewers. You can even choose which viewers will be allowed to view which reports.
Customers hosting their own installation of the DatStat Extranet are responsible for obtaining an SSL certificate. Self-hosting customers may choose to run the DatStat Extranet over insecure http connections if security is not a concern.
Best Practices
While Illume's user authentication and encrypted communications prevent unauthorized users from seeing your data, survey designers, Illume administrators, system/database administrators and SDK developers each play a role in maintaining security.
Survey Designers
If you intend to run an authenticated survey with a defined list of participants, be sure to review Configuring the Login Collection.
If your requirements include separating personally identifiable data from survey responses, don't include questions that require personally identifiable data.
Illume Administrators
Assign users only those roles required to complete their tasks. For example, both a Power User and a Participant Manager can view and update participant information. However, the Power User can also create surveys and query results. If a user should be managing participant lists only, you should assign the user only the Participant Manager role. See User Administration Overview for more information.
Disable users who no longer need access to Illume. In addition to aiding security, this frees up licenses.
Set expiration dates on the Illume accounts you set up for contractors and temporary workers.
Restrict the objects to which non-interactive users have access. For example, if your developers are creating SDK software to add special features to Survey X, create a non-interactive user that has acccess only to that survey.
System/Database Administrators
Restrict access to your SQL Server installation, or at least to the Illume database, to only those accounts requiring access.
Allow connections to SQL Server ports only to trusted hosts.
Back up data regularly.
Use an encrypted password in the Web.config file for the Illume Designer Service.
DatStat provides several add-ons to expand Illume's features and functionality. While the DatStat Extranet is a free add-on, the SDK and Translation Tools require special licensing. For information on obtaining the SDK or Translation tools, contact DatStat through the Customer Care Portal, or by email at sales@datstat.com.
DatStat Extranet
The DatStat Extranet is a free add-on for Illume 4.7. The DatStat Extranet enables you to publish reports to an internal or external website for non-Illume users. Reports may include charts and tables to display survey data, as well as custom HTML and images.
You can schedule reports to be updated regularly, and you can configure how many versions of a report remain available. For example, you can schedule a report to run every Friday and 10:00 a.m., and you can tell Illume to keep 12 weeks of reports available.
You can create an unlimited number of Extranet users, and control which reports each user can access.
The Illume SDK (Software Development Kit) enables customers to develop custom components for Illume surveys. Common uses include:
Connecting to external databases (e.g. to provide participant lists for surveys)
Providing custom feedback (e.g. showing participants how their survey responses compare to overall averages)
Performing complex calculations.
Generating dynamic custom content, such as graphs.
Using the SDK requires programming knowledge. Because the SDK uses .NET technology, SDK components can be written in any language that .NET supports. Microsoft maintains a list of supported .NET languages here:
The SDK includes comprehensive documentation and sample code.
Remote Data Collection
Illume's Remote Data Collection tool enables survey teams to collect data offline on their local machine. This is particularly useful if you are collecting data in locations where there is no hope of an internet connection being available to you. There is no advanced knowledge required for using this tool.
Illume's Translation Tools enable you to field a single survey in multiple languages. These tools are enable you translate surveys in-house, or to export an XML file for translation by a third party. The translated file can then be easily imported back into the survey.
To put a line break in an email message or a report annotation, hold down the Shift key and press Enter.
Pressing Enter alone creates a new paragraph in the Web Console's HTML editor. Shift+Enter creates a line break. Paragraphs have a space between them roughly equivalent to the height of a line of text. Line breaks do not have this space.
The HTML editor on the email message page and the report layout page are the same, so this works for both.


 This brings up the Button image editor.


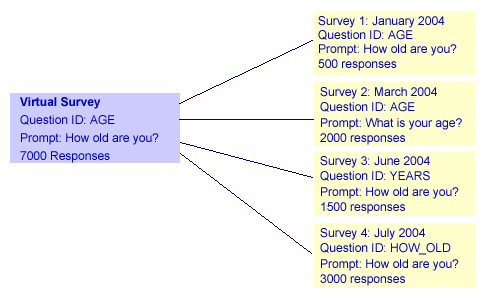


